Disclaimer: “As an Amazon Associate I may earn from qualifying purchases.” Adsense and Infolinks were no help at all.

If you have enjoyed this article or it has been helpful to you please feel free to show your appreciation. Thank you.

Read The Third Wave by Alvin Toffler!
Categories
Phillosoph

Serenity Lock Picks Review

Regular readers will have noticed that I do not usually write unboxing articles. Firstly, this is because funds are very limited (buy some books please!) and this is not a blog that gets sent free stuff. Secondly, I would rather write a post after I have had some time to try the items out.
Currently most my time is committed to another project but I would like to record some impressions on the Dangerfield Serenity lock pick set I have just received.
It has been a tough couple of months so I decided to treat myself. In my previous post I told you about the Bogota picks I brought and the cheap Chinese set of picks I had been playing with. The pair of Bogota picks was very reasonably priced but cost at least twice what you can pick the cheap picks up for. The two Bogotas, however, are much more useful than the dozen or so tools in the Chinese kit. Conclusion is, if money is tight or you only want one set of lock picks, buy a pair of Bogotas. Have a pair for practice and at least a set with your emergency kit(s).
I’ve been getting more into the leisure side of picking and wanted to improve my single pin picking (SPP) skills, hence decided to treat myself to a better quality set of tools. I opted for the Dangerfield Serenity ten-piece set. Firstly, because it has a nice selection of hooks and lifters for SPP. It also contains a Bogota-style pick. It was also currently on discount and UK Bump keys had been nice enough to send me a 10% off voucher. Kit arrived yesterday but I only had time to unpack it this morning. Initial impressions:
Dangerfield Zip Pouch
The kit is supposed to come in a webbing/ vinyl(?) pouch with a snap-button. Instead UK Bump keys upgraded this to the Dangerfield leather zip pouch. If, like me, you grew up watching cop shows where lock picks are always in a little black zip pouch, this will give you a buzz. The zip is in a nice brass rather than the black of the cop shows, but nice enough. I had noted that UK Bump keys was running an offer where if you brought this pouch you got a free pair of Dangerfield Soho lock picks, which are similar to Bogotas. That is a pretty nice deal in itself if you want a pouch. Thoughtfully, not only did UK Bump keys upgrade the pouch with the Serentiy kit, they threw in the pair of Sohos too! Like the Bogota set, the Sohos are designed to also act as tension tools. My ten-piece kit is actually twelve piece now, and effectively has four tension tools rather than two. I quite like this type of tension tool and often use the Bogotas as tension tools in preference to other tools to hand.
Soho Lock Picks
I’ll stress there is no guarantee that you will get these upgrades if you order a Serenity, but it tells you a lot about UK Bump keys’ approach to customer care that they made these additions.
Serenity Lock Pick Kit
The actual Serenity itself has the following contents:
Classic Slimline Wrench
Pry-Bar Wrench
Half-diamond Pick
Angled Reach Ball Pick
Curved Reach Ball Pick
High Hook Pick
Bogota Rake
Swerve Rake
Prince Rake
Princess Rake
The “pry-bar wrench” is what Americans called a “top of the keyway” (TOK) tension tool. American locks tend to be mounted pins upward while in the UK and Europe they are often pins down, which confuses terminology. Note that the Bogota rake has the same handle as the other rakes and picks, not the tension tool handle of the “stand-alone” set. The Swerve rake resembles an elongated snake-rake and the tip can be used for SPP. The Half-diamond pick is often termed a “hybrid” since you can rake with it too.
All of these picks, rakes and tools are made of a thinner metal than the Soho rakes and the stand-alone Bogotas. I have heard this described as 0.22" steel, but do not have a micrometer to measure this for myself.
I have tired a couple of these tools on a practice lock and they have worked as expected. My little stubborn lock is resisting the thinner picks, but this may be due to me being a little out of practice over the last few weeks. It pops for the thicker Sohos. (Update: The Serenity Bogota rake works perfectly on this lock. The Prince and Princess also work. The Swerve is not suited to this size of lock.)
The zip case is pretty much ideal for the Serenity set. You can fit four rakes in one side and the other four picks in the other. Place the tension tools how you wish. There is room for the Soho rakes/tension tools. It begins to get a little cluttered when I add my other “good” pick, a Sandman, but there may be room for an additional snake. If I was asked to suggest one improvement, it would be to add a pocket to keep the tension tools separate.
I got this kit from the same company I got my Bogotas from, UK Bump keys. I have found them prompt and very helpful. From youtube videos I note that they have a number of American customers and I can see why. Register on their site and you will be sent a download link to a free 40+ page ebook on picking. You may also get a voucher towards your next purchase. Their webpage has a blog with some interesting articles and there is no shortage of instructional videos too.
Categories
Phillosoph

Lock Picking Part Two : Let's Rock!

There are several reasons why you might want to pick a lock. If you are picking for the challenge and entertainment then experimenting varied combinations of tensioner and pick is part of the fun. Alternately, there may be situations when you just want to get a lock open with the minimum of fuss.
In the latter case single pick picking (aka SPP) is a technique that you will avoid if possible. Generally SPP needs considerable skill, practice and time.
What are the alternatives? The first technique to attempt is “rocking”.
As a distinct technique rocking is relatively new to me. I first noticed references to it while writing the previous blog on this subject. I grabbed a tension tool, a couple of locks and a hook pick.
I applied a modicum of tension, inserted the hook upside down and seesawed the end. Both locks popped open in a few seconds. I will admit I was a little miffed by this. One of these locks had refused to open to any method for several days when I first started picking! All I’d needed to do was invert a hook and wiggle it? Obviously there is at least one moral to this story. The chief one is that you should not resort to complicated techniques if you have not tried simple ones first. On the subject of simplicity, always consider if there is an easier way to bypass a lock available before you start picking.
You can rock a lock with other sorts of picks too. I prefer to use a rocking action with jag rakes rather than the scrubbing, zipping or ripping. How effective this is depends a lot on the particular combination of rake and lock. One jag rake will quickly open a lock while another will have no effect on the same lock. If you favour jags (which I do not) you had best have a reasonable assortment handy when attempting to rock.
If you read my previous blog you will know the Bogotas are my “go to” picks, and that I am probably more likely to have these handy than a single hook or jags. After my success with an inverted hook I tried the technique with my single hump Bogota. I managed to open my more truculent lock once with the single-hump, and it was not particularly fast. My impression is that my single-hump is too straight to be a good rocker. Which way up you use it seems to make very little difference.
The triple-hump Bogota can be used to rock a lock. Because the Bogota is a shade thicker than some of my picks it helps if you really relax your arm so motion is more freely transmitted to the pick. By doing this you can get the pick moving quite fast, emulating the action of electric picks. Vary you rocking action. More importantly, vary the level of torque you are applying. If the lock will not rock open, try any other picks you have, or move on to other methods. Luckily the triple-hump Bogota also lends itself to jiggling, wiggling, scrubbing, zipping and rippling so you have some other options before resorting to single pin picking.
Categories
Phillosoph

Lock Picking Part One

Version 1.5

One topic I have not dealt with on this blog so far is that of lock-picking. The reason for this is quite simple. Over the years I have acquired a reasonable body of material on the subject, but, due to a variety of reasons had never actually got around to trying to pick a lock.
Some years ago someone got locked out of their desk and my name was forwarded as “someone who might know how to pick a lock.” (Which sheds some interesting light on how some colleagues view me!) I pointed out I knew how a lock was picked but had never done so. I assembled a useful collection of paperclips, small allen keys and screwdrivers from what I had available. As it turned out, when I experimentally jiggled the lock the entire plug came out in my hand! I reached to the back of the lock with a large screwdriver and turned the latch. Cannot really count that as my first lock picking!
A few weeks back I decided to rectify this. There was a time when if you wanted lock picks you either had to make your own or had to prove you were a professional locksmith. While lock picking is still perceived as being a little dubious it is now more widely recognized that most lock pickers are hobbyists who are more interested in the challenge and skill rather than crime. If a criminal wants something he will usually use more destructive means than picking your lock! Lock picks are now available legally from many internet sites, including well-known outlets such as Amazon and ebay. CAUTION: Check your local laws!
I have seen it claimed that “picking locks makes heroin seem dull!” It is an interesting hobby and there is no feeling quite like popping a lock for the first time. I sometimes work on a padlock during the commercial breaks, varying the picks and tensioners I use or whether the light is on.
I am not going to go into details about to lock picking or the theory behind it in this blog since far more detailed material is freely available elsewhere.
I will cover making your own or improvising lock picks in a future post. If you are new to the hobby I suggest getting some commercially made picks first. Bear in mind that American locks are often larger but shorter than those used in the UK, so some pick designs intended for the former may be cramped in UK locks. Look for items designed for European use or “slim-line” versions.

Hooks and Diamonds

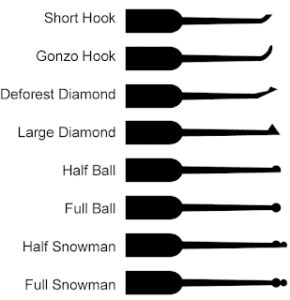
Firstly, some terminology. Basic, conventional picks can be divided into two broad groups: Lifters and rakes. Lifters (also known by other names) manipulate a single pin at a time. (Single pin picking, aka SPP) Lifters include hooks, half-diamonds and half-balls. Terminology for picks can be a little out of wack. A half-diamond will sometimes be called just “diamond” when it is actually a triangle, a “ball” is actually a circle and so on. Just to confuse things further, may rakes are used with a vertical lifting action. Diamonds and balls can be used for both SPP and raking, so are often classed as hybrid picks.

Rakes

Rakes manipulate more than one pin at a time and are used with a variety of actions which include scrubbing, jiggling and ripping. Bear in mind that you can also try these actions with a lifter, often with successful results. There are a number of different forms of rake. 
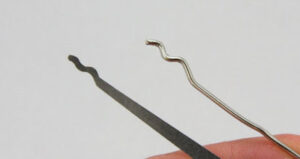
The snake rake has a sinuous tip. You will see similar forms called “worm rakes”, “S-rakes”, “C-rakes”, “W-rakes”, “serpentine rakes” and similar. Currently I only have one snake-style rake and it seems to work best with a ripping/zipping action.
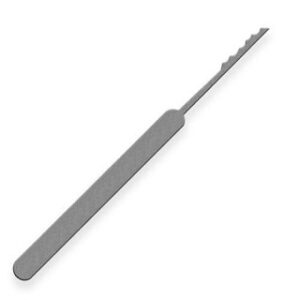
“City rakes”, “L-rakes”, “ripples”, “waves”, “jags” or “jagged rakes” (also sometimes [also!] called “W-rakes” or “lifters”), look like an irregular sawblade. Personally I did not particularly care for these initially. They seemed like a good way to damage the pins. City rakes should not be used with for horizontal ripping/zipping. They are best used with a vertical lifting or rocking motion. When they do work they tend to work very quickly.
A double-ball pick is also known as a “snowman” or “figure-8” and as you might expect, there is a half-snowman. Ball picks are designed so they do not damage the thin wafers in a wafer lock. Worth having if you expect to deal with filing cabinet or automobile locks. The full-diamond, full-ball and full-snowman are designed for locks that have pins or wafers on either side. With a single-sided pick you can just remove the tool and reorientate the tool. The snowman and his half-brother can be used for raking actions. so like diamonds, are classed as hybrid picks.

Bogotas

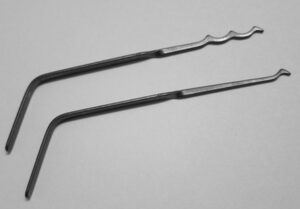
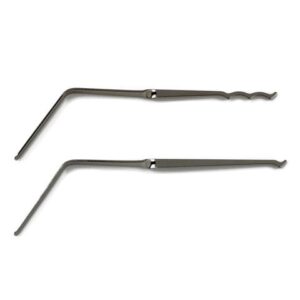
The Bogota rake is a relatively new invention and was created by a gentleman called Raimundo. He claims an inspiration was the mountain peaks and gentle valleys surrounding Bogota, Columbia. This type of pick is sometimes called a “jiggler pick”. With a design this good there are inevitably copies and attempts to circumvent copyright. You will see similar designs called “camels”, “pagodas”, “three-humps”, “M-rake”, “batarang”, “w-rake”  and similar. Batarangs are actually a separate type that looks similar but is inferior. Bogotas and their ilk lend themselves to a variety of techniques. If jiggling or wiggling does not work, try a lateral wiggle, scrubbing or ripping. The three-hump Bogota is the most consistently performing pick I have, and will sometimes pop a lock open in a few seconds.

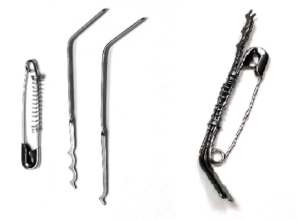
Shown is a very clever way of carrying a pair of Bogotas using a safety pin and a spring from a pen. The safety pin itself can be bent into a hook pick if necessary. CAUTION: Check your local laws about carrying lock picks!
This is a good time to introduce my golden lock picking tip. You will generally need much less force than you are using! You will need less pressure on your tension tool than you are using. If scrubbing or ripping you need to only lightly touch the pins rather than remove metal from them. If it is not working, be more gentle! Finesse not force!
Lock picks are usually offered in sets of a dozen or more designs. My personal recommendation would be to ignore these and get a pair of Bogotas. Mine are from Dangerfield.

The handles of the Bogotas are cleverly designed so that one pick can serve as a tension tool while the other is in use. The single-hump can be used as a half-diamond or hook. Picking individual pins needs skill, patience and time. Many locks can simply be raked open, and the three-hump Bogota performs very well for this once you have discovered the correct actions. The rigidity of the Bogotas is useful since some locks will pop with a lateral wiggle, something that may bend or break inferior picks. The polished finish makes manipulation within a lock easier and hides deposited brass.

First Lock Pick Set

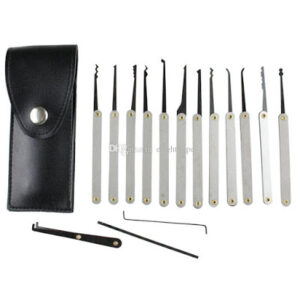
I’m well aware most of you will ignore my recommendation above and buy a kit or two. Trying out different tools and methods is part of the fun of a hobby. When I brought my Bogotas, I also brought a very cheap Chinese-made kit. I mainly got it for the practice lock, but the key extractor or pouch alone was probably worth the purchase price. Using these picks makes me appreciate just how good the Bogotas are. Thinner shanks are not necessarily an advantage and black finish reveals how much brass is scraped from the pins. My wishlist includes at least another S-rake. It was, however, satisfying to open my most temperamental lock with a single hook.
Categories
Phillosoph

Toothbrushes: Less is More!

The other day I decided it was time to replace my toothbrush. Money is really tight at the moment (Please buy some books!) so the only choice was the nearest poundstore. As it turned out, this store was only stocking children’s toothbrushes on that day. On the upside, I got a pack of five for a pound!
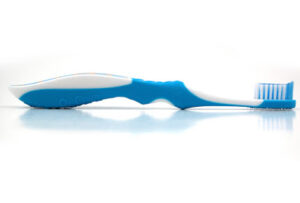
A few days later I get around to opening the packet and selecting a new brush. The handle was noticeably shorter, but not to any detrimental extent. What was a surprise was how much better this brush seemed to clean my teeth. The smaller head means that the brush has more room between the lips and gumline and can reach all the way back to around my back teeth.

In retrospect, this makes sense. Generally the finer the job you want to do the smaller the brush you use. The smaller brushhead of the kiddy’s brush lets me reach a greater area of my teeth for a better clean. It also uses less toothpaste!
I know some of you “ounce-counters” out there cut down toothbrush handles to save bulk and weight. Consider going the full hog and switch to a children’s brush. You will find not only are they lighter and cheaper (less tax!)  but actually more efficient.
Categories
Phillosoph

Sleeping Bags for Hostelling

A few weeks back I got talking about my experiences of youth hostelling when younger.
I didn’t get into hostelling until I was in my early twenties so was often the “old man” of a dorm. That said, I often struck up enjoyable liaisons with some of my fellow travellers. Some of these only lasted a couple of days until our paths parted, others were friendships that remained active for many years.
I was asked to write a little on the blog about my experiences and conclusions. .
One of the first topics I was asked about was sleeping bags for hostelling.

Do you really need a sleeping bag for hostelling, I was asked? My answer would be yes. 
While many hostels provide some bedding there are many that do not. It depends where you are in the world and whether it is an official IYH hostel or not. .
I will note that some of my most memorable experiences have been at “unofficals”, although by no means should you avoid the official places. There have been some fun times in those too. .
Another reason for having your own bedding is that there will be times when you want to travel overnight by train or bus, saving yourself the price of a room for the night.
This is not going to be a generic article on selecting sleeping bags. I will save that for another day if there is interest.

Too Much of a Good Thing?

The most common mistake when buying your first bag is magnum-itis!.
A common mistake when buying a bag is to buy one that is too warm. .
Look around any hostel and you'll see several roommates with legs draped out of too hot five-season expedition bags.
I did exactly the same when I brought my first bag (labelled as -15°C). I still have that bag but now reserve it for outdoor use or buildings that I know will be insufficiently heated. .
In truth, I have seldom used it. 
Use your hard saved money for a more practical purchase.
I soon invested in a one/two-season sleeping bag that folds up to the size of a rugby ball without the need for compression straps.
My bag of choice was a Snugpak Merlin Softie 3, which I am happy to say are still in production. There are several variants available now. There are lengthened versions for the very tall. A tactical version has a reinforced lower for users that might need to sleep in their boots. (Put sandbags over them first!). 
Looks like the modern versions do have compression straps, probably because users expect them. My original stuff-sack neither had nor needed them.
The latest versions may have higher specs than my bag. According to its label my original bag is a “summer” bag for -5 to +10°C, comfort 0°C. The shop I brought mine from had them catalogued as 1-2 season, which they defined as +5 to +15°C.

My Merlin Softie has been all around the world with me and is still good to go. I have used it for both hostelling and camping.
I prefer bags with two-way zips for hostelling and similar travels. They provide better ventilation and are easier to get into in a dark dorm room. 
Some designs can also be zipped together, if your bag has a right hand zip and your loved one's a left.
The compact size allows me to carry a very small pack, with plenty of room for everything else. 
The larger sleeping bags often take up most of your rucksac volume or become large unwieldy lumps lashed to the outside. 
Should conditions be colder than expected, I can always add more insulation in the form of clothing or blankets. Taking insulation out of a heavier bag would not be possible. 
Conceivably I could use my lower performance bag inside another bag.
I suppose if I had my time again I'd buy a one or two season bag and a two or three season and have a really versatile system for all conditions.
I have a lightweight down bag that might work well with the Merlin but I cannot recall any instances where I was cold in the Merlin bag. 
Bear in mind that many of your travels will be to warm places in summer and you will see that such a bag is more than adequate. 
You’ll spend a third of your time on holiday sleeping, so a good bag is a good investment.
Many hostels will provide blankets but expect the guest to provide a sleeping bag liner. A sleeping bag liner is basically a sheet sewn into a bag-shape to keep the bedclothes clean. Some hostels may also have sheets or bags for hire.

For a long time I carried a simple, easily washable cotton sheet bag, both for hostel bedding and to protect my own sleeping bags.
One morning in a German hostel it disappeared from my bed! The maid had mistaken it for one of the hostel’s sheets and sent it on to the laundry. This was my last morning before moving on to Holland, so there was no way my bag would be returned to me in time.
The hostel owner was most embarrassed by this and gave me a set of sheets as a replacement. Once I'd returned home I set about sewing these sheets into a replacement liner, with two modifications:
  • One was to sew the sheets into a mummy shape to match the shape of my sleeping bag.
  • The other was to sew round the opening several pieces of brightly coloured material. This was partially to make my bag instantly recognizable to prevent the same happening again, and also so that I could locate the opening of the bag by touch, saving me from using a light and disturbing my roommates.
Although quite reasonably priced, liners can be very easily made, and there's no reason why they have to be white.
Make them from something you can recognise in an instant and line the neck with something that feels different and identifies it further. Some of you may consider a piece of lace.
I’m still using my homemade liner. Nowadays you can find pile liners to make your bag warmer. There are also silk liners and pertex ones, which have tempted me but I have yet to try.
If you are a restless sleeper who often gets tangled up in their bed clothes, you can make or modify your liner so it has separate legs.
Categories
Phillosoph

Simple Effective Personal Camouflage

For a long time I have advocated the use of camouflaged smocks. Surprisingly it is hard to get the idea that camouflage should be worn over the armour into some heads!
In a previous blog post I discussed the idea of camouflaged aprons or tabards. While I like the simplicity of this approach I feel it still has a way to go. Some of the illustrated examples are overly long and have too rectangular and regular a shape. Most obviously they do little to camouflage the distinctive arm and shoulder region.
Recently I was having a conversation and recalled this:

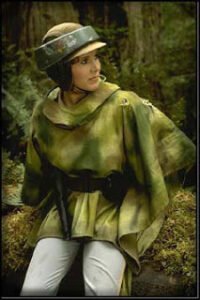
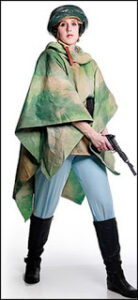
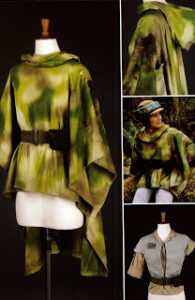
Several of the rebel characters on Endor wear these ponchos. Since it is not raining they seem to be primarily for camouflage. Leia’s, at least, seems to be rigged so that it is relatively short at the front, providing freedom of movement.
In his book mentioned in the previous post Langdon-Davies notes that the sniper suit (and personal camouflage in general) is:
“to destroy your human shape, as well as your human features. It is therefore cut as unlike a Savile Row tailor’s suit as possible”
and that “For many purposes the sniper’s suit may be thought too clumsy and readers are advised to experiment by making hoods of a larger size reaching to the waist. These can easily be taken off when the moment comes to run, and they do not in any case impede the movements of the legs”
A poncho is very good at concealing the shape of the human body. In previous posts I have discussed ponchos and shelter cloths as rainwear and I have discussed ponchos, blankets and cloaks as cold weather wear. Suppose we merge the idea of the camouflage apron and poncho to create a garment intended for camouflage rather than warmth or rain protection. Here, a similar idea is called a bush rag.
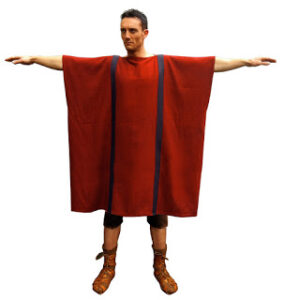
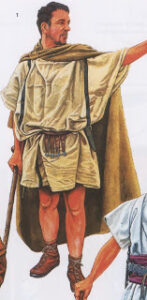
What I suggest is something roughly hexagonal in shape, folded across two opposite points. Its width would be about an arm span as measured between the elbows. This would be half an wearers height by Vitruvian proportions. At the front and back it would be about mid-thigh length to provide freedom of movement. Using the Roman tunica as an illustration, the camo-poncho would not be as long and would taper towards the lower edges. The sides would not be seamed. One of my reasons for mentioning the tunica is that like this garment the poncho would most likely be clinched, the equipment belt or webbing securing the flaps. Tapes or cords can be added for when a belt is not worn. The sides below the belt would not be joined for better freedom of movement when crawling or climbing.

Being a very simple garment it is more practical to make the camo-poncho double-sided. One side could have a verdant pattern and the other a more brown and tan pattern suited to semi-arid, autumnal and many urban environments. Another version would have a desert pattern on one side and a semi-arid pattern on the other. Another variant would have pure white on one side and a pattern for broken snow on the other.
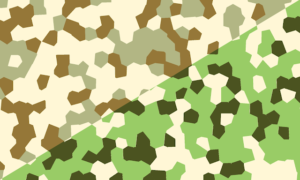
The camo-poncho (smocklet, ponchoet?) would use a contrasting macro-pattern that breaks up its shape. There is little point trying this concept with some of the multi-coloured patterns currently in vogue that blob-out into a single monocolour. In the pattern below individual polygons should be about three or four inches across. Mesh in useful patterns such as CCE can be found.

The double-sided camo-poncho could be created by simply sewing two differently patterned sheets together. A hexagonoid shape can easily be made from rectangles and rectangles cut diagonally. The hem would be made several inches from the edge and the cloth outside allowed to fray. It might even be cut into tassels like a buckskin shirt. The frayed edges and tassels further break up the recognizable shape and assist in the garment drying when wet.
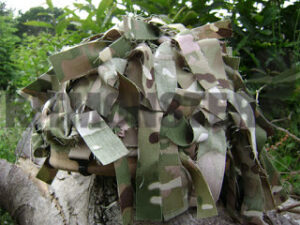
Since the camo-poncho is unlikely to see a parade ground we can add some patches of cloth, hessian and netting to make it three-dimensional, as was discussed for headgear. The poncho could work in conjunction with other ideas such as the soldier’s mantle.
Just to be clear. The camo-poncho is not intended to replace the rain poncho or poncho-liner. The soldier would also carry these items and use them when needed. They are vital components of his lightweight sleeping system. The camo-poncho is not intended to act as a shelter or provide warmth. One of its advantages is that air easily circulates under it, which will be welcome in hot climates. The camo-poncho is designed to provide the wearer with concealment. Warm clothing, including a poncho-liner, can be worn under it if the climate warrants. The camo-poncho can be worn over a waterproof jacket or rain poncho, providing camouflage and snag-protection and also muffling the noise of these materials.
Hunters, wildlife photographers and the like should feel free to try this concept out. It requires minimal sewing skills and is likely to be far superior to more expensive, tailored options.
Categories
Phillosoph

Langdon-Davies Home Guard Camouflage Suit

As I have already pointed out, I am getting old and my faculties are declining. Every now and then I look back for an article I have written to refer to and discover I have never posted it.

During the discussion of camouflage I referred to “The Home Guard Fieldcraft Manual” by Maj John Langdon-Davies.
Despite its age, this is a book I would recommend to anyone remotely interested in camouflage or not getting shot.

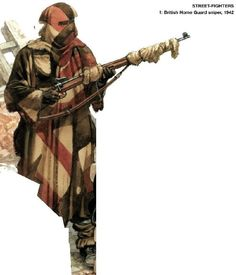
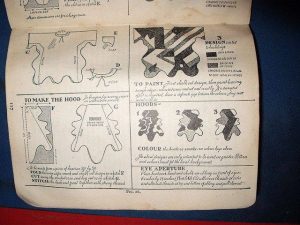
One of the most memorable parts of the book is Langdon-Davies’ instructions on how to create a “sniper suit” from open weave hessian.
Don’t get too hung up on the “sniper” label.
Langdon-Davies considers camouflage to be a skill that all soldiers should be adept at and comments that “twenty rifle rounds at 25 yards will be far more effective that fifty at 250 yards”.
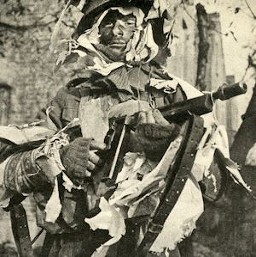
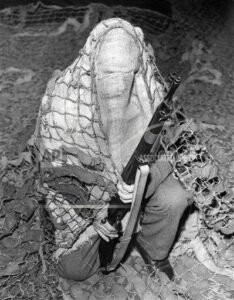
If further proof were needed, note that one of the photos below shows a camouflaged sub-machine gunner.
The basic garment is a loose fitting smock. Its construction is not unlike some of the Roman tunics I discussed in a previous blog.
The seams are some distance in from the edge of the sleeves and sides and these parts are deliberately irregular. These would be permitted to fray to further break up the shape.
The garment was to be worn over the woollen battledress and webbing equipment. A flapped opening was provided for accessing the pouches and pockets within.  
The hood illustrated is a separate piece.
For vision, alternate threads are picked out to create a “slot”. Langdon-Davies cautions against distinctive paired eyeholes. He provides some examples from nature of animals disguising their distinctive eyes with band-like markings.
The book also suggests an alternate design that resembles a short poncho with an integral hood.
He describes this as a waist-length hood with arm openings.
Obviously a poncho with a separate hood is possible too.

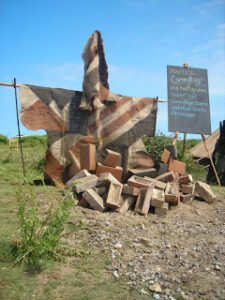
One of the advantages of using hessian is that it has a light, natural colour to begin with. This forms a good base on which to paint contrasting colours, giving good disruption of the human shape.
One interesting suggestion Langdon-Davies makes is that the front and back of the garment might have different patterns.
The camouflage needs of a kneeling man viewed from the front may be different from those of a prone man viewed from above.
Camouflage should be thought of as 3D rather than being two-dimensional patterns.
Additional patches of frayed hessian or cloth can be added to the garment, as can pieces of netting that allow the utilization of natural materials.
Categories
Phillosoph

Compact Living Space

A friend of mine recently contacted me to discuss his accommodation plans. Local zoning laws allow him to build a structure of ten square metres so we soon got onto the subject of optimizing compact living spaces. This topic has applications in many other fields, including survival so I thought I would blog some of our thoughts.
Firstly, make the best use of light. Pretentious interior designers on house makeover shows disparage marigold-painted walls. There are good reasons why marigold is so commonly chosen. It is light and it is warm, so a very good colour for living space walls. My own walls are a cream colour that works well with white trim and furnishings. If you have to live in a small space chose light and warm colours, not just for your walls but the other items that surround you.
Personally I never use curtains. If you do make sure the rail is wider than the window. This allows you to fully expose the window when the curtains are drawn, maximising the light entering your compact space.  
Intelligent use of mirrors can increase the light and illusion of space. Shop around since large mirrors can be expensive. Mirror tiles, on the other hand can be quite reasonable.
Compact living requires efficient use of space. Most caravans have seating areas that convert to beds at night. The table between the seats forms the centre part of the bed and the cushions become the mattress. This has some advantages. Unlike a conventional mattress the cushions can be easily taken outside to sun or air. Beat them with a carpet beater to get the dust out.

In all the caravans I have slept in the tables have been one-legged affairs that engaged a rail on the wall. A more conventional table with folding legs may be a better choice for our compact living space. This allows the table to be taken outside if the weather is nice. Ideally the legs would be an inverted “T” shape so you can easily take your seat. The table is your dining area and desk. At night it is part of your bed. When not needed it folds up and can be placed out of the way.
The lower part of the seats are also storage boxes. Logically this would be a good place to store your bedding. Install some vent panels so the bedding can air and dry during the day.
For bedding use rectangular sleeping bags or duvets. Sleep on one and under another. Have a light blanket, duvet or bag for summer nights and as additional insulation when it is really cold. Air your bedding outside regularly.
I discussed alternate sleeping systems such as hammocks and cots with my friend and these may be the subjects of future blogs. The caravan-style convertible sleeping/ seating area seems the most practical choice for this application.

Above is a rather nice example of a compact living area from an IKEA site. It could be improved by replacing the conventional bed with the system described above. I like the laundry bag that fits at the end of the bed. Ideally this bag would also let you carry the laundry to the machine or laundrette.

Storage space is an important consideration of a compact living area. Unlike a typical caravan you may be living in this area for months or years at a time. The IKEA photo shows most of one wall used for storage areas. These should be as tall as possible. If they do not reach the ceiling it should be practical to use their tops for additional storage.
Conventional wardrobes have doors that swing out into your limited living space.  The above arrangement uses a rail mounted in a storage unit to hang jackets and trousers. Obviously the unit needed must be about half a metre deep. If you do not like your clothing out in the open like this or fear some items might get faded by the sun fit this section with a light-coloured curtain.
Even if your storage units are free-standing it is prudent to attach them to the walls to “earthquake-proof” them. Open fronted shelving units create a feeling of space and make it easier to find things. Transparent boxes are useful here too. If your compact living area is mobile your storage areas will need doors. Sliding doors are worth considering.  Shelves should be detachable so height and arrangement can be changed easily to suit the contents.
Other areas can also be used for additional storage area. The areas under the seating have already been mentioned.  Shelves can be mounted above the seating/ sleeping area but must be high enough that you do not hit your head on them when you stand. Very tall visitors will need watching! If you want a bedside table make it a short shelving unit. If you have room for a free-standing chair have one that folds up when not needed. A stout storage box with a cushion on is a stool. Without the cushion it can help reach those high shelves.
Categories
Phillosoph

Price Drop!

Good news for some of you! I have dropped the price of “Survival Weapons: Optimizing Your Arsenal”. If you do desire a copy please buy it through the Lulu website. Not only will this give you an additional discount but it ensures that more of the money you spend goes to support my loved ones.

Thank you for all the support and interest.

Categories
Phillosoph

Sam's Van: Kitchen Equipment

Sam’s Van is an idea from a friend of mine from Tennessee. When he was in his late twenties he proposed that a person should only have as many possessions as could be transported as a single van load.
For a variety of reasons, I can no longer meet this ideal, but it is a useful concept to help you declutter and reorganize your environment.
There are some interesting websites about minimizing your possessions and these can provide useful inspiration. However, Sam’s Van is about optimizing what you have rather than minimizing it.
Recently I began to consider what I have in the kitchen.
This caused me to look at some lists of “essential” items of kitchenware, which did give me something of a chuckle. I quite like cooking so my kitchen contains some items I would not put on a basic start-up list.
The list below is a combination of what I have in my kitchen and items that appear on lists of essentials. If you are equipping a new kitchen or wish to declutter an old one, this list and my comments may be of help.

Plates, Bowls and Cutlery

At least four of each, with six preferable. The more you have, the less often you will have to wash up!
Bowls end up being used for microwaving veg and other uses so a few extra of these is prudent.
I found that teaspoons tended to be in short supply too so I brought a bundle more and released them into the drawer in the hope that they will breed.

Mugs

Extra mugs save on the washing up and let you be sociable.
Eight is a good number if you are on your own, twelve if a couple.
Mugs also get used as little mixing bowls for making sauces, instant gravy, mustard or similar.

Beer and Wine Glasses

You do not want to drink your beer and wine from mugs.

Pots and Pans

You will need two, maybe three, saucepans of a suitable size for your requirements. For example, if you are mainly cooking for yourself, a pot of about a litre size is going to be the most useful.
Make sure all the pots have lids and that they are of a configuration that you can use the lid to drain the pot.
Avoid steam-release vent knobs unless you like scalded fingers.

Wooden Utensils

You will need some spoons to stir your cooking and spatulas to flip frying or grilling food over. Since some of your cookware will be non-stick it is prudent to get non-metallic items.
If the local pound store does sets of wooden utensils, you can soon acquire half a dozen or more items of varying shapes and applications.

Frying Pan

If you are getting only one, get a non-stick one of reasonable width.
A frying pan can also be used for making and reducing sauces.

Mixing Bowls

A couple of bowls are useful for mixing stuff in, serving fruit or popcorn in and so on.
If you are smart you will select some that you can use in the microwave (and halogen oven). Some glass/pyrex bowls often have measuring graduations too.

Measuring Jug

I measure out the quantity of rice or pasta that I intend to cook using volume, so a measuring jug proves very handy. I also use it to fill the coffee maker with water.
It is used so often that it seldom leaves the draining board.

Chinese Cleaver

Something like 90% of cutting jobs in my kitchen are done by my Chinese cleaver. If I am using another knife it generally means the cleaver is in the wash.
Unlike the western cleaver, the Chinese model has a full bevel and a relatively thin blade. This type is sometimes called a vegetable cleaver but you can use it on anything you might wish to eat. As well as chopping, it can also be used for slicing, dicing and all sorts of fine cutting too.
Best place to get one is a Chinese supermarket, preferably one in a Chinatown district.
I have yet to cook anything the Chinese cleaver could not cut. Should such a situation occur, I have a Buck Ax in the kitchen too. The back of this gets uses as a hammer to break up frozen veg.
How to Use a Chinese Cleaver

Chopping Boards or Mats

Have at least one, and have it of a type that is easily washable. Use it to cut your veg before your move onto the meat or fish or use a different one for each.
If you want to have different boards for meat, vegetables and bread have them different colours.

Paring Knife/Knife Block

The other knife I use a lot is a “bird’s beak” paring knife. These are also called “shaping knives” or “peeling knives”.
This can be used for most of the jobs that a cleaver is not really suited for. Mine came with a knife block set. Its hooked blade is very useful for opening packaging.
I brought the knife block set to stop a certain “guest” abusing my boning knife.

Scissors

Modern packaging means that the scissors get used a lot too. I ended up putting a screw hook to hang them from inside the kitchen drawer so I could easily locate them.
Some lists of kitchen equipment have kitchen shears, which are presumably used for food preparation. Never used or owned these. The scissors or cleaver should serve.

Bread Knife

Whether you need a bread knife will depend on how you buy your bread and how much bread you eat at home. I have one as part of the knife block set and it sees occasional use.
Bread knives should also be used for cutting acidic fruits, so you should probably have one.
If you buy bread, have a cloth bread-bag to keep it fresh.

Carving Knife

There is one in the knife block set. Before I had that I usually used the cleaver.

Butcher’s Steel and Ceramic Rods

No point in buying a cleaver and knives if you cannot keep them in working condition.
I have a pair of ceramic sharpening rods and a butcher’s steel in my kitchen, ready to be used as needed.
See my book on how to use them.

Filleting and Boning Knives

I don’t have a filleting knife, and I find I have seldom used my boning knife.
Good ones tend to be expensive, so do not buy unless you expect to get lots of use out of them.
 

Whisk

Whether you need a whisk depends on your cooking abilities and style. If you have no idea on how to make a sauce or batter you do not need them.
I like the “magic” whisk type that look like they have a spring bent into a horseshoe-shape. I brought two or three of these to save on washing up.
Never felt the need for an electric mixer or blender.

Skimmer

This is a Chinese item like a cross between a ladle and a metal net. It is used to fish stuff out of boiling water or deep fat.
I have seldom used it.

Electric Kettle

You could get by with a saucepan if you have one clean but an electric kettle is worth having. Open flames and being half awake in the morning are to be avoided if possible.
Get the sort of kettle that will only boil the amount of water you need.

Toaster

The usefulness of a toaster depends on whether you have bread in the house. I had a friend staying with me who would buy bread for sandwiches so the toaster saw some use.
Since he has gone it has not been used much.

Garlic Press

I have not seen mine in over a decade.
When I need crushed garlic I simply flatten it between the cleaver blade and chopping board, which also makes it easier to peel. Then slice or mince further with cleaver as necessary.

Potato Masher

Use a fork unless you make a lot of mash.

Pizza Cutter

Just use a table knife.

Ice Cream Scoop

I seem to have inherited one! If you do not have one, simply use a spoon.

Can Opener

I don’t eat a lot of canned food.
When I needed something like canned tomatoes for a chilli con carne, I’d use the can opener on a penknife. A spare penknife is a useful thing to keep in the kitchen drawer.
A friend who was staying with me ate more canned food, so we brought a turnkey-type can opener from the pound-store.
Unless you are disabled or work in an industrial kitchen you do not need an electric can-opener. They are a waste of energy and money.

Bottle Opener/Corkscrew

You should have these. The penknife stands in reserve.

Pepper Grinder

Unsurprisingly, for grinding peppercorns.

Vegetable Peeler

I’m sure I have one of these somewhere but have not used it in years. Often you can simply scrape or wash fresh vegetables instead or use your paring knife.

Grater

I like grated cheese on my spaghetti, so I brought a grater from the pound-store. You can get by with cutting the cheese with a knife so this is an optional item rather than an essential.

Lemon Juicer

Lemon juice for pancakes gets brought ready squeezed. If I have to get juice from a fresh lemon, lime or orange I squeeze them manually or mash them with a spoon.

Pressure Cooker

I probably do not use this as often as I should.
It gets forgotten in the cupboard so I will try keeping it on a shelf instead. I eat a lot of rice and pasta and pressure cooking these does not offer much of a real time saving and the pot is large for the volumes that I cook. The pressure cooker is good for cooking rice or pasta with other ingredients.
Frozen veg is quicker and simpler in the microwave.
The pressure cooker does get used to make the Ham in Cola that I usually cook near Christmas.

Wok

I’m told that most people buy a wok, use it for a few meals then forget about it. I have been using mine for several decades for a variety of meals.
There are lots of things you can use a wok for other than stir-fries. If you do stir-fry, however, buy a chuan to move the food around with. This resembles a cross between a spatula and a shovel.
You will also need a bamboo brush to clean your wok with.
It is worth having a lid for your wok too. My lid got damaged in a move several decades ago and I have managed without, however.
You can buy a wok set in a nice box from many supermarkets. For a fraction of the price you can pick one up unboxed from a Chinese supermarket. Buy a cleaver, brush and chuan while you are there.
Don’t bother with non-stick or stainless steel woks. Get a carbon steel wok of 13-14 inches and season it.

Microwave

I use my microwave a lot but I really should use it more creatively. Mainly I use it to cook frozen vegetables. A bowl of frozen veg can be cooked in just a few minutes. I also use it to make polenta or mug brownies.
The microwave is used for defrosting too but it is less wasteful to let items thaw naturally in the fridge overnight.

George Foreman Grill

The grill in my oven is very inefficient, and the one in the microwave/grill is not that great either so I brought a George Forman grill.
I will admit I have used my wok and frying pan much less since I brought my George Foreman. Bear in mind it cooks both sides of the food at once so will cook quicker than a conventional grill.

Halogen Oven

This is a relatively recent addition to my kitchen and I probably use it more than any of the other cooking devices.
Make sure that your ovenproof bowls, baking pans and casseroles are of a suitable size and shape for use in the halogen oven.

Tongs

I don’t think I have ever owned kitchen tongs. The closest thing I have to them are cooking chopsticks, which I seldom use. A wooden spatula serves for flipping food.
This has changed with my use of the halogen oven. You need tongs (or chopsticks) to reach down into a hot halogen oven to turn or pick-up food. I also have tongs designed to pick up the racks or trays in a halogen oven.

Porridge Pan

If you like porridge, a small non-stick milk pan is worth having. It lets you make breakfast if the pans from the night before have not yet been washed.
I have a spurtle too, but you can use the handle of a wooden spoon instead.

Ladle

I have a couple of these but seldom use them. I do use one as a measure when pouring pancake batter.
You can also use some as very small saucepans for melting a few grams of butter, for example.
I would not class a ladle as an essential. I’d not throw my away but I’d not rush out to buy them if I didn’t have them.

Casserole Dish

Whether you want a casserole dish will depend on your cooking skills and inclinations.
It is a good idea to select one that can also be used in the microwave and halogen oven. I fill mine with tortilla chips and melt grated cheese over them.
A nice looking casserole dish can also be used as a serving dish too.

Measuring Spoons and Measuring Cups

I don’t own any of these and have managed without them. The scales, measuring jug and eating spoons get used instead.
I did, eventually, buy a couple of sets. Many recipes on the internet use volumes rather than weighing.
I also try to measure out high-calorie foods rather than serving myself too much.
Oddly, one set of cups I brought is based around a 200 ml volume rather than 236.6 ml, 240 ml or 250 ml.

Scales

Depending on your cooking style, these can be handy to have.

Timer

Handy to have, particularly if you are easily distracted or not that experienced at cooking.

Colander

Generally, I use the saucepan lids to drain pots. A colander can be useful for some other tasks such as washing fruit or veg. Can also be used as a well ventilated fruit bowl. 

Sieve

I seldom use mine but it is worth having one. A sieve can be used to drain stuff that would go through a colander. It can also be used to sift flour or icing sugar.

Baking Tin

If you want to use your oven, you will need at least one ware that can be used in it. You can use your casserole dish and get by using foil instead of a baking sheet. A non-stick backing tin a few inches deep can be used to make pies or toad in the hole.
According to at least one website a 9 x 13" dish will be the most useful. A square or round dish 8 to 9" across is more useful if there is just one or two of you. Round dishes are more useful for use in a halogen oven.
You will need a non-metallic cake slice (above photo) or knife to use with your non-stick containers.

Tupplewares

A few plastic boxes can prove handy.

Oven Glove and Tea Towels

My girlfriend’s sister took a dislike to my oven glove and it disappeared. Tea towels work just as well and are more versatile.
Towels are great for swatting houseflies from the air to keep your kitchen a “no-fly zone”. (Fitting fly-screen to the windows is a really cost-effective investment!)

Food Processor,  Blender,  Liquidizer

Personally I have managed to cook for several decades without owning any of these so I would dispute that they are “essential”.