Disclaimer: “As an Amazon Associate I may earn from qualifying purchases.” Adsense and Infolinks were no help at all.

If you have enjoyed this article or it has been helpful to you please feel free to show your appreciation. Thank you.

Read The Third Wave by Alvin Toffler!
Categories
Phillosoph

Frogs for Tools

Entrenchments were a prominent feature of the American Civil War.
Earthworks were already an established component of sieges, but this conflict frequently saw troops digging in at more temporary positions.
“Hard Tack and Coffee (p.361)” tells us that each corps of 23,000 men had six wagons loaded with entrenching tools that were provided to units that needed them.
In later wars, infantry were issued entrenching tools as part of their personal equipment. SLA Marshal criticised this practice:
“The only amendment that might strengthen them would be to add that rations and ammunition should be specified only in the amounts which reason and experience tell us the Soldier is likely to expend in one day. Beyond that, everything should be committed to first line transport. This includes entrenching tools since twenty heavy and sharp-edged spades will give better protection any day to an entire company than 200 of the play shovels carried by Soldier”
(The Soldier’s Load and The Mobility of A Nation, p.57)
There will be situations where a unit cannot be easily reached by the company train.
The best approach most likely lies between the two approaches.
A unit will have some tools organic to it but also have access to more substantial items from the company or battalion.
For the prudent civilian, the approach is similar. One should have portable items with some larger items cached at base, home or with a vehicle.
Level of issue is another issue.
Some argue that if the enemy is close, half the unit should dig while the other half stands guard, so only half the men should carry entrenching tools.
If on a mobile patrol, only a couple of tools may be needed.
In an urban sweep, digging tools are of limited use but there may be a need for crowbars and axes.
This last point illustrates something that should be borne in mind in the following passages.
For simplicity, I may use spade-type entrenching tools for illustration but the proposed ideas are equally applicable to other types of hardware such as axes, mattocks, picks, tomahawks, prybars and so on.

When I was writing about the soldier’s load it became apparent that entrenching tool covers and carriers were rather superfluous.

When on the march the entrenching tool is best carried with the rucksack.

Rucksacks have numerous pockets, loops and straps that can be used to secure such an item so a carrier that can be affixed to them is redundant.

There are times when the rucksack is not carried but the entrenching tool may be needed, and may be needed in a hurry!

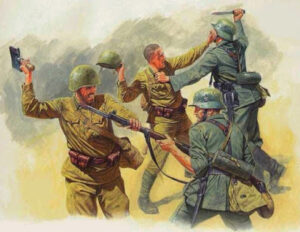
The various belt mounted carriers in common use take up a lot of room and do not permit the tool to be brought quickly into action. This is why we have numerous images such as the one below.

Assault troops ignore their belt carriers and tuck their e-tools through their belts. The belly position is not ideal if the soldier has to crawl or is forced to go prone by enemy fire. A better position is around the right hipbone, as was often done with tomahawks. See my previous blog on fast-drawing of items such as tomahawks.

One function that a carrier or cover does serve is to protect the soldier from the sharp-edges of his tool.
There are simpler, lighter and more efficient ways of doing this.
The image shows a simple guard used with a tomahawk.
For a spade, a U-shape can be made from plastic or aluminium tube or siding. Cord or elastic and hooks or simple knots are used to keep this in place.
Such constructions do not prevent the soldier from drawing his tool in an emergency. A muzzled pick, tomahawk or spade are still effective weapons.
If a tool does not carry well tucked through the belt, a simple “frog” can be constructed.
The simplest is to tie a cord into a circle and pass it behind the belt, letting one end to pass through the other to form a simple loop.
Loops like this are used to carry hammers on tool belts. If the carry is considered too loose the circle is reduced.
Other tricks can be used.
It is possible to tie a clove hitch without access to the ends of a cord. This can be done with the hanging part of the loop and the shaft of the tool passed through the centre of the knot. Such a knot can be prevented from collapsing when empty by the simple use of a paperclip or loop of fishing line.
A better frog can be created from nylon strap.
Ideally, a second strap would be sewn to the outside of the loop, the outer having either a fastex or double-D buckle. The outer strap can be tightened when a more secure grip on the shaft is wanted, the buckle easily released when it is not.
To the frog, I would add one or two eyelets to which a short length of cord can be attached. For articles such as tomahawks, the cord can be passed over the top of the tool and tucked down inside the loop, which is then tightened. This helps secure the tool but is easily released by the action of pulling upwards on the head.
Potentially, items such as machete sheaths and even pistol holsters could be designed to be compatible with the frog.
Watching episodes of the TV series “Vikings” I note that some axes are apparently worn on belts using two loops or rings. One ring or loop is horizontal, the other vertical. The latter keeps the head from swinging around.
The vertical ring appears to be a smaller diameter than the width of the axe edge. Presumably, the butt of the axe is passed through both rings to stow it.
Categories
Phillosoph

Seven Tools of EDC

Today, as I was coming into work, I was thinking about “magic number seven”.
In short, this is an observation that the average number of related “data chunks” a person can recall is seven, plus or minus two.
This is usually specified as for short term memory, but may be relevant to longer term memorization of lists too.
A friend of mine is working on a language-related project. It seemed to me that if you must have lists of categories or affixes, then breaking them up into groupings of seven or less might be a good approach.
As it is wont to do, my mind drifted and I began to think about the ninja “six tools of travelling”.
I know six is not seven, but bear with me a moment.
I remember this list by recalling that three things on it are “flexible”: hat, rope, “towel”; and that three are not: medicine, writing kit and fire tube.
As I point out in my earlier article, this list does not include a knife, since telling a ninja or any other sensible person of that era to carry one was probably redundant. If we add knife/tools to the list it becomes seven.
OK, I thought, does what I have on me right now meet the criteria of the six/seven tools of travelling/everyday carry (EDC)?
  • Firstly, I have a hat. It’s cold out and my head has little remaining natural insulation. If it was sunny out and I was planning to spend any time outside I would probably have a hat of a different design.
  • Rope, or cordage at least. I have a spare shoelace tucked into the bottom of a pocket. I also have the dental floss in my pocket kit which can be used for a variety of purposes.
  • “Towel”. The item the ninja regarded as a towel (tenugui) was a relatively thin, multipurpose item. I have a bandanna in my pocket which can serve similar purposes, including as an emergency hat.
  • Medicine. My pocket kit contains plasters, painkillers and disinfectant wipes.
  • Writing kit. I have a pencil. I can also write things down on my phone.
  • Fire. No ninja tube of smouldering charcloth, but I do carry a source of fire. A lighter rides in the same pocket as the bandana and shoelace. A short piece of duct tape wrapped around it may be used for repairs or for tinder. A bag of tissues in another pocket may also be used for firelighting.
  • Knife. I carry a Swiss Army knife and a mini-Leatherman Squirt P4 and have a Swiss Army Classic SD mini-knife on my key ring.
These seven tools do not just represent concrete objects.
They also represent broader, more generic categories.
For example, the hat also represents shelter, so includes a coat suited to the weather, scarf and gloves should they be needed, and the survival blanket I carry in my pocket pouch.
A silver survival blanket is a far better thing to have available than a little tin full of gizmos and gadgets!
The hat also is a reminder to accessorise! Hats, scarves, gloves, bandannas and similar can make the difference between comfort and catastrophe.
EDC Pouch Contents
The writing kit also represents communication, so includes my phone and the USB drive I carry.
In addition to the pencil and chalk in my pocket kit, I have a couple of pens (one is part of my Swiss Army Knife) and a Sharpie. The chalk or the Sharpie may be used to mark walls, tree trunks etc.
Communication can include signalling, which includes my phone and the whistle and photon light on my keychain. Illumination can be taken as a subset of signalling. I have a larger flashlight in my thigh pocket, and the phone has a flashlight mode.
The knife also represents tools in the narrower sense, so includes my mini-prybar, diamond sharpening card and the P51-style can opener on the keychain.
The knife also represents the requirement for self-defence, where such is permitted.
The fire icon I have used above also represents knowledge. EDC items are of little use unless one knows how to best use them. Using cordage requires knowing some basic knots, for example.
As can be seen, the “Seven Tools of EDC” are a good starting point for planning an EDC or larger kit.
There are other categories, of course.
Money is always useful and documentation may be needed.
I carry tape, pins, paperclips and other items that might be used for repairs. These might be considered a subset of the knife/tools category. I have added a needle and a metre of invisible thread. This is bound to the side of my pencil along with a wrapping of electrical tape. The needle may be magnetized using the magnet with my Swiss Army Knife.
None of the seven categories really covers navigation, but I do carry a Suunto clipper compass which has proved to be surprisingly useful in town.
On the next level up, food and water, or the means to procure and prepare them should be addressed. At the EDC level this is addressed by the money and credit card. My pocket pouch has a long piece of braided fishing line and a score of small hooks, which may be used for other purposes.
If you live in a very hot, dry environment carrying a supply of water on your person is prudent.
Categories
Phillosoph

Useful Pocket Kit

I may have mentioned before on this blog that I am prone to migraines. I tend to avoid using painkillers unless I have to, but recently my doctor told me my condition was such that I’d be advised to carry more painkillers with me.
I’m always in favour of precaution and preparedness, as we know!
If I have to carry some painkillers, it seems only prudent to also carry some other items of similar usefulness.
Some of my jackets are short on pockets, and I spend a lot of time not wearing a jacket.
The logical place to carry this kit was the cargo pocket of my trousers. You are less likely to be separated from your trousers, which is why in my articles on the soldier’s load I recommend the cargo pockets for survival kit, minor injuries kit and other important items.
I will stress here that what is illustrated in the photo is not supposed to be a comprehensive survival kit.
There is no means to create fire or cut in the pouch, since these are already carried elsewhere. 
And sometimes capabilities are duplicated, or worse. I cringe when I think how many items I have on me that can be used open beer bottles.
Not having all your eggs in one basket is prudent, of course. Should one pocket get damaged and I lose the contents. I will not have lost everything.
My pocket kit is basically a collection of useful items for everyday carry,.
Cargo pocket carry means you do not want a container that is hard or bulky.
Do not carry a survival tin. It is an unwelcome lump that will dig into you, swing against your thigh and hurt you if you fall on it.
I want my EDC items easily accessible, not packaged up tight so squaddies won't play with it. Many components of a commercial or issued survival tin need stocking up, incidentally.
The best thing you can do with a survival tin is empty it and utilize the contents.
 
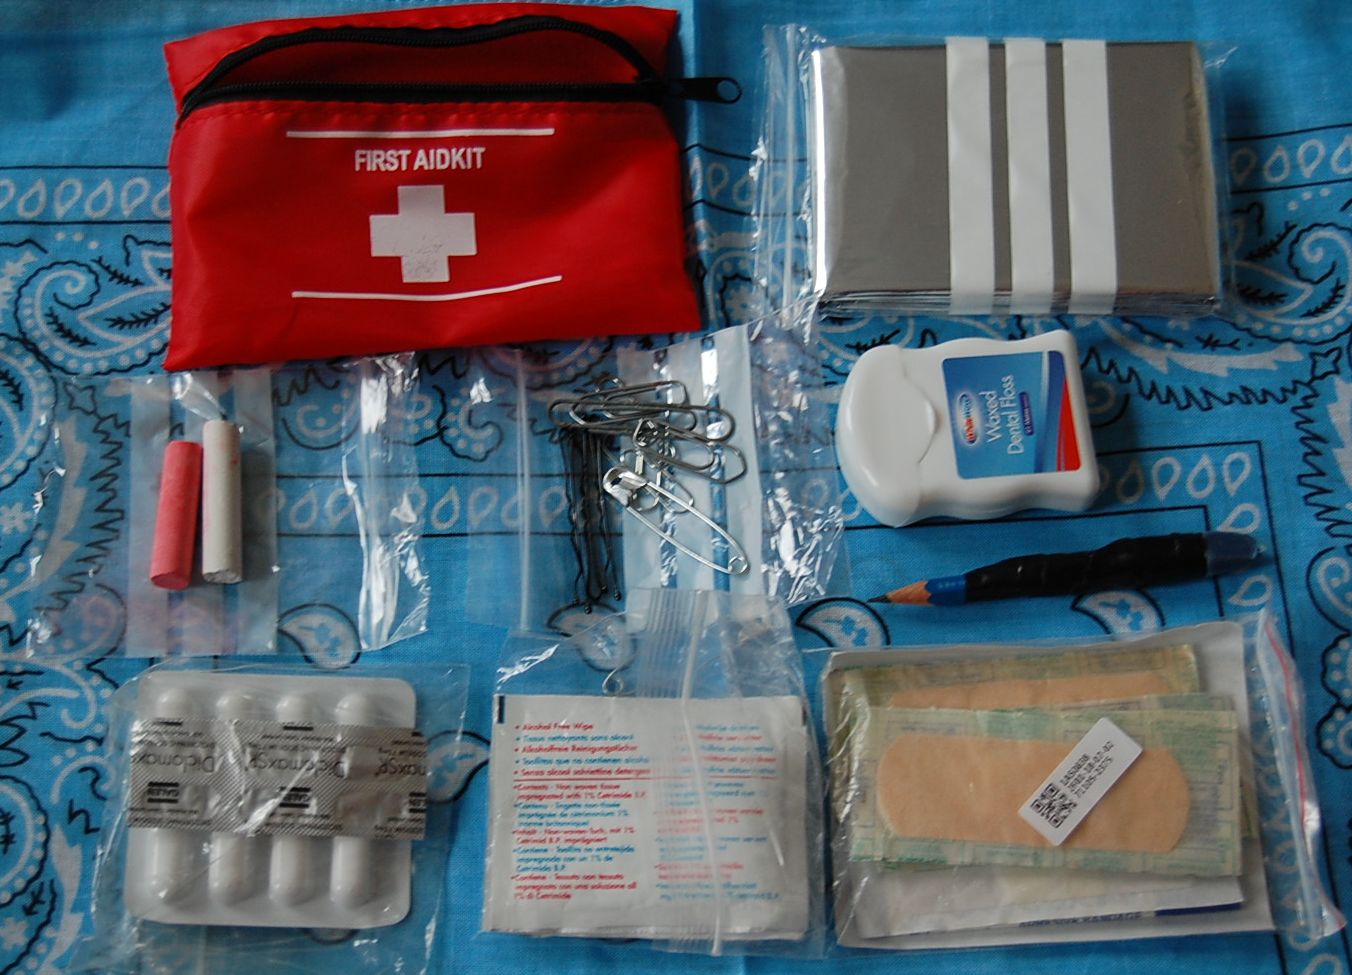
For my pocket kit, I selected a cheap first aid kit. It came with a rather nice triangular bandage that was worth the asking price alone. I have this bandage in my primary travel medical kit.
 
To the now emptied pouch I added the following:
    • Some paracetamol, and some diclofenac, the latter being good for migraines. A sheet or two of water purification tablets could also be added.
    • An assortment of plasters.
    • Container of dental floss : 90 metres of useful cordage. The spool may be removed from the plastic outer container.
    • Small bag of safety pins, hair pins and paperclips. Useful for broken zippers or improvising tools. I need more of the larger, springier paperclips since these are more useful. This bag now includes a SERE pin.
    • Two short lengths of chalk. One light/ white, the other dark/ coloured. For leaving messages and route marking. One colour will contaminate the other if they are together. Place in separate bags or wrap the sticks in something like clingfilm. In another trouser pocket I have a Sharpie.
    • Pencil, wound with about a foot of electrical tape. I should have added the tape first and used the rubber to cap the pencil point. Hindsight is wonderful! I have added a sailmaker's needle with a metre or so of invisible thread to this.
    • Foil space blanket. In its own zip lock bag for protection. This squeezed into the pouch, but could be carried outside it within the cargo pocket.
Note that each component, other than the pencil, has its own ziplock bag.
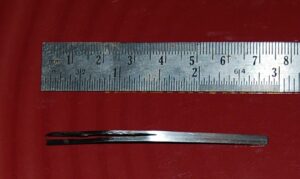
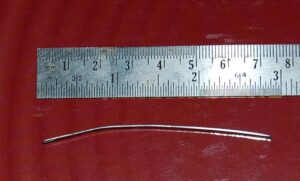
Since I have created this kit I have added a bypass knife/shim and a piece of music wire bent into a traveller hook. Tape over the points so they do not poke through the plastic bags.
Recently, I stabbed myself deep into the thigh while reaching for a rubbish bag. One of the safety pins in the pocket kit had opened. Injuring myself with my survival kit, not my finest moment!
Pack your pouch so that the pins and delicate items such as the pills and chalk are in the centre, cushioned by the plasters on one side and the foil blanket on the other.
One idea is to take a rectangle of plastic and fold it. Place around the bags of pins, needles, hooks etc. Tape and/or line may be wrapped around the outside of this piece of plastic.
The pouch within the pocket is within a larger zip lock bag that could be used to carry water or found food.
 
Not shown: You could add a small compass to this kit.
I already carry a clipper compass elsewhere on my person so this was not a high priority for me.
I am also going to add a suitably sized card with Morse code on it, but have not yet had time to print one out while near a laminator.
Also later added to this kit is six-spans of braided fishing line and 22 fishing hooks on nylon, no.12 and no.10 size.


Categories
Phillosoph

Fantasy Lock Pick Set

Version 1.1
Recently I described the lock sport kit I have built based around the Dangerfield Serenity kit. The Serenity kit gives a pretty good selection to build a kit around.
A hypothetical challenge has been posed to me. If I was putting together a new kit, perhaps to be associated with this blog and my other writings, what would be my wish-list contents?

The case would have reasonable room for a user to add additional items. Four pockets would be prudent. It would be nice if there was room for my skeleton keys and similar related items. 
 

The contents of the kit effectively divide into three groups: SPP, raking and turning tools. 
 

SPP is the field I have least experience with, but to my mind any kit should include some provision for practising and developing these skills. A kit should have a standard or partial hook and a half-diamond, at least. Notably the Serenity kit did not have a standard hook. Perhaps it was felt that the two reach tools (one angled, one curved) could do the same job. A more conventional hook seems desirable, even if it is just so the user can establish they prefer other tools. The high hook in the Serenity set I have not had much success with. I have even managed to get it stuck in locks. Gonzo hooks seem popular with many SPPers, so this may be a better substitution. I ended up rounding the tip of my high hook into a Gonzo-like hook and it handles somewhat better.
 Standard hook/ euro-hook, Gonzo hook, half-diamond and a couple of reach/ offset tools for good measure seems reasonable for the SPP component, but I am open to suggestions from those with more experience in this field than myself. 

Turning tools: I think a kit should contain several of these, and have provision for the user to add additional examples. Many pickers prefer prybars but I like L and Z shaped tools. The Southern Specialities six-piece set that is included with the twelve-piece Toool set and 2500 Series turning set seems to me like a good basis to start with. I would bend the ends of each tool so the narrower (2.4mm) examples also have a 12mm long nose and the wider (3.18mm) examples also have a 6mm short nose. This gives twelve width/ thickness/ length combinations in a relatively compact package. Perhaps there would be a related prybar set you could take as an option or addition.

Rakes: At least one Bogota! A triple-hump, although I’d not complain if there was a spare also. Perhaps give one triple a standard twist and the other a euro-twist for variety. I have yet to try a double-hump so I would not object if one was included in this kit. My recent experiences suggest more humps are more useful so perhaps a four or five hump Bogota. instead. Some of my easiest SPPs have been with a half-diamond so I would be happy to have a single-hump Bogota included too. This would be my reserve/ alternate half-diamond. There may be a case for making the other half-diamond pick a different size to the Bogota. The selection of rakes would also include something like the Sparrow Octo rake and the Warlock too. The final type of rake would be something that can handle keyways that the Bogotas, Octo’ and Warlock are too big for. This might be something like a snake rake or worm rake, but the wire finger rakes have impressed me recently. Perhaps a five-peak continuous wave and a three-hump Sabana-style? This would be either wire or flat stock, whichever works best. That is eight rakes, including the duplicate triple-hump Bogota. Five SPP tools and six turning tools makes 19 pieces. Perhaps add an adjustable wishbone turning tool to make it an even 20? 

Handles are something that would distinguish this kit. The Dangerfield Bogotas and Sohos in my Serenity kit are designed to double as standard-width turning tools. An additional benefit of this feature is that the tools nest together and take up very little room within a pouch. Four rakes take up less than a centimetre of width. I would like it if the various Bogota rakes in my hypothetical kit were designed the same. These could serve as general use turning tools, reserving the dedicated turning tools for more specialized applications.

The real world Octo rake and Warlock have very wide handles with decorative transfers. For my kit there would be something plainer and less bulky. Perhaps this might be a rod or flat bar with an Octo rake head at one end and a Warlock at the other. The “narrow” rake might also be a double-ended tool: a three-hump Sabana one end, five-peak wave at the other. Flat bar would allow rocking as well as scrubbing actions, the latter difficult with springy wire.
What kind of handles should the SPP tools have? Bogota-type handles for these would make for a very compact kit indeed. On the other hand, SPP tools may be used for longer durations than rakes. Perhaps there is merit in giving these more conventional grips, perhaps designed along the lines I suggest in a previous article. The thermoplastic handle on the Sparrow Worm rake seems like a good model. Most of my picks lack handle materials and I have never found that a problem. A case can be made that you get better feedback without. 
The idea of creating a double-ended Octo/ Warlock and narrow rake reduces the number of pieces to 18, but twelve of these are double-ended and/or multi-functional!
Update: I have become fond of the double ended picks in the Honest Dong Shi wave rake kit. I would have no objection to the SPP picks being double-ended as well. Perhaps a hook/ gozo, a reach/ offset and a half-diamond paired with a larger variant, similar to the princess or Goso p-nuckle.
Categories
Phillosoph

Mission Impossible Lock Picks

It is Friday so time for a more light-hearted post.
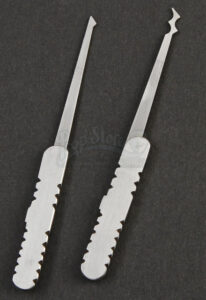
A few weeks back I came across a webpage with the following image. These are props from the film “Mission Impossible 3” and were used in a scene in the Vatican. I cannot say I remember noticing them when I saw the movie.
The original webpage has vanished from the net, so I do not have any of the additional images. The picks were designed so that the handle of each forms a sheath for the other pick so they can be carried as one compact unit. The construction material of the whole picks seems to be plastic, possibly of the same sort used to make credit cards. I have no idea as to whether they will work in real life.

Bizarrely, the writer of the original page referred to the picks as “files”.
Note that this set has no tension/ turning tool. I don’t recall what Tom Cruise did in the movie, but not using a tension tool is the number one movie mistake when it comes to lock picking.
As can be seen, the kit has a half diamond and a two-hump batarang. What amuses me about this is that it looks like it was made by someone who had heard about paired Bogotas but could not be bothered to web-search on what they actually looked like. (Knowing that I would write this article today, I tried picking a lock with my three batarang-style rakes last night. The lock only opened for one. The finger rakes, on the other hand, opened the same lock in a fraction of the time!)

Categories
Phillosoph

Two Pick Sets, One Review

Today I am going to look at two different lock pick kits. A seven piece kit and a five piece.

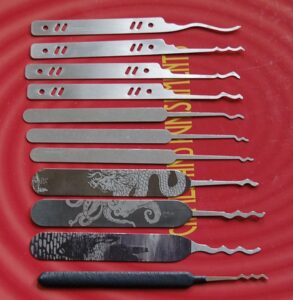
The seven piece kit is one you have already seen in my post on the Serentity plus kit I have built. These are often referred to as “mini-rakes” or “finger rakes”.
Regular readers will know that one of my more reluctant locks I practice on is a little Abus. In my early days of picking I considered the possibility that my Bogota rakes were too big to pick this lock. Hence, I became interested in acquiring a set of rakes more suited to smaller keyways. Experience has shown that it was my skills that were deficient in the case of the Abus. The Bogota is one of the most reliably performing picks for this lock. Ironically, one of the best picks for this lock is the much larger Octo rake. I was, however, well aware that in a few months I might have to deal with much smaller padlocks, so the finger rakes remained on my wish list.
Problem was, these rakes are actually part of a much larger kit. Many stockists break the kit into two parts and sell the parts separately. The finger rakes tend to sell well so are usually out of stock. Understandably vendors are reluctant to restock until they have shifted some of the other half of the kit. In short, I have had to wait several months for these. At least once they sold out before I was able to place my order.
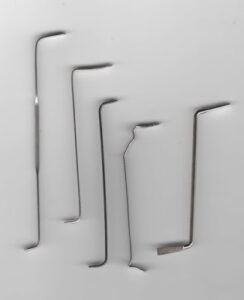
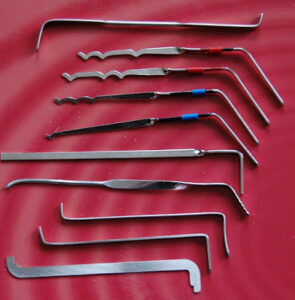
The finger rakes appear to be made from what I suspect is music/ piano wire. The actual rake parts have had their sides filed flat to thin them. That is some nice attention to detail. What many websites on making picks from paper clips fail to tell you is that paperclips may be too wide for some keyways. You will need to file down the sides, or in the field, abrade them on a suitable hard surface.
If you look carefully you will see the rakes can be grouped into two styles. One style resembles Soho/ Sabana/ Monserate-type rakes in that a straight section separates the humps. The set has a two-hump and a three-hump example, top and fifth down in the photo. The peak to peak distance (wavelength) of the finger rakes (12mm) is close to that of the equivalent part of a Soho, but not identical (13.5mm).
The remaining rakes might be termed as “continuous wave”, with one to five peaks. Wavelength is close (7mm), but not identical (6.5mm), to that of a triple-hump Bogota.
I brought this set to use on small keyways. A very pleasant surprise has been that this kit works very well on many standard-size keyways too. Being constructed of wire, these rakes are very light and springy. They are not suited to techniques such as rocking. The technique that seems to suit them best is scrubbing. Insert them in the keyway and move them back and forth. As always in lock picking, if it does not work, use less force!
I did find a padlock with a tiny keyway, only about 4 mm high. Mindboggling thinking about how small the pins must be! The main challenge was finding a suitable turning tool. I ended up using a short length of hairpin, doubtless a product of some of my recent handcuff opening experiments. The finger rakes popped this tiny lock open in a few seconds. They also open small warded luggage locks. Even the multiple-peaked examples fitted down the lockway.
People who make lock pick kits are well aware of the “socket set mentality” many men have, also known as “more is better”. The three-hump “Sabana” can do anything the two-hump can. In small locks, only the first hump and a half of either is likely to contact the pins. Likewise, the five-hump wave can do anything its less endowed sisters can. I am uncertain as to if the single-hump has potential as an SPP half-diamond. The locks I have successfully opened with it also open for the Sabanas and multi-waves. This implies that you could potentially split the finger rake set into two sets, making sure each has a Sabana and either a four or five wave rake. The three-hump and five-wave might find their way into my main lock kit.
I like the finger rakes a lot. I expected them to be a specialist item but they have proved more useful and versatile than expected. UK Bump Keys have them for under just under £3/ $5, which is great value. A few stockists charge a bit more, but this is often still a good price given how useful they are likely to be. These finger rakes tend to sell out fast, so balance how much you are willing to pay with how long you want to wait.
The larger kit the finger rakes come with is usually termed a “Wave rake” kit. I have seen these attributed to either KLOM, “Honest” or DAINU, with considerable variation in price. These are probably all made in the same place in China, so the possibility of directly importing only the finger rakes should be looked into.

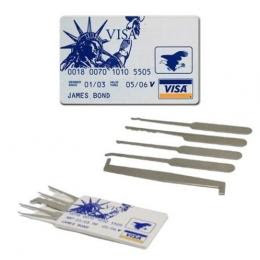
The second set that I am looking at is one that I brought when I first began buying lock picks. It was a fun purchase of what I considered a novelty item.
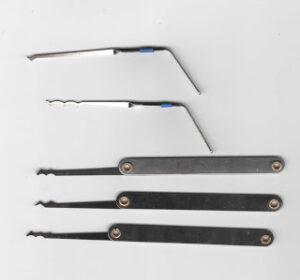
As you can see, it comes in a box printed as James Bond’s credit card. (Visa? I would have thought Access as better for lock picks!). The design on the box will actually vary, some websites offering a blank fronted box. I am a bit dubious as to the tactical practicality of pick sets apparently designed to fit in a wallet. It seems if you are illegally detained, your wallet and jewellery are very likely to be taken off you. This kit seems a little thick to fit in a wallet, but my wallet is one that only holds cards and is a little on the small side, so others may feel differently.

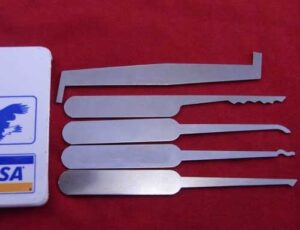
This kit was a surprise. The picks are actually quite nice! Several times on this blog I have mentioned the poor finish and crude production methods of some Chinese-made lock pick sets. The picks in this set are nicely finished with a good polish and smooth edges. The metal seems adequately springy. I have seen one video where the picks showed signs of rusting, so watch out for this if you carry them in humid conditions. It seems I was lucky with this example. The second of these kits that I brought was of much cruder finish.
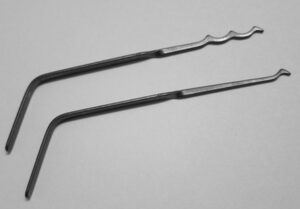
The kit has two Single Pin Picking (SPP) lifters: a hook and a half-diamond. You also get two rakes: a snake and a jag/ city rake. The fifth piece is a turning tool. I have seen one video on youtube where the kit came with two hooks instead of a snake. I have also seen a kit offered for sale with a training lock that apparently has a duplicate snake instead of the jag.
I have heard complaints that the tools are too short but I have not found that to be a case. My Bogotas are probably shorter. The short handles may be an issue if you are using them for prolonged SPP. For the rakes, the short handles are perfectly adequate.
I like the snake rake. Last night I even opened my Abus with it. Regular readers know I am not a big fan of jags and ideally I would rather have seen a two or three-hump Bogota in this kit instead. I suspect the kit predates Bogotas, however. That said, this jag works very well. Using it as a rocker, it has opened several of my practice locks in well under a minute.
The one piece I do not like is the turning tool. It is too thin for a turning tool of this type and the noses too narrow. Used centre of the cylinder (TOK) it continually pops out. It is not much better edge of the cylinder (BOK). The best use for it may be to grind it into a Bogota!
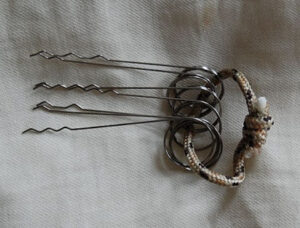
This kit may be more practical if carried without the box. I have seen suggestions for drilling a hole in each handle so they can be carried on a split ring. Or rivet them to create a fan. There are key carriers that resemble jack-knives and this is potentially another way to carry this set. The short handles could be used as a tang to fit a longer handle.
The reason I think this kit may be of interest is that it can be found at very low prices. I paid just a few pounds for mine and the vendor also sent me a free booklet on lock picking. I have seen these sets at even lower prices. Then again, I have also see the same sets at five or six times this price, so shop around.
Categories
Phillosoph

Escape: Handcuffs and Double-locks.

Version 1.1

Today’s blog is the second part of our look at handcuffs. Once I have this out the way I can move on to the product reviews and suggestions.
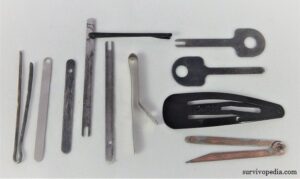
I have seen suggestions that the handles of some lock picks can be used as shims. Most lock pick handles are way too wide for such use. Even types like the Bogotas that have handles designed to serve as turning tools are likely to be a millimetre or so too wide for many handcuffs. What can be done, however, is to use the head of a pick. Obviously some designs of head are too wide. Picks I have successfully shimmed with include my half-snowman, the Dangerfield one-hump Bogota and the jag from the “James Bond Credit Card” set. Some of the snakes and hooks should also be suitable.

Another experiment I conducted was to use a handcuff shim on a cable tie. As I suggest in the previous post, I have further slimmed down the single end of the shim I made. With it I have successfully disengaged the locking mechanism of a cable tie. Admittedly the tie I had handy was larger than average but I believe the tool should be effective on standard sized zip ties too.

In the last post on handcuffs I dealt with how to deal with single-locked cuffs. If you are in cuffs for any length of time a trained captor is likely to double-lock them. This is why I am rather dubious about E&E sets that contain a multitude of different shims.

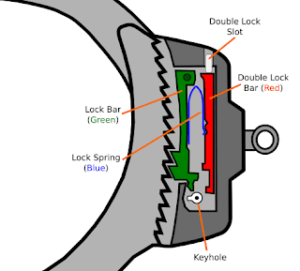
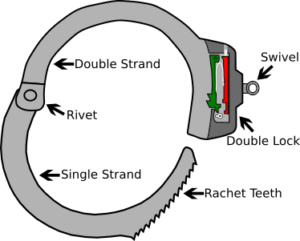
In the diagram above the double-lock mechanism is in red. Whilst the green single-lock pawl moves up and down, the double-lock mechanism slides back and forth (or up and down, with respect to the diagram above). The single-locking pawl is under constant pressure from a spring. The double-lock mechanism, however, clicks from one position to another and back again. When the double-lock is applied the red piece will physically prevent the green part from raising. Hence when a double-lock is applied the cuff cannot be further tightened and cannot be shimmed.
In the diagram above, you can see a channel above the double-lock mechanism. The handcuff key has a post that can be inserted into this hole to push the double-lock into the locked position. A paper clip, pen refill or any object of similar dimensions can be used to apply this lock if a key is not handy. Incidentally, looking for a post on the key is a good way to determining if the handcuffs you are considering buying a “real” or a novelty item. On some designs of handcuff there is a slot cut in the side and the lock is applied by using the post to flick across a “trigger”. A handcuff of this type can be seen in the “Secrets of shimming” video in the previous post.

To disengage the double-lock you normally need a key. The key is turned in the opposite direction to that you would use to open single-locked cuffs. First the double-lock must be released, then the key turned in the opposite direction to release the single-lock. In the diagram above the key would first be turned anti-clockwise, and then clockwise.
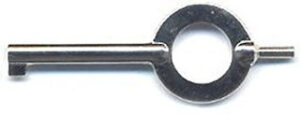
The primary means of dealing with double-locked cuffs is a key. You are advised to spend your money on acquiring a few keys before you invest in commercial shims. Later articles will look at some of the E&E keys available. But a word of caution:
Many years ago I watched a movie about undercover cops at a high school. In one scene a youth spots the handcuff key on a policewoman’s key ring. He says something like “I’ve been busted enough times to know a handcuff key when I see one!” The supposed schoolgirl manages to talk her way out of it, making some comment about being kinky or similar. Having a handcuff key in plain sight on your key ring may get you identified or mistaken for a cop, and the results of this may be more serious than in the movie. Some cops will take a dim view of non-police having handcuff keys, regardless of what the actual local laws permit. Likewise, in some localities carrying of a handcuff key(s) may be illegal. Escaping from legitimate custody is certainly illegal. The techniques on this blog are intended for protection against illegal restraint.
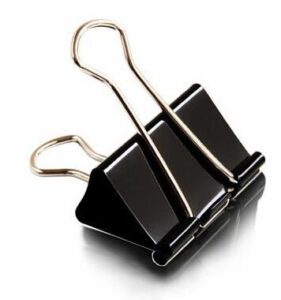
If you do not have a key there are a few things you can try to release a double-lock. Some lock picks can be used to push the bolt back to its unlocked position. Probably these will be hooks, but I have done it with the Dangerfield single-hump Bogota too. I’ve used the same tool to then lift the single-lock. The bulldog clip handle and some other improvised means work better for the latter, however.
A better way to disengage a double-lock is to use a hairpin aka bobby pin. Strip the protective bulb from the end and bend the straight part. Contrary to what you may see in many youtube videos I have found that a gentle curve with a radius of about 18mm works best on the cuffs I have tried. If the slot at the bottom of the keyway is “6 o’clock” then you want to insert your piece of pin at about “2 o’clock”. Give it a vertical angle of about 30-45 degrees. The idea is that it curves around the post and the wall of the keyway to push on the bolt until it clicks across. Bend the pin more as necessary. You can use this slightly curved pin to shim the cuffs once the double-lock has released.
Transparent training cuffs, such as those supplied by Shomer-tech are useful in learning this technique, but be aware doing this repeatedly can damage the plastic around the keyhole. Once you have the basics practice on all metal cuffs.

No discussion of the double-lock would be complete without some mention of kinetic unlocking techniques. The idea is to strike the cuff against a hard surface so that conservation of momentum causes the double-lock bolt to bounce up to the unlocked position. I’m told that this trick is more likely to work with older models of modern handcuffs. A related technique is pull on the shackle of the cuff as the body is struck. The theory is that if the double-lock does not fully disengage it will still move enough to allow the pawl to temporarily lift. Pulling on the shackle while striking the cuff seems a rather complicated operation if you are on your own.
The Darby-style handcuffs that Houdini was familiar with were vulnerable to being opened by striking. Strike near the hinge and keyhole. Darby-style cuffs are still in use in some parts of the world.
Categories
Phillosoph

Serenity Plus Lock Pick Kit

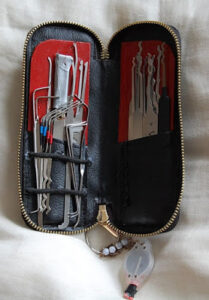
Finally acquired the last component for my locksport kit, so it is time for a quick show and tell. I have come to think of this as my “Serenity Plus” kit.

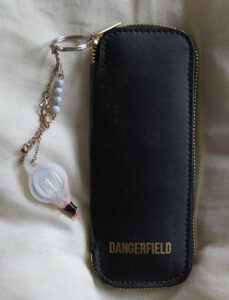
The Dangerfield pouch that was provided with the Serenity kit as a free upgrade. Note that I have added a small Photon II-style light to the zip-pull. Also notice the home-made red filter made from a red drinking straw and electrical tape. I usually watch TV with the lights off. The light lets me select a pick from the case if I feel like picking a lock during the advertisements.

The pouch opened. Note that I have lined the pouch with red painted plastic backing. Appropriately enough these were created from security key cards, painted with red enamel paint. An elastic hair band has been cut and glued in position to hold the turning tools and hybrid picks. Not clear in the photo is that the right side includes a couple of hair pins, useful for making small turning tools, opening handcuffs and similar.
The right side of the pouch contains rakes and the left side lifters. The distinction between these categories is fuzzy, however. Various lifters can be used to rake or rock, and often this should be the first technique attempted with them. Rakes can sometimes be concentrated on a single binding pin. The Princess and Prince inverted are effectively deep hooks.

The contents of the left side. From the top:
    • Swerve rake from Serenity kit.
    • Bogota triple hump from Serenity kit.
    • Princess rake from Serenity kit.
    • Prince rake from Serenity kit.
    • Snake rakes from SouthOrd. Large, small and angled small.
    • Sandman rocker rake from Sparrow.
    • Octo Rake from Sparrow.
    • Warlock rake from Sparrow.
    • Worm rake from Sparrow.

The all important turning tools:
    • Wide tool made from laboratory spatula.
    • Pair of Soho rakes from Dangerfield.
    • Triple hump Bogota from Dangerfield.
    • Single hump Bogota from Dangerfield.
    • Standard width turning tool made from laboratory spatula. Hooked end designed to open small warded locks.
    • Turning tool made from wiper insert. With standard and narrow heads.
    • Serenity kit turning tool modified to have additional narrow head.
    • Prybar-type turning tool from Serenity kit.

Contents of the right side:
    • Razor pick with home-made protective cover. Note fishing line to prevent loss.
    • Curved Reach Ball hook from Serenity kit.
    • High hook from Serenity kit. (Steep/ Postal hook?)
    • Angled Ball hook from Serenity kit.
    • Half-diamond from Serenity kit.
    • Partial hook from SouthOrd.
    • Half-snowman rake from SouthOrd. Made by filing down SouthOrd’s double-ball pick.

And as a bonus, my set of finger rakes, aka mini-rakes. These do not really fit in the kit but are something you are recommended to acquire. Intended to fit very small locks they work very well in standard sized locks too. Because they are springy they are more scrubbers than rockers. They tend to sell out fast when they are in stock. I’d like to thank Marcus of UK Bump Keys for his efforts to get me a set.
I make that as 28 items. Admittedly, there is some duplication with the turning tools but I do not consider that a bad thing. The half-snowman was an indulgence and just a bit of fun. Many of the other rakes will do anything this pick can, and probably in less time. I brought the snakes since I expected some locks would be difficult to use the Bogotas in. They have not seen much use, and I now have the finger rakes. The Sandman has not seen much use and I suspect it is better suited to American locks. Not found much use for the Swerve rake either. The Octo rake and Warlock, on the other hand, are very impressive. I’d put those on my must-have list right after the Bogotas. I have had little SPP success with the high hook. It has got stuck in a lock at least once! I may file the end round to create a Gonzo-style hook. I have not had much use for the razor pick yet. It only works on certain locks and I have yet to encounter any. Those E&E enthusiasts that think they can open any padlock if they have a razor pick are pr0bably in for a shock!


Categories
Phillosoph

Escape: Handcuffs and Shimming

Today I am going to look at ways to bypass the single lock of handcuffs. To do this it will be necessary to briefly describe the mechanism we will be dealing with.

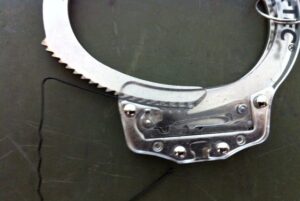
A typical pair of modern handcuffs uses a very simple mechanism. As you can see, the shackle/ strand (the moving part) has ratchet teeth. The teeth are engaged by the teeth on the pawl  (green part) within the mechanism. The pawl allows the shackle to move in but not be pulled out. In “single-lock” mode the handcuff can be tightened but not loosened. The handcuff key engages the pawl directly and lifts it up, disengaging the teeth and allowing the shackle to be opened. Note that the pawl is under spring tension so will drop if the pressure from the key is removed.

Above the pawl is a second mechanism (red). When this mechanism is engaged the handcuff is termed to be “double-locked” or “transport-locked”. When double-locked the pawl cannot rise, even if the correct key is used on it. The shackle of a double-locked handcuff can be neither tightened nor loosened. I will deal with double-locked cuffs in more detail in a future post. Today it is sufficient to understand that the techniques I will describe only work on single-locked cuffs, not those where the transport-lock is still engaged.
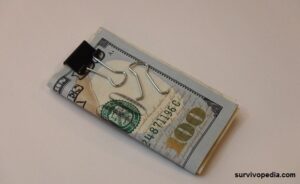
One way to unlock single-locked cuffs is to raise the pawl, mimicking the action of a standard key. For most cuffs this is relatively easy since the key has a simple flag without any cut-outs or other distinctive features. A variety of items can be used instead of a key. Bulldog clips, of the type that are triangular in section and have separate wire handles are very good for this. Obviously, these can be found in office environments or in desks. A desk can provide a prisoner with a variety of items that can be used for escape! Remove one handle and use the hooked end in the keyway of the cuff. Transparent training cuffs are very useful to have available when learning these techniques. Be careful of putting too much pressure on the plastic face of a training cuff and damaging the keyway.
The second technique for single-locked cuffs is shimming. This may be attempted when you do not have something to use as a key or when the keyhole is difficult to reach. Probably the best way to learn shimming is with a hair pin, aka bobby pin. Transparent training cuffs are very useful here.
Take a bobby pin and pull the protective blob from the end of the straight side. Open the pin out and give the straight side a slight curve. Slide the straight end of the pin along the top of the ratchet teeth on the shackle and into the housing. The pin can go no further when it is up against the pawl. You now need to push the shackle inward while also applying gentle pressure to the shim. This will obviously tighten the cuff but human wrists can take a measure of compression. If you do this correctly the pawl will raise and the shim will slide between it and the shackle before the pawl can descend again. If your shim is sufficiently inserted the teeth of the pawl and the shackle will be separated by the shim and cannot engage. Keep moderate pressure on the shim and you should be able to pull out the shackle.

The chief merit of shimming is that a variety of items you may have on your person or in your surroundings can be turned into shims. If you do not have a bobby pin then a paperclip or various bits of wire can be used in the same fashion. Shims do not need to be metallic. Strips of card or plastic may be suitable. Strips of aluminium soda can seem too flexible but this might be solved by folding them. The material used for the can ends is thicker. One way to use a piece of can as a shim is to fold it into an inverted U-section shape. This may not be practical if the shackle is a tight fit within the housing. It may not be possible to slip the material between the side of the shackle and the inner wall of the housing. A large plastic drinking straw may be used as a shim in the same fashion. Be careful when handling strips of soda can. You can easily cut your fingers and the blood may make your escape attempt more problematic.
If you carry an escape kit then including some purpose-built shims is prudent. Some users carry quite a variety but in reality you need two types at most, with perhaps a bobby pin or wire for very narrow cuffs.
Commercially available shims tend to come in two forms. There are standard shims and “split” shims that have a notch in one end. Some handcuffs have obstructions intended to prevent shimming and the notched shim is supposed to counter this. The commercial notched shims I have seen only have a notch of a few millimetres depth. Some high security cuffs have obstructions that seem to be deeper than this.

Most commercial shims are made of steel. Some websites specify stainless steel but very few also provide the information as whether the stainless steel used is also non-magnetic. For an item such as a shim that you may want to conceal a low magnetic signature is an attractive feature.
While I was pondering this problem I discovered the turning tools I had made from laboratory spatulas were not magnetic!
Like many items of scientific equipment, lab spatulas are often subject to massive mark-ups. Price may vary fiftyfold so shop around.
The spatula is slightly over 3.5mm width so needs to be narrowed down a little for use as a shim. Round the corners and bevel the ends a little while you are working on it. I chose to slot one end. I used the cut-off wheel of a Dremel for this, which is probably not the best (nor the safest!) tool for the job. Not the neatest job I have ever done but sufficient for illustrative purposes. Use abrasive paper on the shim to polish it and remove any rough edges. The shim should have a slight curve. Passing it through a handcuff’s mechanism a few times creates this.
I don’t currently have any cuffs with anti-shimming features to test this shim against. It works very well on the training cuff and both the bifurcated and non-bifurcated ends can be used with this. The length of this shim lets me insert it across the full width of the cuff. This results in the handcuffs looking like they are secure but capable of being pulled open when desired.
Some cuffs use a narrower shackle as an anti-shimming measure so perhaps the non-bifurcated end should be narrowed even further. This would result in a tool that has an elongated Y-shape or that resembles a very slim tuning fork!

Many thanks to Shomer-tech for providing me with the transparent training cuff.
Categories
Phillosoph

Escape Introduction

In a certain adventure series I watch one or both of certain events are likely to happen every few episodes.
The first is that the protagonists are likely to find themselves deep in dark woods with no phone reception.
The second is that one or both of them will be knocked out and wake up tied up somewhere, usually with a gloating adversary.
You’d think that they might consider investing in a pair of satphones, or some other alternate communication options. Investing in some counter custody equipment would also be logical.
Escape and Evasion (E&E) is not just something for action heroes and spies. Many of us are more at risk than we realize. I can think of at least two people that I know who have been victims of illegal abduction. Neither were wealthy. In one case the motive was rape. Fortunately both incidences ended happily, except for the would be rapist, and I have no problem with that result.
Today’s blog is an introduction to a series of forthcoming posts on the topic of escape.
An abductee may face confinement and/or restraint. I have already addressed confinement to some degree with the articles on lock picking. Lock picking is a non-destructive technique and if you are illegally confined you should have no qualms about damaging property if it allows you to escape.
This blog has also looked at some methods against physical restraint, most recently with an article on escaping zip-ties. For convenience let us divide physical restraint into four broad categories.
The first of these is restraint using cordage. This may be rope, leather thongs, string, wire or a variety of similar items. Here your main options are cutting the cord or undoing the knots. The practicality of each very much depends on the materials used and how you have been tied. Your teeth can be used to chew cord or manipulate the knots. If you cannot reach your own bindings you may be able reach those of a companion. Hands may be restrained before or behind you so any escape gear you carry should be accessible from either posture. Look for edges that you can abrade the cordage against. Look for objects in the locality you can break to create cutting edges. Items such as lighters can be used to burn through bindings.
Once you are free do not neglect the potential of the remaining cordage as a tool or weapon to further aid your escape.
The second class of restrain is that using chains and manacles. In the modern world the most commonly encountered of this category are handcuffs. Such restraints are much harder to break or cut. There are ways to bypass or damage the mechanisms, however. Ways to deal with handcuff restraint will be detailed in forthcoming posts. I’ll be assessing the merits of some of the commercial products offered.
A more recent category of restraint is the use of adhesive tape such as duct tape. I have looked at ways to break such restraints in a previous post. Many of the techniques suggested for use against cordage can also be applied to tape, with the obvious exception that there are no knots to attack. Your location may include organic solvents that can be used to weaken the adhesive. Possible sources include petrol, brush cleaner, paint thinner, stove fuel, nail polish remover, alcohols and similar.
The last category is that of zip-ties and similar devices. A variety of techniques against these have been covered in previous posts. Future blogs will look at some of the tools you may use to apply such techniques.