I have just read a book called “Traditional Ninja Weapons” by Charles Daniel. Yes, there are a few books out there with “ninja” in the title that are worth reading.
Today, I want to look at just one of the ideas in this book.
The author suggests that most weapons can be divided into three general classes as either “battlefield”, “duelling” or “surprise self‑defence”.
Battlefield Weapons
Battlefield weapons are intended for uses when true one‑to‑ combat is rare. Often these weapons are offensive orientated since since armour, shields and/or terrain are used for protection.
Daniel lists “axes, spears, maces, giant swords and halberds” as examples.
Battlefield weapons are often distinguished by their reach or range. Many are designed for open terrain.
Battlefield weapons are often specialised, optimised for use against certain targets and relying on differently armed comrades to handle other threats.
While Daniel talks about traditional/historical weapons, these criteria continue to apply to more modern battlefield weapons.
Duelling Weapons
Duelling weapons are usually intended for one‑to‑one confrontations and usually, although not always, fight like against like. The duel is distinguished by the feature that the combat will usually be subject to some rules and restrictions.
Some duelling weapons are variants of battlefield weapons. Weapons similar to duelling weapons may appear on the battlefield, but they are often backup or secondary weapons.
Daniel gives the katana, jo staff and rapier as examples.
Surprise/Secret
Daniel defines “surprise self‑defence” weapons as including those that the opponent does not learn about until too late.
I prefer to call this class “surprise/self‑defence” since some surprise weapons are not defensive and some self‑defence weapons are not used covertly.
Daniel gives “nunchaku, butterfly knives, walking sticks, weighted chains and many of today's "ninja" weapons” as examples.
Weapons of this class tend to be used as short ranges, be convenient to carry and may be concealable.
So what? you might ask.
This is an interesting concept, since it encourages us to look at weapons and their use within the context of the environment they were intended for.
The short staff or half pike, forest bill, partisan, or glaive, or such like weapons of perfect length, have the advantage against the battle axe, the halberd, the black bill, the two handed sword, the sword and target, and are too hard for two swords and daggers, or two rapier and poniards with gauntlets, and for the long staff and morris pike.
The long staff, morris pike, or javelin, or such like weapons above the perfect length, have advantage against all manner of weapons, the short staff, the Welch hook, partisan, or glaive, or such like weapons of vantage excepted, yet are too weak for two swords and daggers or two sword and bucklers, or two rapiers and poniards with gauntlets, because they are too long to thrust, strike, and turn speedily. And by reason of the large distance, one of the sword and dagger-men will get behind him.
The Welch hook or forest bill, has advantage against all manner of weapons whatsoever.
Yet understand, that in battles, and where variety of weapons are, among multitudes of men and horses, the sword and target, the two handed sword, battle axe, the black bill, and halberd, are better weapons, and more dangerous in their offense and forces, than is the sword and buckler, short staff, long staff, or forest bill. The sword and target leads upon shot, and in troops defends thrusts and blows given by battle axe, halberds, black bill, or two handed swords, far better than can the sword and buckler.
The morris pike defends the battle from both horse and man, much better than can the short staff, long staff, or forest bill. Again the battle axe, the halberd, the black bill, the two handed sword, and sword & target, among armed men and troops, by reason of their weights, shortness, and great force, do much more offend the enemy, & are then much better weapons, than is the short staff, the long staff, or the forest bill.
Weapons that perform well in private fights and those needed on a battlefield, differ in their desirable properties.
For example, it is now obvious why martial arts that have become sports often perform poorly when the sportsman has to defend themselves. There are no proscribed tactics or targets, no notification that attacks may begin.
Similarly, some techniques originally intended for the battlefield do not work in other contexts.
Skill in grappling may be decisive in a one‑to‑one encounter, but in other situations rolling on the ground will just give other enemies an easy kill.
I will tell you something that most martial arts teachers and self‑defence instructors do not like to admit. Some do not even admit it to themselves.
Many of the techniques you may have learnt will not work if your attacker has a knife.
Switching to a specialised set of anti‑knife techniques is not a solution. In many knife attacks, the defender fails to see the knife before the attack. Poor lighting, crowded conditions or competent tactics by the knife-man are just some of the factors that can hide a blade.
ATACK: Assume That Attacker Conceals Knives. Treat any attack as a potential knife attack. Defend accordingly.
Whenever you learn a technique, you should be asking yourself several questions:
• Will this technique be practical if the attacker has a knife or other weapon?
•Is the attack realistic? Would it reach the defender and is the attacker maintaining a guard?
• How would I counter this technique if I was the attacker?
• Would this technique work against someone not fighting in my style or a particular style?
Today’s blog expands on an observation I made in a previous post.
I noted how frequent it was that many tai chi defensive movements presented the outer surfaces of the forearms towards an enemy.
The inner side of the forearm has a deeper covering of flesh. Within these muscles are the radial and ulnar arteries and the radial, medial and ulnar nerves.
A strike to the inner forearm may numb the nerves, reducing the limb’s ability to defend or attack. A cut to the inner forearm may sever one or more arteries, resulting in a potentially fatal bleed‑out.
If you cannot avoid taking a blow or cut, taking it on the outer rather than the inner side of the forearm is preferable.
Cloth, such as your sleeves will help reduce any damage from a knife strike. If you are a law enforcement officer or in a similar role where knife attack is probable, make a habit of wearing gloves or fingerless gloves.
Here I will remind the reader that parrying actions are secondary defence techniques to evasion and avoidance. Techniques such a ginga and dodging will keep away from knives. Parries are used when evasion fails, or as a component of a counter‑attack action to control the weapon hand.
An effective parry does not just redirect an attack, but includes motions that remove potential targets from the path of the attack.
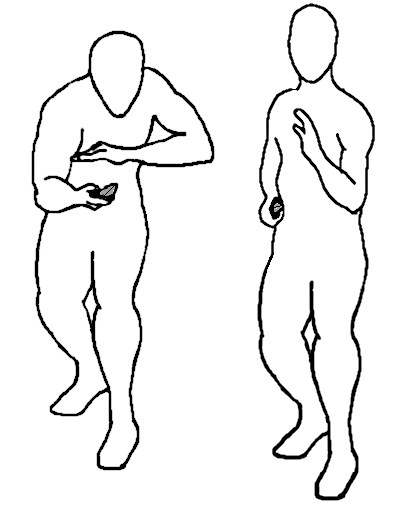
Palm-In Parrying
Many tai chi defensive movements/“postures” place the lead hand with the back of the hand toward the enemy or uppermost. This orientation protects the inner forearm area from the most likely direct attacks.
One of the most obvious example of this is peng/p’eng/wardoff. The lead arm is held curved and roughly horizontal before the body, back of the palm towards the threat. The rear arm is usually held below or behind the lead arm, often orientated so the inner forearm is protected.
“In this posture the harder area of the forearm is used to block [parry] the attack and so not damage the soft area of the arm.”
In other movements, such as “Grasp sparrow’s tail” we see the lead arm in a more vertical position, but once again the back of the palm and outer forearm are towards the enemy.
Parries with the outer forearm may utilize the ulnar edge of the forearm, in much the same way that parries with the palm may utilize the edges of the hand. Avoid parrying bone against bone, however.
Parries from such movements are often taken with the outer forearm making initial contract. Combined with waist movement, the arm may rotate to redirect the attack. This action may result in the hand being placed palm down on the limb. This contact may be used to grab, hook, redirect, push, control or to sense the foe’s next actions.
For an example, see the illustration of the “Outside Crane” in “Attack, Avoid, Survive”. Contact is made with the back of the hand and the hand rolls to hook the fingers over the arm.
Such contacts should be transitory. Leave a hand in contact too long and the foe may try cutting it.
For those familiar with wing chun, it will be appreciated that tan/taan sau/sao is an outer forearm towards the enemy configuration.
Palm-First Parries
Of the tai chi movements that do not present the back of the hand, many instead make initial contact with the palm or fingertips. Many of these use an approach angle that still protects the inner side of the forearm.
Under parries with the palm, I choose to include those movements that make initial contact with either edge of the palm. This is the “knife‑hand” between the base of the little finger and wrist, and the “reverse knife hand” surface between the base of the thumb and wrist. A contact made with the edge of the hand may roll into a contact with the palm. A contact with the palm may transfer to the a palm edge.
It is also possible to employ the edges of the palm when making palm-inward actions.
Remember that palm‑first actions may be parries or strikes. In fact, the only difference between a strike and a parry is often one of context and opportunity.
One of the aspects of simultaneous attack and defence is that one body-part may attack as another defends. Another aspect is that a defence may also attack and an attack also defend.
The back of the palm is also a striking weapon. For example, from peng, either hand may deliver a potent backhand strike under the jawline to the Stomach‑9 point on the side of the throat.
Less potentially lethal, the back of the hand may simultaneously hit the points above the eye and under the cheekbone.
Quadrants of Parrying
In previous writings, I have talked about the “quadrants of defence”. Most attacks may be parried by either a inward or outward parry, and will require either a high or low level parrying action. Your parrying response thus constitutes either a rhomboid or a rectangle, depending on the fighting method you train in.
The “back‑of‑the‑hand” or “palm‑in” parries are very well suited to outward parries.
From “hold the ball” or “grasp the sparrow’s tail” the arm is easily dropped to swing outwards for a low parry or flicked up and outward against a higher attack. Because tai chi teaches you to hold your arms relaxed, such actions can be very fast and strong.
The outside of the forearm in the primary contact area, although the back of the hand may slap an attack off line. More of slapping‑style parries a little later.
Inward back‑of‑the‑hand parries may need a bit more practice.
The high inward parry may be made as a chopping action, contact area most likely being the ulnar edge of the forearm or the knife‑edge of the hand. Allow your arm to relax and power the motion by a waist twist and footwork.
The low inward back‑of‑the‑hand parry I find a little more awkward. You need a sort of combined swinging/thrusting action, with a waist twist to power it and take potential targets out of the way. This resembles the low parry of karate, but is thrust inward. A hikate action can help with the waist action.
Palm‑first parries, including knife‑hand and reverse knife‑hand actions, may either parry inward or outward. Their drawback is that using the hand rather than the forearm, the defender must be more accurate and there is a greater probability of failure.
In addition, certain palm parries will expose the inner forearm to attack. Favour palm parries that keep the outside or the forearm uppermost and/or towards the enemy.
When practical, use double‑handed parries rather than single‑arm inward parries. The outward parrying arm of the pair will probably be in a back of the palm outward configuration, with the outside of forearm available to parry.
Some parrying actions that used crossed arms were described in the last post. Practice these so the outer sides of the forearms are always outward/uppermost relative to the enemy/threat.
Double‑handed parries need not be made with the arms touching each other. See the illustration of an “inside crane” in my book. The rear arm makes an outward parry with the outside of the forearm and the palm inward, and the lead hand makes a knife‑hand parry with the outer forearm upwards.
Ready stances such as boxing ready, fighting ready and p;eng hinge should be practised with the back of the hands and forearms towards the enemy.
Erle is shown in a variant of p'eng hinge (above). This posture looks non-aggressive, but one arm is positioned ready to defend the upper body, the other the lower and they both may act together.
Another useful pre‑combat stance is to stand with one hand over the other, both around belt‑buckle level.
A defence against a high hooking strike is to bring your hand up to the side of your head, as though brushing back your hair (if you still have some). Ideally this action sweeps across the face on the way. This defence also utilizes the outer forearm area of the bent arm.
Commonly depicted as a blocking action, this can be made into a parry/evasion by turning toward the attack and dropping downward and moving backward. This spiralling action may be used to drive the other hand out in a counter‑strike.
This action may offer some protection against a high knife attack, reducing the severity of an injury at least.
Combine this arm motion with ginga and you have esquiva.
Note that in ginga the bent arm presents the outside of the forearm towards the foe.
Whip/Slap Parries
In “Knives, Knife Fighting & Related Hassles”, Marc Macyoung recommends “whip/slap” parries. These “…originate from the wrist, using the elbow as a pivot point. One way of looking at them is, under control, you throw your wrist at an incoming strike. When done properly, the wrist will arrive at the destination the moment your arm’s motion is arrested. This allows for all of the energy to be transferred into whatever is hit.”
Striking or parrying with a relaxed or semi‑relaxed arm has obvious parallels with the tai chi techniques and principles described above.
When applied with the palm of the hand, the whip/slap parries clearly have a similarity to the tai chi palm‑first defensive moves already described. Obvious applications are as inward or downward parries.
As a parrying technique primarily using the hands, accuracy is needed as well as speed and relaxation.
The hand configuration shown in Macyoung’s book for the upwards whip parry (left) has a clear resemblance to the crane/turtle head/horse foot hand used in tai chi single whip (above). As the relaxed hand is flicked upward or outward, the wrist naturally bends and the fingers trail. Primary impact surface is the back of the hand or the wrist area.
I have seen a clip of Erle Montaigue conducting a knife defence workshop. A student stabs at Erle, so Erle twist to face right and brings an arm up in an explosive “Paint the fence, Daniel‑san” move, hitting the underside of the knife arm. Much to everyone’s surprise, this impact against the arm knocks the knife out of the student’s hand and high up into the air.
This nicely illustrates that a whip/slap type technique may be used even if the contract area is the outer forearm rather than the wrist or hand. This action is therefore applicable to movements where the back of the hand is towards an enemy.
A parry with the dorsum of a horse foot palm is not just for rising parries. The back of the horse foot hand may be directed as an outward horizontal or oblique parry or even as a downward parry with the fingers raised upwards.
When the fingers of a horse foot hand are horizontal this resembles the fook sau of wing chun, so may be used for indexing a foe.
As a defensive technique, horse foot hand may both parry and hook over attacking limbs.
The sides of the horse foot hand, or even the knuckles, may also be used to parry/strike at an attack.
Note that these defensive moves have mainly used the palm, knife-hand and hammer-fist, the primary weapons taught in Crash Combat. To these has been added the use of the back of the hand and the forearm.
This is a further illustration of how defensive moves may be used offensively.
First of all, I will make it clear that this blog is not about the infamous scissor block aka X-block.
The danger of this technique I have addressed in both my self‑defence books and on this blog a few times already.
Unfortunately, every forum seems to have at least one blow‑hard who knows a guy, who knew a guy who was attacked and successfully used a scissors block. If you get really lucky, it may work, but the odds are really heavily against you.
Many readers may have seen the “Surviving Edged Weapons” (1988) video. Around the 74 minutes mark there is a simulated attack where the police officer uses a scissors block.
As soon as he is stopped, the attacker drives the point of his knife into one of the cop's forearms and cuts deep along and down the forearm.
If you made the block with the palms towards the attacker, the way it is often taught, the radial and ulnar arteries and nerves will be exposed to this counter. Getting cut on the outside of the forearm is not much fun either.
As an aside, note how often defensive moves in tai chi present the outer surfaces of the forearms towards a foe.
A long bladed weapon may reach past the scissors block and injure the face or head. While it is unlikely an attacker would have a sword bayonet, bread knives or carving knives are possible threats. Such knives are found in any domestic kitchen or hardware store and often feature in domestic violence.
For an armed fighter with a weapon in each hand, such as a pair of sai, the scissors block may work.
Fencing masters such as Joseph Swetnam called this the “double parry” and recommended it as a technique by which the rapier and dagger could deal with powerful longer weapons such as a quarterstaff. Notable is that this is described as a parry, suggesting that it is used to redirect force rather than block/obstruct/oppose it.
Any technique that leaves a target in the path of a weapon has potential for a dangerous failure.
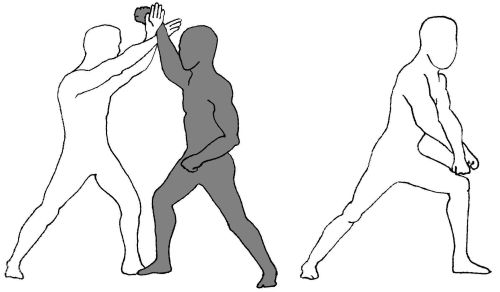
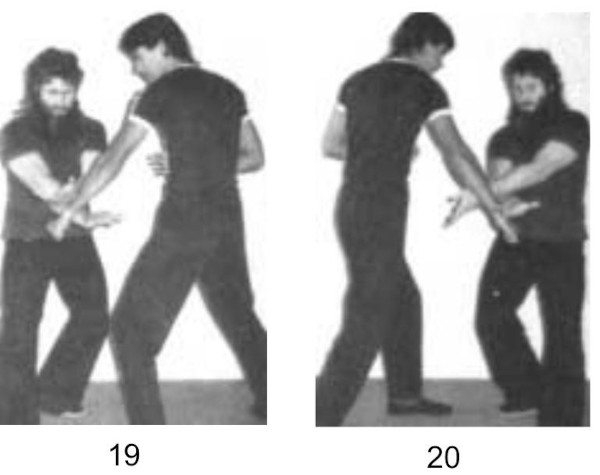
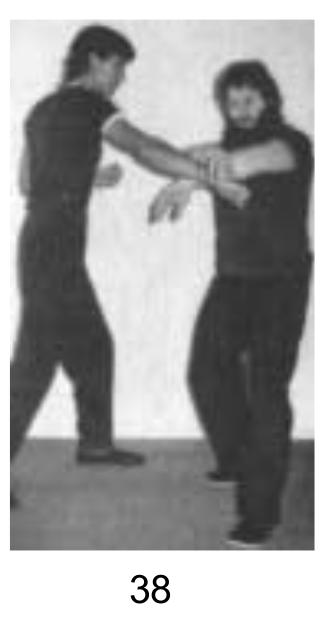
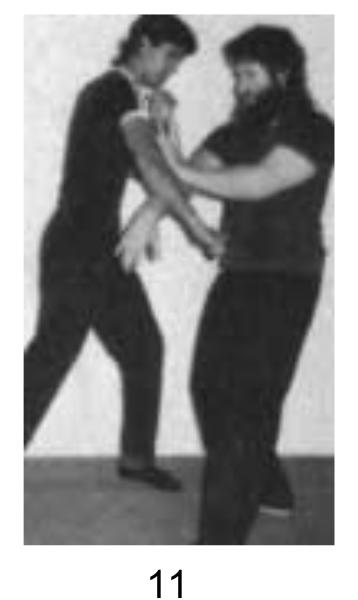
In my last blog, I supplied a link for Erle Montaigue's “How to Use T'ai Chi as a Fighting Art”. The term “scissors block” is used twice in this work. If the associated photos are examined (Nos. 19, 20, 38 and also 11) it will be seen that what is actually being used is a type of two‑handed parry. Waist rotation is being used to divert the force away to the side rather than trying to directly oppose or absorb it.
Rather than countering a vertical downward attack, the two‑handed parry is being used against low lateral attacks. A similar technique could be used against higher level attacks. A low cross hand parry is sometimes termed a “willow tree”.
One of the reasons for using two hands is as a counter to the folding principle. The other hand helps sense or inhibit attempts to slip another attack past a successful parry.
From long har chuan (covered in both my self-defence books) you will have learnt that one hand will often take over a parry to free the other for a more effective counter‑attack. This is facilitated if both hands are in close proximity when the initial defence is made.
With this in mind, it will come as no surprise that many tai chi forms have movements where the hands or wrists are crossed.
Both Yang and Wu styles have a movement usually translated as “cross hands”. Alternately, it is called “ten hands” since the Chinese symbol for the number ten is a cross.
The technique commonly called squeeze, press, ghi, ji or chee may also be looked at as a type of crossed hands. Some writers use the term “cross hands” when discussing ghi. Usually one hand is held with the back toward the foe, and the palm of the other hand placed on the wrist.
One of the applications of this technique is to grasp the head, chest or a limb between the two hands, hence the squeeze/press name.
The joined hands may also be used to push or strike when close to the foe. A variation is to place one palm on the back of the other to make a two‑handed palm strike. Erle notes the press attack can either be a powerful pushing movement or it can be a snapping downward attack.
Yet another variation uses one forearm to ward‑off (peng/p'eng) the foe's attack or body. The rear palm is placed on the forearm and body motion used to unbalance or strike the foe.
The next example is taken from “Wu Style Taijiquan” by Wang Peisheng and Zeng Weiqi.
Tai chi moves can often appear very abstract. In this technique, the fighter crosses his hands while apparently allowing one leg to cross behind the other. At first glance, this seems a questionable and potentially unstable move.
When seen in context, we see the twisting turn and drop to the right avoids and aborts the attacker's attempt to kick with his right foot. The motion further unbalances the attacker to fall to his left.
The twisting and dropping action has acted like a spring being compressed, allowing the tai chi fighter to explode upwards and knee or kick his unbalanced attacker.
Crossing the hands puts them in a position from where they can be thrown outwards for balance, or as an alternate or follow-up means to strike.
For a casual-looking ready stance, place one hand over the other at around belt-buckle height. From this position a variety of defensive or counter-offensive moves can be made.
Weapons
Many of the techniques described above may be used if you are only wielding a single weapon.
If you are using a baseball bat or hiking staff, you will most likely hold it like a katana with both hands. The weapon may be wielded to defend either side.
If using a weapon with less grip area, such as a knife or baton, it may seem that you unarmed side is less defended. The solution is to bring the weapon to the same central location that a longer weapon would be used from. The unarmed hand is brought up to around the opposite shoulder to defend the chest and throat area. The Filipino martial arts refer to this as the “live hand”.
With a little thought, it can be seen that the unarmed hand may be brought forward to assist the armed hand in several of the two‑hand defensive and counter‑attacking techniques already suggested for unarmed use.
Essentially, you have created a posture where your inside gate is close. You keep your inside gate towards the enemy so that you may use either hand in defence or attack.
Many years ago, I read an observation that a shorter blade offered more control. I thought about the possibilities of a short, fixed blade on a full-sized handle.
There are, of course, a number of knife designs that use this strategy. Many wood-carving knives have blades much shorter than their grips. The familiar “Stanley”‑type knife might be included here, although the replaceable blades do sacrifice some potential strength.
And there are, of course, many tasks where a long blade is more suitable. If I want to quickly build a shelter, or turn wood into kindling, bigger is generally better.
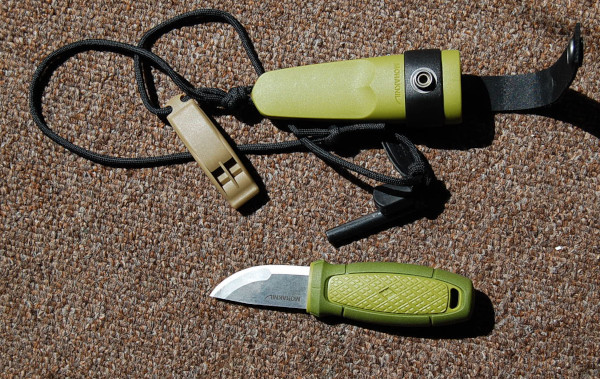
Regular readers are well aware I am a big Mora knife fan. I own a couple of Mora 860 Companions, a 511 and a Pro Robust.
Recently, I came across the Mora Eldris. A similar, short bladed knife had featured in an episode of the Netflix production of “Ronja, The Robber’s Daughter”.
Time for an early birthday present!
This is not going to be a full review of the Eldris.
There are a number of those on-line already and I have not had this knife very long. I will record some of my initial impressions and related thoughts.
I chose the green model. The colour is actually a yellowish-green and possibly a little vivid to be considered a camouflage shade. Rather resembles grass in the summer sun.
Some gear you want low-profile, other items you want highly visible so you are unlikely to lose them. I think my Eldris is more the latter.
Mora call this their “pocket knife” and I have even seen it ironically referred to as “the Mora pocket folder”.
It doesn’t fold, but it is small enough for many pockets, and does weigh a lot less than many pen knives and multi-tools. Certain legislations will prohibit carrying a fixed blade knife without good reason, no matter how short the blade.
The Blade
As one might expect from Mora, The knife is very well designed and very good quality.
Some reviews have listed the blade as 63 mm, while the box description claims 59 mm. Several different measuring instruments I used make it closer to 54 mm.
The blade is actually shorter than the main blade on many penknives.
The blade is short but broad. The blade is 2 mm thick, but one gets an impression of a very sturdy item.
Blade material is stainless steel, which is my personal preference for knives that may be used for messy jobs a long way from home.
At time of writing, I am not aware of any carbon steel variants of the Eldris, an option that Mora have offered for some other models.
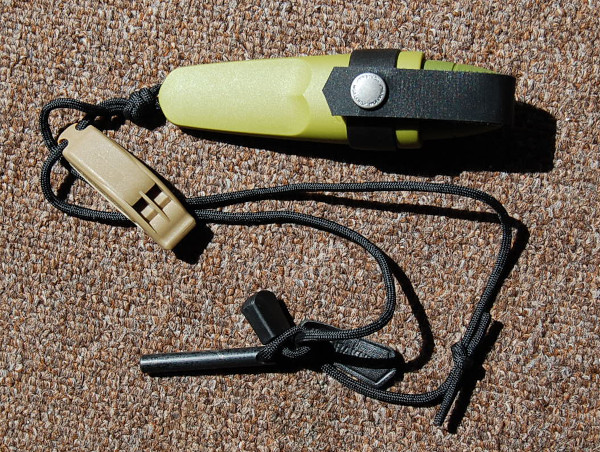
In addition to the Eldris, an Eldris Light Duty is available. The main difference, other than the colour choice and price tag, is that the Eldris has its backspine ground to act as a ferro‑rod striker.
The forward part has a wider bevel and thinner edge than that nearer the grip. This is a feature also seen on the Mora Kansbol knife. The blade has a Scandi-grind.
Out of the box, the knife felt very sharp. Many reviews talk about it seeming razor sharp straight out of the box. I used it to cut some cordage I was using, and the ends appeared very feathered.
I ran it down some crocksticks I had set up at 20 degrees. The knife did not feel so sharp to the fingertips, but cut a lot better.
I suspect a wire edge may have been the culprit, which is to be expected on a blade straight from the factory.
I suggest that new owners at least strop the Eldris before serious use.
The Grip
The grip is oval in both cross-section and shape. For some reason it reminds me of a Russian Doll!
Brand new, the grip surface has a slight tackiness. There are textured sections for increased grip retention.
I have relatively slender, skinny hands. The pommel of the grip sits within my palm. I suppose if you have really big hands this may or may not not be a good fit, so try before you buy.
It is possible to insert the knife into the sheath butt first if you really need a longer grip.
For most of us, however, the grip is quite frankly, excellent,
I am pleased to see the design includes a generously designed lanyard hole.
If Mora offered the companion blade on this grip, I would be very happy!
One of the reasons for the grip shape is that the sheath is intended to be ambidextrous. You may insert the blade with the edge either to the left or the right. Like other plastic Mora sheaths, the knife clicks securely into place and won’t be coming out until you want it.
The only thing the knife lacks is a belt hanger. This is a separate component, if you want one.
The belt hanger does not have a retention strap, but in genuine Scandinavian fashion, may be hung from a button instead of a belt (or a belt with a button?)
Accessory Kit
I brought my Eldris with the “Fire Starter, Secondary Lock and Paracord” kit. This came as a separate box stuck on to the bottom of the knife box.
I will call this the “accessory kit”.
The accessory kit, as Herny Ford famously said, is “any colour you want as long as it is black”.
This makes the discussion of the camouflage characteristics of the handle and sheath colour somewhat moot, since black is not a camouflage colour.
The accessory kit is mainly designed to make the Eldris a neck knife.
I have a couple of neck knives. One was once in production by CRKT and may be seen at the top of a photo in this article. Another was made and sent to me by a generous friend. A link I posted in another recent article shows 58mm Swiss Army Knives such as the Classic SD used as neck knives.
In my recent review, I noted that Mors L. Kochanski became well known for carrying a Mora knife on a neck cord.
The Eldris differs from most neck knives, in that it is a full-sized knife, be it one with a short blade.
It is probably a shade lighter than the knives Kochanski carried, but possibly not by that much, since a Companion or 511 are hardly heavyweights!
Secondary Lock
The “secondary lock” is a sort of frog/collar that fits around the sheath and mounts a strap across the butt to keep the knife in place.
The back of the sheath has two dimples which engage with bumps inside the collar section to lock it in place.
The instructions show that it should be pulled up the sheath until it clicks.
Presumably, the belt hanger fitting utilizes the same features.
As I already noted, the knife fits very securely into the sheath already. The secondary lock adds extra security since the knife is intended to be hung handle downwards when in neck knife mode.
When you first go to use it, the retention strap seems to be a little too short. You need to give it a bit of a pull for it to stretch and reach the popper. Whether this will change with use, I do not yet know.
Fire-Starter
The accessory kit also contains a “fire starter”. This is a fairly substantial ferro‑rod mounted on a short loop of cord.
The back of the blade of the Eldris (but not the Eldris Light Duty) is intended to be used as a striker for the fire starter. The user is cautioned not to use parts of the blade other than the back.
There is a little leather tab that according to the instructions is supposed to be folded over and braced against the end of the rod when the fire starter is being used. This is a feature I do not think I have ever seen with ferro‑rod systems.
I prefer to keep the knife blade still and pull the ferro‑rod backwards, and in this mode the tab seems to have no function.
The instructions show two ways to carry your fire starter with your knife.
The first appears to be passing the rod through its loop and securing it to the neck cord with a lark’s head knot. The rod on mine is too long to pass through the loop (or the loop is too short). Either way, I cannot do this with my example.
I later realized that the cord could be so knotted by passing the plastic fob through the loop. This needs to be pulled tight with the fob section as long as possible to prevent the fire starter sliding around. I positioned it so that it is unlikely to create noise by hitting the sheath, but am not confident it will stay there.
That leaves the second mode. The loop is dropped down over the bottom of the inverted sheath and finds a location just above the secondary lock, around the fat section of the sheath. To do this, the loop also needs to pass over the neck cord.
You therefore, cannot remove or stow your fire‑starter without removing the knife from its neck carry.
Like most similar devices, the ferro‑rod comes with a thick protective coating. Your first few strikes will be unimpressive until the coating is worn away.
Potentially, the second mode could cause rattling. Keeping the leather tab between the sheath and the rod seems to reduce this, and the rod mainly hits the compliant material of the secondary lock.
If you are hunting, it may be prudent to remove the fire starter from the knife. Having a neck knife swinging around may not be ideal anyway. Some animals have very acute hearing and what are relatively small noises to us may alert them.
The Cord
Last, but by no means least, the cord.
Mora call it paracord, but when is paracord paracord?
I ask this because I recently saw a “credit-card” survival tool that was wrapped with what was claimed to be “paracord”. Since it was about 2 mm in diameter, possibly less,
I am confident to bet this “paracord” is not 550 lb-rated, and very unlikely to be Mil-Spec 550. The cord was, however, perfectly good for the uses that it was intended for.
Worth remembering that real paracord can be too stretchy for many survival applications. That may be why your basha roof always sags!
550 lb paracord is 4 mm in diameter. Admittedly, paracord is made in other sizes. I have a 100 metre roll of 3 mm 425 lb-rated paracord that is more than adequate for the purposes I use it for.
Technically, I suppose it may be claimed to be paracord if it has been used to make parachutes. There is cord of under 2 mm diameter and only 95 lbs that is claimed to be paracord. Several friends will doubtless remind me that cats and beavers have been parachuted!
Mora chose to call the cord in this kit “paracord”. It seems more compressible than other paracord I have to hand. It is 4mm diameter, but does not feel like there are multiple internal cords within. The ends are heat sealed, and evidently there is a white core material. I don’t intend to cut into it to find out if it is “real” paracord or not.
It is, however, perfectly good cordage for the use it was provided for.
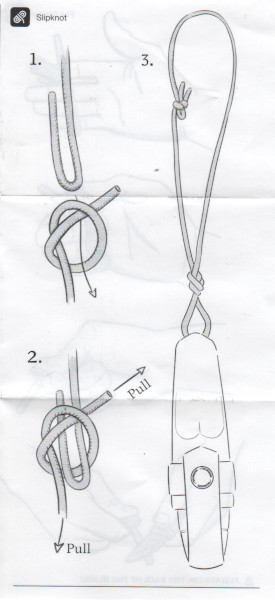
Fit the cord to the sheath exactly as shown in the instruction sheet. Feed one end of the cord into one drainage hole. When it emerges, feed that end back down into the sheath until it sprouts out of the other drainage hole. Pull on the cords until they are roughly equal in length.
Tie the two sections of cord in an overhand knot. The overhand knot near the sheath is supposed to reduce the tendency of the sheath to twist.
I tried a figure-eight knot, but it used up too much of the cord’s length. If you have a thick neck, large head (or big hat!), you may find the length of cord provided insufficient.
The knot suggested to join the ends of the cord is not one I have ever seen before. The instruction sheet calls it a “slipknot”, and no argument can be made that it is not a slipping knot. It is not the knot usually encountered as a slip knot, nor any of the other knots that sometimes use this name. It is not even the jam knot, a slip knot that pretends not to be one!
This knot, which I will call a safety knot, is simple. Tie a loose overhand knot in one end of the cord. Take the other end, fold it into a bight and place the bight in the eye of the overhand. Pull the overhand tight.
The utility of this knot for a neck knife or similar object is obvious. If the cord catches on something or the knife gets caught in machinery or similar, the knot will undo even when the force is not enough to snap the cord or break the sheath.
During wear, the end bight worked free, resulting in a single cord held firm by the overhand knot. This is an interesting alternative, which seems less likely to come undone when not desired.
You may need more security if climbing or working near water. The safety knot may be quickly modified into a fisherman’s knot.
When I assembled this, the first thing I thought was that the neck cord cries out for a whistle.
Unfortunately, all the whistles I have to hand were orange! The sheath colour really wanted something that complemented it more.
One thing I did find was that attempting to open the popper of the secondary lock pulled the safety knot undone, or loosened it. You will need to hold the sheath in one hand when opening the lock. You will also need to use both hands to draw the knife.
Conclusions
The Eldris poses several questions.
The first is, perhaps, is the accessory kit worth the money? It is a little pricey for what it is, even if a little cheaper if bought with the knife.
Paracord is pretty easy to acquire, and may be found in colours and patterns that better suit the sheath and grip colour than black.
The fire starter is of good quality, and more robust than some examples. Similar items may be acquired from other sources for a little less, however.
The main feature of this fire starter is that the loop is exactly the right size to fit around the sheath. I find the fob at the end of the cords a little ungainly and obstructive when the fire starter is carried in this mode.
Is this the best position to carry a fire‑starter? Would a butane lighter attached to the sheath with a rubber band (cut from a bicycle inner tube) be more practical? Said band could hold both a lighter and a ferro‑rod.
If you intend to carry the Eldris as an inverted neck knife, the secondary lock has an obvious appeal.
Something similar, however, could easily be constructed from some appropriately coloured webbing strap and a button. popper or Velcro.
The secondary lock may be “belt and braces” since I expect the lock in the sheath will prove to be very effective.
An interesting idea would be to use the lanyard hole to connect the knife to the sheath. Then in the unlikely event the two do part company, your knife will be lost. This precaution may be useful for other modes of carrying the Eldris.
It is a wonderful knife, but what are you going to actually use it for?
For some jobs, a longer blade is better. If gutting a fish or skinning a rabbit, I would be inclined to reach for a Mora Companion rather than an Eldris. The Companion is probably a more versatile knife, which is why one sits in my bug-out kit beside a kukri.
The Eldris has been touted as “the perfect knife for any outdoor activities” but that is clearly clickbait nonsense. Perfect if you also have a machete, saw, axe and Swiss Army Knife handy too, perhaps.
Perhaps it is unfair to compare the Eldris to other sheath knives.
The Eldris has been described as a pocket knife, or as having the virtues of a fixed blade with the convenience of a pocket knife.
It does offer an interesting alternative to many folding knives. It is stronger, simpler, and better suited to messy jobs. Lighter than many folders too.
The Eldris is a supplement to a good penknife, rather than a replacement.
I can see myself carrying an Eldris if heading into the wilds, but it would not be replacing the Companion or any of my other primary tools.
Mora’s main competitor for the Eldris is Mora themselves.
While the Eldris is very reasonably priced compared to many other outdoor knives from other companies, it is about three times the price of many other Mora models.
The Eldris has an obvious superiority in materials and design, but the cheapest Moras are still first class quality and outstanding value for money. Companions or 511 may be more versatile choices than the Eldris.
Within camp or when working, the Eldris might be handy for numerous minor cutting jobs, being handier than fishing out a folding knife.
It is a good choice for the sort of jobs an average belt knife may be a little big and clumsy for.
Personally, I have never really been one for neck knife carry. I may get more used to the idea with time. The cord may be wrapped around the sheath and the whole thing carried in a pocket until the neck knife mode was wanted, of course.
If you are not sure whether to invest in an Eldris, it may be prudent to buy a Eldris Light Duty first and try it for fit.
About a week ago, I posted the second part of “Knives You Need”, discussing Swiss Army Knives.
Since the first version went up, I have added more links and more content.
The pocket clip for my Swiss Army Ranger arrived, so I have posted an additional image of the new scales with the clip installed.
I have also put a few additional modifications on the page.
For today’s chapter of Survival Library, it seems appropriate that I look at two books that look specifically at the use of Swiss Army Knives.
Whittling in the Wild
If you are interested in Swiss Army Knives, you will have encountered videos posted by Felix Immler. Most of the links from my previous blog are to videos by Herr Immler, and for good reason.
There is a lot of rubbish on Youtube, but people like Felix Immler are a welcome breath of fresh air!
Immler has written several books on the Swiss Army Knife, but I have only been able to find a copy of “Whittling in the Wild”. It may be found under variations of this title such as “Victorinox Swiss Army Knife Whittling in the Wild”.
Felix Immler has apparently done a lot of work encouraging young people to experience whittling and create objects for themselves.
Most of the projects in this book are toys, fun‑stuff or curios. This is not the book to teach shelter construction or how to make a better rabbit trap. However, within these projects are many construction techniques that might be put to other uses, so they are worth a browse.
The book is worth reading just for the sections on safely using your Swiss Army Knife and basic handling techniques.
If you have young people you want to teach to use a knife safely and creatively, this is an ideal book. Many of us longer in the tooth and barer in the pate may learn a thing or two too!
Swiss Army Knife Camping & Outdoor Survival Guide
The second book is “Swiss Army Knife Camping & Outdoor Survival Guide, 101 Tips, Tricks & Uses” by Bryan Lynch.
Part One of the book mainly looks at a variety of knife models from Victorinox, ranging from the 58mm Midnight Manager to the SwissChamps and several of the locking blade models.There is a nice chart comparing the models included in the book.
Part Two is a nice section on safely using and maintaining your knife, including sharpening tools such as the wood saw and the chisel.
Part Three is on using your Swiss Army Knife in the wilds.
One oddity of this section is the author states that the distance of an arm‑span, fingertips to fingertips, is “roughly 5 feet (152cm)”.
Generally, the arm‑span is taken to approximate an individual’s height. For me this is bang‑on: distance from the centre of my chest to finger tips is exactly half my height.
The author later mentions that he is “a little on the short side”. The quick measuring scale he illustrates will not apply to the majority of readers. As he himself states “Obviously everybody is different, so premeasure your own limbs”.
Most of this part are presented as “projects” with an estimated time. Most of the projects are survival ideas that will be familiar from other sources.
Many are nicely described, and include the occasional less‑well known idea, such as the fire‑plow. Wilder has a nice story about someone using a fire‑plow, but I have seldom seen mention of this device in other publications, although it is included in some versions of FM 21-76/3.05.70 and the SAS Survival Handbook.
There is a suggestion about carrying wire wool under the corkscrew. I wonder if contact with the corkscrew will encourage the wire wool to rust, which makes it even less useful for firelighting. It is not a particularly good tinder for non‑electric sources of ignition. Some Swiss Army Knives have an LED. Can steel wool be ignited with the batteries for these?
There are far more useful things to carry than steel wool.
When using the back of the saw or some other tool with a ferro‑rod, it is more effective to draw back the ferro‑rod while placing the “steel” on the tinder.
I liked the section on carving wooden fish hooks from branched twigs.
The author talks about “catch and release” sport fishing.
Some mention might have been made that the paracord net described (or any net made with knots) will damage fish and should only be used for emergency or sustenance fishing. Similarly, wooden gorges as hooks are very cruel, often illegal, and should only be used in genuine emergencies.
While fish trapping with a bottle is mentioned, there is no mention of trot‑lines, which are likely to be more efficient than active fishing in an emergency.
There is a useful section on how a Swiss Army Knife may be useful for firearm maintenance and cleaning.
I also liked the tip on making a squirt bottle for cleaning out wounds. Yet another use for the sometimes maligned reamer! A bottle with a drinking nipple can probably be used the same way.
“There is a lot of wasted space in a vehicle, and I urge people to use it.” Good advice, although I would stress having something like a rain poncho, duct tape, vehicle tools and a sleeping bag or poncho‑liner.
Imagine attempting to repair your vehicle in very bad weather. It will help to have a means to keep the rain or snow off what you are working on.
In the “Urban” section, the author describes getting locked in a washroom cubicle. Similar happened to me in the toilets of a very famous museum. Like the author, I used my Swiss Army Knife to dismantle the lock and free myself.
Summary
In summary, I liked both of these books. Each is worth a read. I was lucky in that I was able to read both of them together.
There is a good possibility that when you really need a tool, your EDC Swiss Army Knife may be the only tool available. These books provide a nice reminder that you are better equipped than you might fear.
I had originally planned to make “Knives You Need” a two‑part series.
I have now had second thoughts.
The second part was going to address the topic of field knives. Much of it would have repeated ground already covered in other previous articles.
Instead, I have decided to take a slightly different angle and have decided to break this topic into smaller, bite‑sized pieces.
Many of you reading this may have spent good money getting yourself a survival knife. Good tools are important, you will get no argument from me on this point.
However, unless you spend all of your time in the great outdoors, the odds are that when you really need a tool, that survival knife will be back at home or in your car rather than on your person.
What is more, the tool you actually may need may not actually be a knife.
If you are willing to spend hundreds of dollars on a survival knife, is it not sensible to invest a little in the tools you are most likely to carry with you every day?
It is no secret I am a big Swiss Army Knife (SAK) fan.
Multi-pliers and lock knives will be covered at a later date.
Critics of the Swiss Army Knife point out that the blades lack a locking mechanism and potentially may close on the fingers of the user.
In practice, I have seldom had this happen. Perhaps penknife users are more cautious due to the lack of locking mechanism?
Mechanisms fail, so a lockknife that is mistakenly used like a fixed blade may be a greater potential risk.
There are several websites that give advice on safely handling and using penknives. Many of these are written for scouts, but many older users would probably benefit from putting these ideas into practice.
I recently read of someone who did have a blade close on them. They accidentally hit the back of the blade against a nearby wall.
This might have been avoided if the user had taken the precaution of extending an arm and checking for clearance around themselves before starting at task.
This is a prudent procedure for any tool use.
If using a long tool like an axe, hold it at full extension and check all around you. Do not forget to check for obstructions above and below you too.
The Penknife Grip
When using a folding knife, use what I call “the penknife grip”.
Your four fingertips are pressed against one scale. The opposite scale is held by your thumb and themar eminence. This keeps your precious digits out of the way of the main blades. This is the way to hold your penknife when opening tools.
When you need to close a tool, hold the knife in the same way and place the palm of your other hand on the back of the open tool. Calmly and smoothly fold your hands together to close the tool.
Many actions can be performed with your knife held in the penknife grip, keeping you safe should a tool unexpectedly close.
Some tasks will require a grip with your fingers around the knife body. Ensure a solid object, such as what you are working on, obstructs the tool from closing and that any pressure is applied in the correct direction.
Never use force to compensate for a blunt tool!
Never cut towards a body part, including your own. This simple and sensible precaution is often neglected in Youtube videos!
Right Tool for the Job
The risk of injury may be reduced by using the right tool for a job.
The long knife blade and saw-blades probably have the greatest potential for causing injury.
If you need to cut something, the short blade or the scissors are usually more appropriate.
If you need to bore a hole, use the shorter blade or the reamer.
If you need to pry, use the can- or bottle-openers, or better still use a more appropriate tool that is not your penknife.
In the pouch I carry my penknife in, I also carry an eight centimetre-long flat pocket pry bar. On my keyring, the P38 may be used to pry or open paint tins.
It is handy for trimming my nails or other minor jobs that it is not worth getting the main Swiss Army Knife out for. It actually sees a lot of use since it is the first tool I usually reach for.
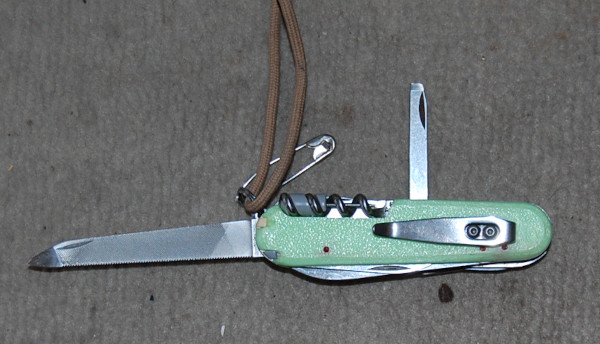
The Classic was donated by the lost property box. It originally had green cracked scales and was missing its tweezers.
A few years back, I treated myself to a new toothpick and tweezers, which had recently become available in green.
Recently, it occurred to me how shabby the cracked scales looked. I would need something that matched the green of the toothpick and tweezers.
I found a set of replacements at a tolerable price. What was more, the new scales were in luminous green.
Classic SD with luminous scales. Note whistle, P51 baby can-opener and Photon-light also on keyring. The safety pin is attached directly to the Classic SD. I have now removed the safety pin since it had a tendency to open while the keys were in my pocket.
The Classic is a single-layer SAK with a small blade, a pair of scissors and a nail file. The tip of the nail file of the SD model is designed to act as a screwdriver. Some users grind the end to create a wider slot screwdriver. Some reviewers complain that the file no longer ends in a pointed nail cleaner. The screwdriver tip is still good for cleaning nails.
The Classic SD is one of Victorinox's most popular best sellers.
A friend showed me the 58mm Rambler, which is a two-layer SAK with all the blades of the Classic SD plus an interesting combination tool with a cap‑lifter, magnetic #00/#0 Phillips screwdriver and wire‑stripper/bender as well. I will likely buy a Rambler if I ever need to replace my Classic SD.
(Update: I have no willpower! I brought a Rambler and transferred the luminous scales on to it. This now rides on my keyring.)
The Manager is apparently a Rambler that replaces the toothpick with a retractable pen. The Midnight Manager is a Manager that replaces the tweezers with an LED. I have heard this light is not waterproof.
There are other 58mm models, but I feel the Classic SD or the Rambler are most useful.
I do not see much point in a 58mm model without scissors.
One oddity in the 58mm models are the bladeless Jetsetters. Supposedly airliner “cabin-safe”, this ignores that the scissors are probably a more practical weapon than the blades of 58mm models. The wirestripper on the combo-tool will not work without a blade.
If you intend to have a 58mm as your primary EDC knife, the MiniChamp may appeal. The extra tool that most appeals to me is the cut and picker.
Some may find the MiniChamp may be a bit bulky or heavy for keyring carry. A friend of mine has an alox version and considers it a little heavy for his keyring. Pocket clips for 58mm models may be found, but I do not use one myself.
Incidentally, SAK with Alox scales generally do not have tweezers and toothpick slots. I would recommend only considering models that have these useful tools.
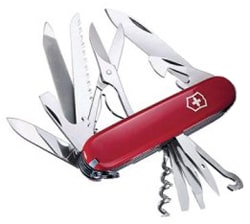
When it comes to “full-sized” (91mm) Swiss Army Knives, Victorinox currently offers 28 different models.
For general use, survival, emergencies or EDC (Everyday Carry), I would suggest one of the following models:
Spartan
As one might expect from the name, the Spartan is the most basic model of the 91mm Swiss Army Knives. Apparently it remains one of their best sellers.
It is a two‑layer knife, so you get a large and small knife blade, plus the can‑opener and the bottle‑opener. On the back is the reamer and the corkscrew.
Knife blades are quoted as 58 mm and 36 mm in length, with a hardness of RC 56. My own measurement gives a cutting edge of around 60 mm, with the distance from tip to knife body being greater. A 91mm Swiss Army Knife complies with the 3 inch/76 mm blade length restrictions some areas impose. This figure was probably chosen so that SAKs were exempt!
While on the topic of smaller knives, this video suggests a 74mm Executive for EDC, but they have been discontinued.
The applications for the knife blades are fairly obvious. Quite large pieces of wood may be split or removed by using techniques such as batoning.
The knife blades are sharpened at an angle of 20 degrees.
The X-notch is an alternative to the square or log-cabin notch. It may be created by saw cuts or batoning a knife blade
The bottle-opener and can-opener are collectively referred to as the “opening layer”. Both the can-opener and the bottle-opener have applications that may not be immediately obvious.
The 58mm Rambler has a tool with a magnetic Phillips screwdriver. Oddly, the screwdrivers on 91mm knives are not magnetised. My bottle opener is weakly magnetic and the can opener more magnetic, but that may be due to the magnet I keep in them.
Bottle‑Opener
The notch on the bottle‑opener/cap‑lifter works together with the cutting blade to serve as a wire-stripper. The notch may also be used as a wire‑bender or nail‑puller. It may be used as a striker for small diameter ferro-rods.
Various other parts of the bottle‑ and can‑opener or the keyring eyelet may be utilized bending wires or similar materials.
The tip of the bottle‑opener is a large (6 mm) slot screwdriver. This will fit in a socket heads adapter should you need another type of screw head. The screwdriver tip may also be used as a light prying tool.
Can‑Opener
The tip of the can‑opener is a small (3 mm) slot screwdriver. What is not often appreciated is that this part is also intended to work with Phillips and Pozidriv screws too. The tip may also be used for light prying, such as opening stubborn pistachio nuts.
I sometimes use the screwdriver tips as measuring gauges to estimate if something is 3 or 6 mm .
The hook part of the can opener may also be used to cut tape on boxes. Felix Immler has a video on how to turn this part into a more efficient hooked cutting tool. Some alternate examples of sharpened the unsharpened edge to improve string and box-cutting capability.
This can-opener may also be used as an orange peeler or a billy lifter.
One of my favourite uses for this tool is that it can be used to carry a 5.7 mm magnet. The magnet is useful for picking up or holding secure small screws, or magnetizing a pin, tweezers, safety pin or needle for navigation.
The can-opener on its own is now magnetic. Interestingly, the bottle-opener on the same layer is also weakly magnetic.
I have taken to alternating storing the magnet between the bottle-opener and can-opener to increase the effect. The main blade and scissors are now also magnetic, and the hook weakly magnetic.
Check to see if the pin in your penknife scales is actually magnetic.
Corkscrew
My main use for the corkscrew is to carry the 1.5 mm mini‑screwdriver.
The mini‑screwdriver is an essential for anyone who wears spectacles or even sunglasses. Not all SAK come with the mini‑screwdriver. I very much recommend acquiring one.
Not surprisingly, all the SAKs I recommend for EDC have corkscrews so you can carry a mini‑screwdriver.
The mini‑screwdriver may be used as a tiny prying tool to pop the back off a watch and to remove the battery. It may be used to drive out small pins, and may be used this way when replacing the spring of the SAK scissors.
If you want to use the corkscrew, the tool holding the magnet may be used to park the mini-screwdriver.
Cotton wool may be wrapped around the corkscrew to serve as a source of tinder, or it may be used to carry a supply of fishing line.
There are other alternate tools designed to fit in the corkscrew, including the Fireant, a tiny ferro‑rod. Larger diameter ferro‑rods may be cut down to fit within the corkscrew.
Alox handled variants may lack the corkscrew and other back-tools.
I have glasses, so carry the mini‑screwdriver.
Note that the Spartan, Climber, Camper and Huntsman have an equivalent that replaces the corkscrew with a #2 Phillips screwdriver. These the Tinker, Super Tinker, Hiker and Fieldmaster.
Trivia: MacGyver did not drink, and many of the penknife models he used in the series lacked a corkscrew.
Reamer
The reamer is another very versatile tool. It acts as an awl, a scraper, a punch, a seam‑ripper, wire‑stripper, wire‑bender and a threading tool.
The reamer is very useful for creating pilot holes for a drill bit or gimlet. It may be used to clean up or bevel a hole you have bored.
A bit of trivia: when your reamer needs resharpening, it should be sharpened at 48 degrees.
84mm and 91mm Swiss Army knives share the same component for their reamer.
Scale Tools
Scale tools usually refers to the tweezers and toothpick. Some models have additional items such as the ballpoint pen or pin.
Some tools you will not use often, but will be very pleased you have them when you really need them. This may include the tweezers or toothpick.
Some models, such as those with Alox handles, lack the tweezers and toothpick. The tweezers in particular are worth having, and the toothpick has also proved useful to myself.
Even if you do not own a Swiss Army Knife, the tweezers are a useful thing to have in your medical or emergency kit. They are hard to beat for compactness and functionality.
Trivia: Tweezers for the 58mm and 91mm models are of similar size, but differ in the shape of the head.
A friend of mine likes his Compact Swiss Army Knife. Unlike many Swiss Army Knives with only a few layers, the Compact includes the pen and mini‑screwdriver.
The Compact is a two‑layer knife like the Spartan but replaces the small blade with the scissors, and the reamer with the multi‑purpose hook. Instead of the cap‑lifter and can‑opener, there is a single “combo‑tool” that serves as a 6 mm screwdriver, can‑opener, cap‑lifter, wire‑stripper, emergency Phillips screwdriver and wire‑bender.
Personally, I think the reamer is a “must‑have”.
The Compact apparently evolved from the 84mm Golfer. An 84mm version of the Compact would be nice, especially if they replaced the long nail file of the Golfer with a reamer.
The Companion is a three-layer SAK that replaces the can opener with a box-opener. Oddly, the box-opener was not paired with the combo-tool to keep can-opening capability. Lots of other SAK tools serve as box-openers, including the small blade, scissors, reamer and can opener.
The Climber is a three‑layer version of the Spartan, adding the hook and scissors and retaining the reamer and small blade. The same tool selection was available in an 84mm Climber Small model/Alumnus, but it is sadly no longer in production.
The 74mm Executive is comparable to the 84mm Climber, but also out of production.
For a minimal bulk, “city carry” EDC knife, the Climber is a good choice and very good value for the tools and capability it offers.
The Camper is a Climber replacing the scissors and hook with a wood saw.
If I had to make a choice, I would choose the scissors over the wood saw.
The Explorer is a Climber that adds a magnifying glass and in-line #1/#2 Phillips screwdriver. If you now find it difficult to read labels in the shops, the Explorer may be a good alternative to the Climber.
Scissors
Keeping your toenails trimmed is an important part of looking after your feet (and socks). The Swiss Army scissors are excellent for such applications. Better than many purpose‑designed items!
The SAK scissors are widely regarded as being the best available on any multi-tool. You probably own dedicated scissors that are not as good.
The scissors are also surprisingly robust, being quite capable of cutting through soda cans and tin can walls to construct various items.
The scissors are probably the Swiss Army tool I have used the most, and I suspect I am not alone in that.
I regard the scissors as a must‑have feature on a Swiss Army Knife.
Multi‑Purpose Hook
If I recall correctly, the multi‑purpose hook was once called the “parcel hook”, being intended to hook though the string of a heavy parcel or bundle of firewood and let you use your penknife as a handle.
The hook is rated for 90 kilos/200 lbs of load!
The hook is often underappreciated, since there are many other applications for this item. These include being used to untie a stubborn knot, twisting materials to make natural cordage or an eyelet in wire, lifting hot billies or their lids, pulling stuck zippers, as a pen holder, retrieving tent pegs, and tightening lacings.
Some hooks have a nail-filing surface on the back.
Check out some of the videos on‑line for more applications.
There is even a modification to turn the hook into a groove carving tool. Worth considering if your penknife is a dedicated whittling tool. Putting a cutting edge on your hook may make it less effective at some of its other applications.
Trivia: The hook and scissors will be mounted on the same layer. If your 91mm knife has one tool, it will have the other too.
Huntsman
The Huntsman is another of Victorinox’s best sellers.
Effectively, it is the Climber with a woodsaw blade to create a four‑layer model.
A Huntsman will cost approximately twice what you might pay for a Spartan. Prices vary a lot, however, so shop around!
For “bushcraft” and “woodcraft” use, the Huntsman is a really good choice, having both the scissors and a wood saw. A saw is a handy thing in the garden too!
Wood Saw
Many traps and other items you may wish to construct may require accurately cut parts.
The wood saw is also useful for scraping bark off, creating sawdust or shavings for tinder, descaling fish, and may be used as a striker for a ferro‑rod.
Take a look at this video on using the wood saw and a tip on waxing it.
Trivia: The wood saw is one of the few commonly used SAK tools that lacks a nail‑nick
Oddly, the original scales of my Ranger have “Camping” and a tent logo. Several models of SAK other than the Camper have this decoration.
The Ranger is the Huntsman with the addition of the metal saw/file. It also has a chisel blade and a 2 mm fine screwdriver on the back, so three additional tools than the Hunstman. Unlike some larger Swiss Army knives, there is a back layer tool on every layer.
I have found the metal saw useful, so will choose a Ranger over a Huntsman.
The chisel is useful when forming notches in wood, and may be used as a plane/scraper.
A Ranger will cost approximately two and a half times what you might pay for a Spartan. As I have already said, prices vary a lot, so shop around!
I once had to cut down the bolts on a rucksack frame since they were digging into my back and damaging my shirt. Not surprisingly, I like having the metal saw/file available.
The metal saw is better than the wood saw for cutting some plastics and for some wood‑cutting tasks.
It is also a good striker for a ferro-rod. Keep the saw still and pull the rod across the back.
The file may be used sharpening improvised fishing hooks.
The tip of the metal saw may be used as a Phillips screwdriver or nail-cleaner. It may also be used with a socket.
Trivia: 91mm Swiss Army knives with the metal file will also have the chisel.
Since the seven‑layer Champion was discontinued, the Ranger is as big a Swiss Army Knife as I care to consider carrying. I don't really want something over three centimetres thick!
A sewing needle, wrapped in invisible thread, has been placed under the metal saw.
The tweezers have been modified to be pointed. The tweezers with my Classic SD/Rambler are unmodified, so between the two knives I have both a pointed and a standard configuration set of tweezers.
A small hole has been melted in the toothpick so that it may serve as a blunt needle to thread cordage such as dental floss.
Using the small blade of the Ranger, I made a tick removal tool by cutting a slit in the end of the toothpick. I am most likely to use the toothpick in my keyring SAK if something is stuck in my teeth.
Both the toothpick and the pointed tweezers with the Ranger may be used against ticks.
A second hole was drilled in the new scales to hold an unthreaded additional sewing needle. The pin proved to be poorly magnetic, so I replaced it with a bead-headed pin that was more magnetic and easier to remove.
Old Ranger with new luminous scales. Note magnet carried in can-opener.
New Scales!
I liked the new scales on my Classic SD so much, I went ahead and brought a matching set for my Ranger. I kid myself this will make it less likely to lose in Autumn.
Check out the video on how to use warm water to remove the old scales without damage.
Generally, I like my kit “low-key”. The SAK is an exception, since it is not really a tactical nor defensive item. It is, however, valuable in both replacement cost and in utility as a resource. Thus I like that the new scales make it easier to see and hopefully less likely to lose.
Check out this modification, however, since it may be applicable to other knives and tools. So might this idea!
The new scales are “plus” scales, so have additional carrying places for a pin and an SAK pen. I drilled another well for a second pin. I later discovered the pins I have are not magnetic, so I replaced the first pin with a small, unthreaded needle that is magnetic.
As well as being luminous, the scales have some nice texturing for improved grip.
The larger 91mm scales were a bit harder to fit snugly compared to the 58mm for the Classic SD/Rambler. I had to use a vice.
Do not forget to pad the jaws of the vice so you do not damage your new scales!
Slots for the scale tools were very snug for both sizes of scale, making the tools difficult to remove. I used a circular needle file to create a small scallop underneath which solved the problem. Overdid it a little on the toothpick for the Ranger , but adding some “White Tack” to the slot solved that problem.
The Ranger has been fitted with a loop of beige bootlace about 14 cm long. So too has my mini‑Leatherman Squirt P4.
Both tools ride in a mobile phone belt case with cut‑out bottom corners.
The loop of cord is passed down through a corner and then the tool passes through the loop to form a lark’s head knot. Even if the top of the pouch pops open, the two tools cannot be lost.
The loop is also large enough to pass around my wrist or hook my thumb through for added security when using the tool. The safety pin may be used as a pin or clip to secure the tool to clothing or D‑rings.
This loop now has a ferro-rod toggle.
I have also to fitted a pocket clip to the Ranger, giving me another option when I need my hands free.
The pouch mentioned above is on my trouser belt. If I am wearing trousers, I have my Swiss Army Knife and mini‑Leatherman with me. I will also have my keys, so will have my Classic SD/Rambler available too.
The belt pouch also holds the aforementioned pocket pry bar and a diamond‑impregnated metal sharpening card.
The few jobs the Ranger is not suited for, the mini‑Leatherman or pry bar can usually handle.
If this collection of tools cannot handle a job, they may often be capable of making something that can.
The tools form a component of the EDC kit I have distributed across my keyring, trouser pockets and compact pouches on my trouser belt.
Summary
For EDC, I prefer a Swiss Army Knife to include scissors, a reamer and corkscrew/mini-screwdriver.
My personal choice is the Ranger and Rambler. I carry my Ranger in a belt pouch. Previous knives have worn through a few pockets over the years.
If you want something more pocket-friendly and more compact, there is the Compact, Companion and Climber. All have similar capabilities, with the Climber possibly being best value.
For an even lighter option, Sportsman, Waiter or Bantam.
The Swiss Army Knife is the tool you are most likely to have with you when you need a tool. It is worth spending a bit of money to get one you are happy with.
That said, the web currently lists the Victorinox Ranger as $75, with the lesser bladed models at correspondingly lower prices.
Given the very high quality of Victorinox knives, that is a pretty reasonable price compared to the prices of some other folding and fixed blade knives.
Many years ago, I went to buy a coffee at the café at work. The usual staff were not there.
Another young lady had been sent there instead. She was struggling with trying to open up in an unfamiliar environment. She had brought her boyfriend with her, but he was not much use and had decided his best approach was to stand by looking gormless.
I waited patiently.
The lady got to the stage of installing the milk boxes in the dispenser. I was familiar with these from my own experience in temp jobs. They have a blind-ended plastic tube. The end of the tube must be cut off before the box can be used.
The poor girl was unable to locate where the usual staff had placed the scissors, or whatever else they used. Futility, she gamely hacked away at the tube with a blunt butter knife.
I took pity on her.
I produced my trusty Swiss Army Knife, unfolded a blade and offered it to her.
I will admit, at that point I was seduced by the chocolate bar display. I only caught what occurred out of the edge of my vision. It was over before I could intervene.
What happened was this:
The young lady had taken my knife and hooked the blade behind the tube. She had then pulled it towards her. She had assumed my knife was the same as the usual semi-blunt objects she had encountered in cafés. It wasn't.
The edge went through the plastic like it was not there. The girl recoiled a foot or so. Luckily the blade missed her.
“That is a sharp knife!” she exclaimed. She seemed oblivious to the fact that she had nearly just cut off one of her breasts.
I accepted back my knife. Silently, I vowed that in future I would not to lend my blades to other people.
I have been duly wary since that incident. When my girlfriend reaches for certain tools, I cannot help but warn: “Careful! That is sharp!”
She returns this with an eloquent look. Part of it says: “I know! I am not and idiot!” but I think there is also a smidgen of pride that says: “Of course it is, it was you who sharpened it!”.
Morals of this story: Do not assume a tool is blunt. Do not assume someone else knows how to use a tool safely. Never cut towards yourself.
I am pleased to announce that the Fourth (and final!) Edition of Crash Combat has now become available.
This version has been extensively expanded, being about 50% longer than the first edition.
More content, extra illustrations, more techniques, new techniques and generally much more book for your money.
In addition, much of the book has been rewritten and restructured so information is more easily assimilated and learnt.
While Crash Combat was originally written for a military context, it remains relevant to any individual wishing to learn to protect themselves in this dangerous and uncertain world.
Reams have been written about the bayonet in the last one hundred years. Several US Army manuals begin by talking about “the Spirit of the Bayonet”. Much is written about the psychological effects training and using the bayonet is supposed to induce. We are even told “the bayonet is irresistible”.
As I noted in an earlier post, the practicality of the bayonet as a weapon was being questioned as early as the introduction of breech-loaders. Once machine guns became common, one would think the matter had been settled. Not so.
The Bayonet en Mass
Part of the problem with examining this topic is that many writers fail to distinguish between the use of the bayonet in massed charges and its use in personal combat.
Many bayonet manuals do not give much space to how a massed charge is to be actually conducted. Perhaps this was covered in other manuals. A US Army manual from 1916 informs troops that they should walk most of the distance to the enemy position so as not to unduly tire themselves. At 30-40 yards distance they may begin to move at double time, and rush the last few yards. A British manual from 1942 urges troops to approach the enemy position using all available cover. When reaching 20 yards distance, the unit was to form up for the charge and rush the final distance. When conducting massed charges it was felt important that a line formation was maintained. Given the effects of adrenaline and irregular terrain, this may not have been practical in many cases.
If one can approach to within 20 yards of an enemy position, there were probably better options than a bayonet rush. The position could be attached with multiple grenades, and automatic weapons used to sweep the visible sections of trench, for example.
Sir Basil H. Liddell Hart said:
“There are two thousand years of experience to tell us that the only thing harder than getting a new idea into the military mind is to get an old idea out.”
The conventional military mind seems to have retained its fascination with the bayonet charge long after such tactics should probably have been retired. Certainly bayonet charges have been used since the Second World War. Charges were used in the Falklands War, and in Afghanistan.
Hill 180 Korea
One of the last great bayonet charges, for American forces at least, was the bayonet charge by Easy Company, 27th Infantry Regiment, against Hill 180.
“Commentary on Infantry Operations and Weapons Usage in Korea, Winter of 1950-51” by SLA Marshall has a chapter on the utility of bayonets, and the following observations about the attack on Hill 180:
“The tactical omissions, which accompany and seem to be the emotional consequence of the verve and high excitement of the bayonet charge, stand out as prominently as the extreme valor of the individuals. . . The young Captain Millett, so intent on getting his attack going that he “didn’t have time” to call for artillery fires to the rearward of the hill, though that was the natural way to close the escape route and protect his own force from snipers who were thus allowed a free hand on that ground. . . His subsequent forgetting that the tank fire should be adjusted upward along the hill. . .The failure to use mortars toward the same object. . .The starving of the grenade supply, though this was a situation calling for grenades, and the resupply route was not wholly closed by fire. . .The fractionalization of the company in the attack to the degree where only high individual action can save the situation, and individual ammunition failures may well lose it.
It cannot be argued that bayonet charges have not worked. And yet, one cannot help but wonder just how many lives have been needless expended because a massed bayonet charge was attempted rather than other more practical options. For a young officer the bayonet charge seems a gamble between a medal or a court martial. If they survive.
Individual Bayonet Use
Let us move to the more practical topic of the use of the bayonet as a personal weapon. In the second edition of “Crash Combat” I suggest that the use of the bayonet, or other close combat means are only attempted if the threat is within three body lengths. If the distance is greater, seek cover, reload and shoot, or some other tactic.
Older manuals recommend the bayonet be used for night combat where muzzle flash might expose your location. It is also to be used in close quarter situations where any firing might endanger comrades.
Three to four kilos of rifle does not make an ideal spear handle. It is, however “what you got”.
To use a bayonet, you must have a bayonet. Most modern bayonets are overweight supposedly multi-purpose tools of little actual utility. Understandably, many soldiers have discarded them in favour of more useful blades.
I won’t discuss techniques for unbayoneted weapons, since these are covered in my books.
When to Fix Bayonets
Assuming you have one, when should you fix your bayonet? Wartime British manuals require the bayonet to be fitted whenever the enemy is within 300 yards. Sights for shorter ranges were set to compensate for the changes the fitted bayonet made on point of impact. The Russians took this further. During wartime the Mosin-Nagant was always fitted with its bayonet. A fitted bayonet is necessary to zero the sights.
In a more modern context, it may be prudent to fix bayonets if engagement range is less than 50 metres.
The Indoor Bayonet
A fixed bayonet may seem a handy thing to have when sweeping a house. As well as its defensive use it can probe under beds or into other dark places. Bert Levy comments that within a building, bayonets are more a hazard to comrades and likely to get frequently caught on furniture. Levy was probably referring to sword bayonets mounted on relatively long bolt-action service rifles. Experiments need to be conducted to determine the best ways for teams to move with modern bayoneted weapons within building interiors. Since shooting will remain the primary offensive mechanism, this will probably be a low-ready position, rather than the high-port usually required for moving with bayoneted weapons.
À la Bayonet
Recently I read an entertaining and informative paper on the bayonet. Unfortunately the author devotes a big chunk of his discussion to perpetuating the bayonet wound fallacy. Later in the paper he graphically describes how visceral and final an encounter involving bayonets may be. It does not occur to him that this may be related to why there are so few bayonet wounds in the field hospital. Most victims never make it that far! Near the end of the on-line version of the article he states: “The Military Manual of Self-Defence (55) offers a series of aggressive alternatives to traditional bayonet fighting movements, its focus more on disabling the opponent than parrying until a clean point can be made. While not necessarily offering a full replacement to classic bayonet training, it does show that more options exist.”
This did amuse me. Firstly, The Military Manual of Self-Defence (Anthony Herbert) unashamedly copies entire sections from other works. Most of the bayonet section is taken from “Cold Steel” by John Styers USMC. The illustrations even still look like Styers! Styers, in turn, drew directly from Biddle (“Do or Die”), who was an instructor for the USMC. This “untraditional” system was that taught to most marines.
There is also an amusing irony here. During his military service, Herbert was wounded fourteen times. Three of them were from bayonets!
Today I will look at another illustration from John Clements’ book on Medieval Swordsmanship.
This sequence shows how a downward strike is accompanied by a step forward with the right or rear foot, and the text describes how to resume the initial position (left). What I like about this is that if you view it right-to-left it equally illustrates a downward strike that follows stepping back with the left or lead leg. For example, an enemy targets your lead leg, so you step back to avoid the strike and simultaneously strike at his head. Striking low may have exposed the upper part of his body.
Medieval Sword and Shield describes a similar sequence, although this time the defender is in “half-shield” guard (above, left). Again, if the enemy strikes low, the targeted leg is brought back and the sword is brought down on the attacker.
Clements’ book makes a lot about the prevalence of leg wounds among the remains of the Battle of Visby. The above sequences suggest that attacking the legs was foolhardy, at least with shorter weapons such as swords. Some context helps us understand the discrepancy. The victorious Danish forces were mainly composed of professional soldiers and mercenaries. The Gutnish forces were primarily farmers, and only partially equipped with armour. It seems likely that professional fighters would readily exploit the defender’s lack of experience and equipment and target the legs. Whether such tactics were common in other battles against experienced fighters is open to debate.
The “step back while striking” drill has obvious applications to modern combat. If we do not hold a sword it can be adapted to other weapons or empty-handed techniques. In a previous post I have mentioned that the leg raising actions so typical of Scottish Highland dancing may have been training to take the leg out of the way of low strikes.
Many years ago I wrote about a very silly sequence that appears in some knife-fighting manuals. It should be apparent to readers that when an attacker threatens your leg, a more practical response will be to withdraw the leg and simultaneously strike at any target available, such as arm.

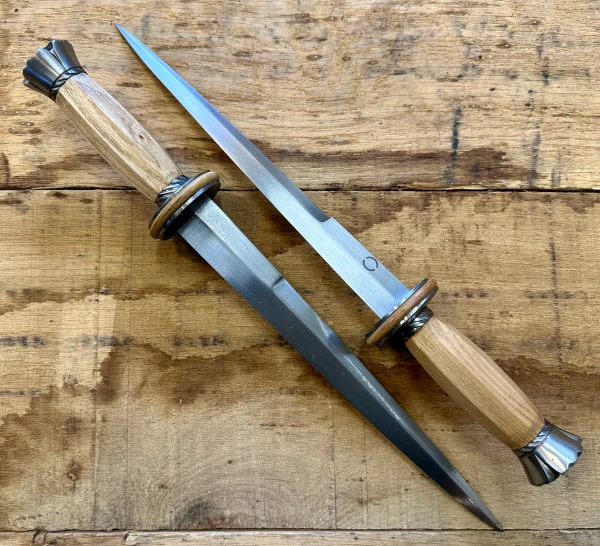

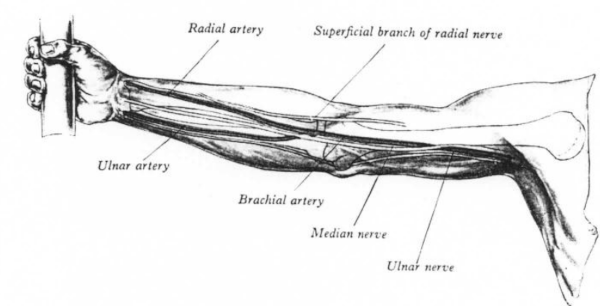
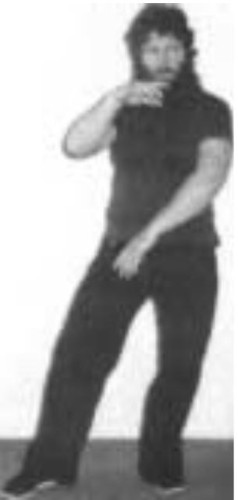 combat the “hold the ball” hand positioning is often made with the lower hand palm down.
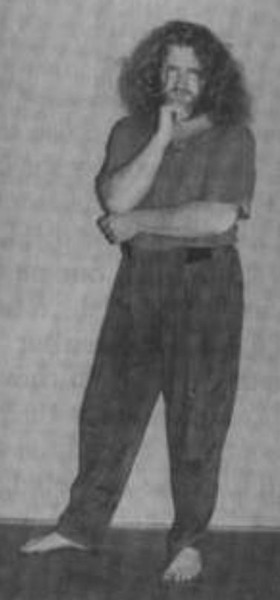
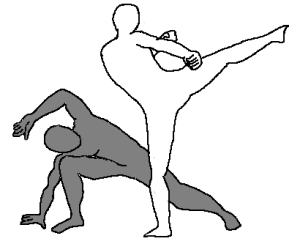

 The hand configuration shown in Macyoung’s book for the upwards whip parry (left) has a clear resemblance to the crane/turtle head/horse foot hand used in