Roll back to the start of this century, and you would have found me practising cookery in a mountain hut in the middle of Iceland.
I had found myself part of an impromptu group hiking over the mountains.
While most of my companions tucked into their freeze‑dried rations, I busied myself cooking my dinner in my Kephart‑inspired cook kit.
I do not remember exactly what I was cooking, but it was based around some rice. Among the foodstuffs I carried was included rice, flour and “Alpen” (a brand of muesli).
Cooking a meal from base ingredients was considered to be somewhat eccentric by my fellow hikers. It was, however, admitted that my meal looked far more appetising than theirs! I was probably carrying less weight of food too.
The following day, a beautiful German girl scrutinized by every move with great interest as I improvised an Alpen bannock, cooked in my home‑made folding handled frying pan.
Carrying flour and knowing how to make use of it on the trail I can attribute directly to my acquisition of “Jack‑Knife Cookery” by James Austin Wilder.
Not to be confused with an inferior book of similar title by the “Woodsman’s Thong” (!)
The real Jack‑Knife Cookery book was first published in 1929, but has undergone several reprints. My copy dates from the twelfth printing from 1965.
Written for boy scouts, this book begins by proposing a scenario where you have only flour, raw meat and a jack-knife. How would you go about feeding yourself?
The reader is then introduced on how to cook “twister” and “kabobs”, both of which may be cooked on green sticks over a “plug‑hat hole” fire.
From here, Wilder introduces the reader to cooking dampers and other foods, cooking on or in coals, “Imu” cooking, how to cook vegetables without a pot, mixing without a bowl, how to cook in a billy, making stews and many other useful subjects.
All of this is illustrated with Wilder’s own drawings and anecdotes/“yarns”, so is clear and highly readable.
Having fed the inner (young) man and grabbed the attention of the reader, Wilder moves on to discuss camping and related topics.
This is 1920s’ style, of course, so of interest to anyone who understands that they may have to survive outdoors without Goretex, GPS and freeze‑dried rations.
The third part of the book logically drifts into survival and emergency advice, peppering it with additional recipes and cooking techniques, including fun stuff such as boiling water in a glass bottle.
The section on friction methods for starting fires is entertaining, if not as technical as that in “Northern Bushcraft”. This section includes a story about using a fire‑plow/fire‑plough, a technique many survival manuals do not bother to include. There is also a “sawing” friction method using sections of bamboo which I do not recall often seeing in other works.
This book has been a great influence on many young outdoorsmen, myself included.
To this day, I may sometimes be found in the kitchen mixing flour and sultanas together when I feel peckish.
Jack‑Knife Cookery is a great book. I treasure my copy, which sits in pride of place on my shelves next to “Camping and Woodcraft”. I thoroughly recommend adding a copy to your survival library.
Now the bad news. I have been unable to locate an on‑line or Kindle copy of this book. The only search engine hits I get are dodgy sites with bad English that want your credit card details first, so steer well clear of those.
Printed copies may be found, although on‑line prices tend to be high. I have seen copies offered for as little as $30, so shop around before you part with hard‑earned cash.
If ever a book should be preserved on Internet Archive, it should be this one! If anyone reading can make that happen, make it so.
Many decades ago, back in my student days, I was cooking something one weekend. I had decided to make a sauce to go with my meal, so I needed to brown some flour.
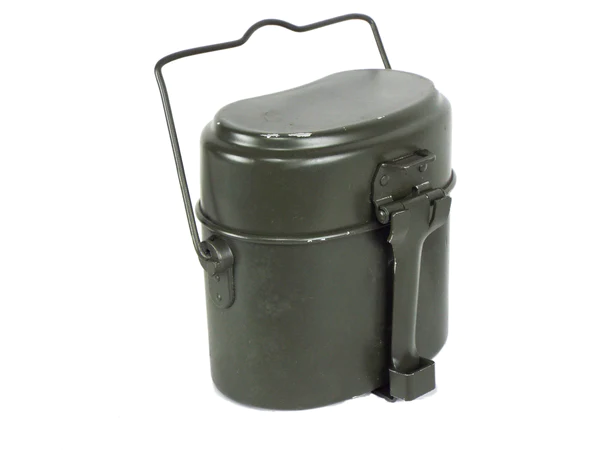
Running short of pans, I put into service a set of British Army mess tins I had with my collection of camping items.
As the flour browned, there was a sudden flash of silver. What looked suspiciously like molten solder appeared at the bottom of a pan!
Needless to say, I decided to do without my sauce, and the mess tins too.
It was many decades before I even considered getting another set of British Army mess tins. Authors such as Kephart had sold me on the wisdom of having a cooking vessel you could hang above a fire when needed.
I was in no hurry to get a new set, since I don’t actually rate the design that highly.
One website gloated that a design that has been in service for 70 years must be good, oblivious to the fact that they had already noted the 37-pattern replaced a design that had been in use for 150 years. Sadly, armies often keep bad stuff in service for a long time too!
About the only virtue of the British Army mess tins was they were a good shape to fit inside a pouch or rucksack side‑pocket.
During the Second World War, a version made from tin-plated mild steel was issued to conserve aluminium reserves for other purposes such as aircraft manufacture.
Around 1944, aluminium mess tins began to be issued again, and this is the material that has been used for post-war issue.
There are minor differences between the pre-1944 and post-1944 aluminium, but for convenience I will call both 37/44 pattern.
When researching this blog, I came across someone trying to sound clever saying they preferred the stainless steel version when they could find them. There was no stainless steel British Army 37/44-pattern mess tin issued.
Many British Army influenced nations copied the design.
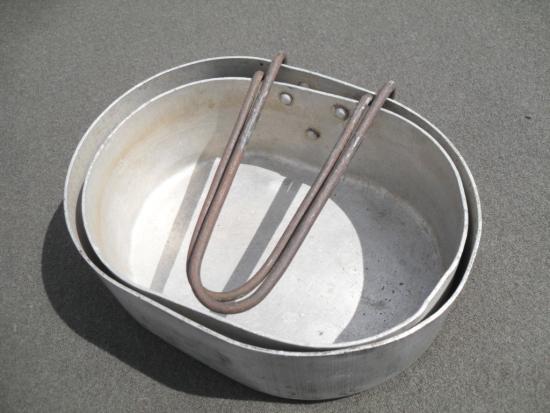
The Indian version was oval and had the handles on the longest side. This may have been more practical with respect to handling and cleaning.
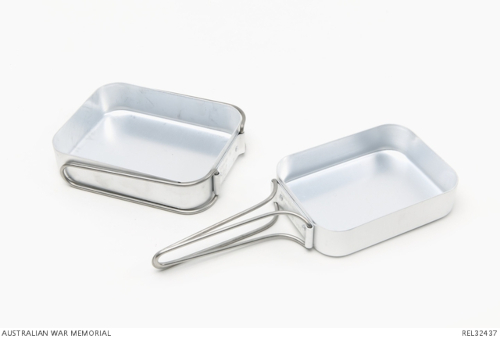
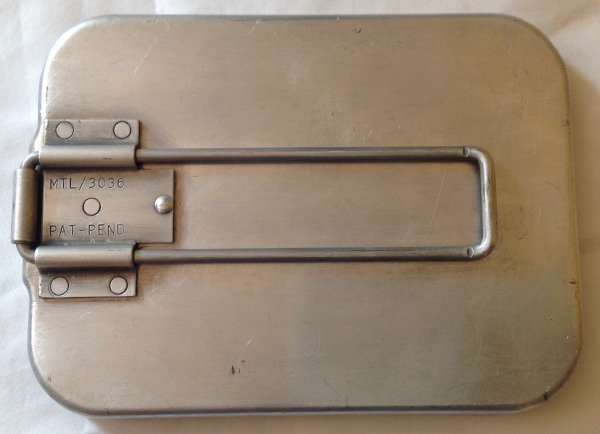
Another notable variation was the Australian version, which had sideways-folding handles and was shallower.
Copies, often of less quality materials, were also manufactured. For many years I assumed that this was the explanation for my melting example. Now I learn more about the topic, I wonder if I had purchased some wartime tinned examples. I seem to recall they may have had “fullers” in the sides.
I recall reading that the way to identify a “knock-off” was to try to push in one side. If it popped out again, it was legit. If the dent stayed, it was not.
Tales from the Supply Depot is a good source for the variations between different models. He offers the advice:
“These tins are very easily available, having been made continuously for over seventy years, and can be bought for a few pounds- the metal is far thicker and better quality than the cheap copies sold in camping shops so even if you are not a collector it is more sensible to invest in a second hand military set rather than a new civilian set as these are almost indestructible!”
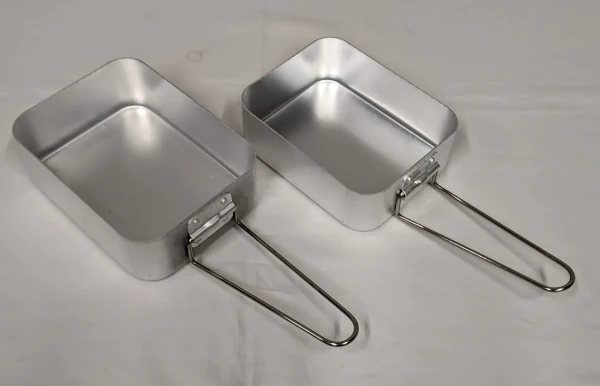
The 37/44 pattern consists of two rectangular pans with folding handles and rounded corners. One pan is slightly smaller than the other and will fit inside the larger. The smaller pan may be carried either bottom up or bottom down.
The pans actually look larger and bulkier than I recalled. The smaller one will comfortably hold a litre of water. The larger pan also takes a litre. You can squeeze nearly 200 mls more in, but the water level will be impractically close to the rim.
The capacity of my set is actually less than the capacity quoted by some vendors.
The two tins nest, although that is not so welcome if you do not have time to clean the outside of the smaller one.
Sometimes the larger tin was carried in the large pack and the smaller tin in a belt pouch or in a smaller backpack.
Some soldiers just made do with a single tin.
Supposably, the metal of the thin handles is a poor conductor of heat, so may be held without the need for gloves or bandana. I would be very cautious trying that.
The handles have no locking mechanism. If moved in certain directions, the handles of the mess tin will suddenly fold, usually dumping the tin’s contents.
Use
In the field, the mess tins were mainly used as simple water boilers.
They were either used to make tea, or to heat up the canned items from the 24 hour “ratpack”. For the latter duty, the cans were placed in the mess tin, water poured into the remaining space and brought to a boil for a few minutes. Using the hot water to make a drink was not recommended since it was contaminated with whatever was on the outside of the cans.
While I was shopping for a set of mess tins, I was bemused to see some vendors claiming they were “easy to clean”.
Many an old soldier would dispute that!
The corners were hard to get clean and the issued hexamine stoves often left the bottoms sooty and covered with hard to shift partially burnt fuel residue.
While “nesting cook kit” sounds like a good feature, the outsides of the inner vessels need to be very clean otherwise they contaminate the insides of the outer pots. You can wrap the inner vessels up, but this may make them too bulky to nest.
Using the mess tin just for water did cut down on some of the cleaning.
This was not the case when a unit was fed from a field kitchen. The mess tins were often the only receptacle available.
Some interesting culinary combinations were experienced as dessert was piled on top of the remains to the main course. Irish stew with custard, anyone?
The mess tins are probably a little large for the uses they were actually put to. That may be why the Australian model was of a lower capacity. The side-folding handles of the Aussie version are a clue to another flaw of the original.
The 37/44 mess tins cannot be hung over an open fire, like the “European”-style pails. The European mess tins are effectively small buckets, while the British mess tins are awkward to carry tea or water any distance.
The British Army mess tins are mainly designed to be used on stoves.
There are ways to use them over an open fire.
Flat‑topped rocks may be employed, although likely to be wobbly.
Bricks or logs with the top hewn flat are another possibility.
Three or four 6 inch nails can also be used.
If you let your fire burn down to coals, pots may be placed directly on the coals.
Digging an L‑shaped hole in the side of a bank and building the fire at the bottom is another option.
Lids for Mess Tins
Combined with the Esbit cooker, the mess tin was not noted as particularly efficient.
The black build up on the bottom of mess tins was common, which may suggest incomplete combustion from using too much fuel.
Often the smaller tin was used as the boiling vessel and the larger tin placed over it to act as a lid.
It was not long before some companies started offering purpose built lids that could be used with the issue mess tins. These could also be used as frying pans, some examples even having non-stick coatings. One company even went as far as offering the mess tins with non-stick interiors too.
Back around the 1980s, many soldiers and survivalists regarded the mess tin lids as an essential bit of kit.
It is rather surprising that such lids are now hard to find.
I have seen a non-stick set of mess tins, but it is not clear if these have the same size and proportions as the issue items.
Lids are much harder to find. I have only found one place offering them. The price was actually quite reasonable, so I purchased an example to test out for this review.
The interior has a black coating, which may be non-stick. I have yet to cook with this item and find out if this is the case.
I got distracted by trying to fit the lid on the mess tins. It would not fit. The lid actually seemed to be a different shape to the large tin.
Careful measuring confirmed that the lid is exactly the same length as the large tin!
The rim of the lid was actually irregular. Perhaps it took a few dings going through the post, but the length of the bottom is still too small.
My current mess tins lack any numbers or identifying symbols, so may not be actual army issue, despite what the seller claimed. On the other hand, they appear brand-new rather than used. Their dimensions seem correct, however, so I suspect the fault is with the lid.
Careful use of a ball-peen hammer reshaped the lid rim so it is slightly bigger than the large tin. This also removed some of the black coating near the edges.
I can fit the lid over the large tin, but when the smaller tin is packed inside the lid will not stay in place unless packed inside a snug 85-pattern water bottle pouch. The handle of the lid is also very tight, and scores the outer surface of the lid when it is pulled out.
Definitely room for a better executed version!
Conclusion
Many regard the British mess tins as a classic. I am not one of them.
Personally, I think the British Army 37/44 pattern mess tin lacks versatility as a field cooking vessel and is somewhat oversized for the uses it is put to.
They are a good illustration of how the needs of a soldier may be very different to a camper or prepper who lacks a comprehensive support infrastructure.
There are some similar smaller cooking vessels that are commercially available, some with lids that fit!
I notice certain vendors are offering “Crusader Mess Tins”. This is an oval shape so hopefully easier to clean. It consists of a single pot with a lid/flying pan. I don’t know if these have become an official issue. The name is an obvious attempt to associate it with the Crusader canteen cups.
Mess Tin Survival Kit
In the first of my Survival Library posts, I recommended Lofty Wiseman’s “SAS Survival Handbook”.
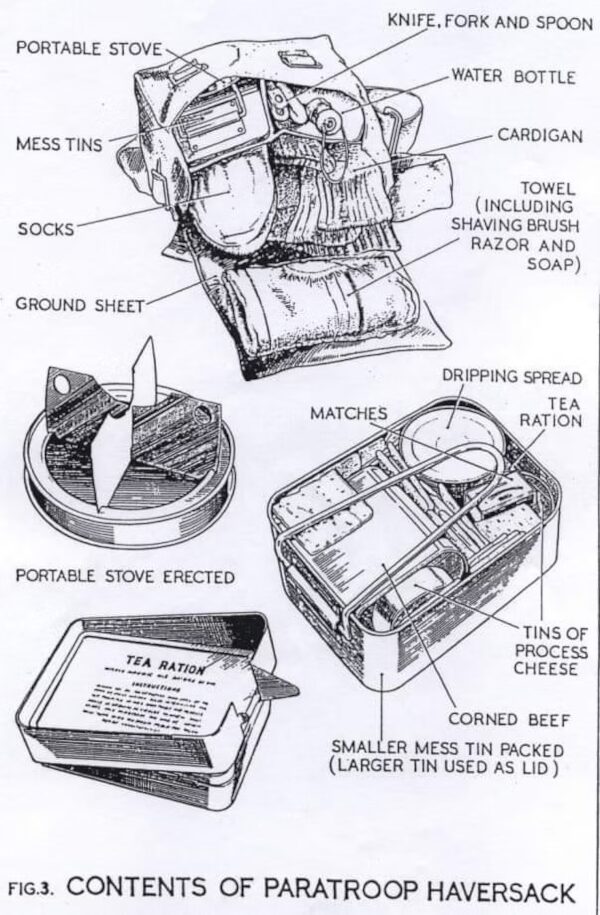
As well as describing the tobacco tin-based survival tin, Wiseman also suggests a “survival pouch”, one of the main components of which is a mess tin into which most of the other components are packed.
I don’t like all my eggs in one basket, nor do I want to carry emergency items by a means I am likely to be separated from. Jackets get taken off, bags get put down. That is why a certain proportion of my gear is in my trouser pockets and pouches on my trouser belt. This is more comfortable than a lumpy tin crammed in a pocket.
One of the criticisms of the survival tin is that the useful stuff it does have, it does not have enough of.
You could do worse than empty the contents of the survival tin into a mess tin, then add greater quantities of the useful stuff. You will need more than a handful of fishing hooks and matches. Why not join the 21st century and carry a lighter rather than matches? A space blanket, whistle, signal mirror, candles and a fresnel lens are all good additions. A mess tin in a pouch can pack a lot of genuinely useful emergency gear.
A mess tin can heat-treat a genuinely useful quantity of water.
The downside of this idea is that a mess tin-based kit is of no use if you stow it in your pack. You have to keep it on your person, and since it is somewhat bulky, this may not suit many of you.
When I wrote “Survival Weapons”, the concept was to optimize what firearms one spent their hard-earned money on.
There were also several knife related chapters in the book, but I did not apply the same approach to these. Instead I gave a description of the pros and cons of various types of knife for the reader to consider.
I admit, I have too many knives. I find myself sometimes wondering, if I had to restart, what should I have brought and what should I have not brought.
Essentially, the question is what knives do I really need?
After decades of buying and using knives, and way more money spent that I want to think about, my answer to this question may have some value for the reader.
This article will be in two parts. The first part will concentrate on the knives that are primarily for home use.
The knives you use in the home are those that you are likely to get the most use from, in some cases using then daily. It makes sense to get your home selection in order before spending the price of a new car on a custom survival knife!8
Part two will cover outdoor and general purpose knives.
Home Utility Knives
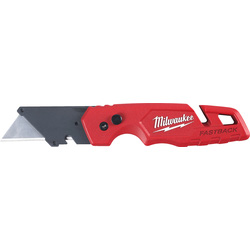
A Stanley knife is a useful addition to your home tool kit.
“Stanley” is actually a brand name, but in many parts of the world the term “Stanley knife” has become generic for certain designs of utility knife with a replaceable trapezoid-shaped blade.
Prices range from very reasonable to very high, which is odd, given that, as far as I am aware, they all use the same blades!
The short blade gives very good control, while reducing the chances of cutting too deep and damaging something it was not intended to cut. Some variants of blade have a rounded tip to further reduce the chance of damage or accidental injury.
A retractable blade may be handy for limiting cut depth or safety, while a fixed blade may be better for prolonged tasks such as carving.
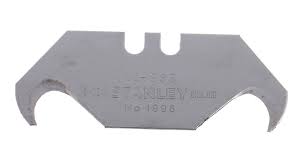
The type of blade most commonly encountered is a straight‑edged trapezoid-shape. A concave edged variant is favoured for some tasks.
Blunt blades may be replaced with new ones, although it is possible to resharpen dull blades.
Some handles have a small cut-out for wire stripping. The value of features such as strap-cutters will depend on the work environment you carry a Stanley knife in. Some handles can be fitted with purpose-designed metal‑ or wood‑saw blades.
I seldom use my Stanley knife. It is usually at the bottom of a tool box or back of the cupboard somewhere.
If I need a cutting edge, there is generally another knife more readily in reach. Of course, not everyone has a bookcase decorated with knives and a kukri by the bed!
This, incidentally, is a theme we will see again in this article: Knives for use in the home should be placed so they can be easily found and accessed when needed.
My Stanley knife now hangs‑up on the inside of the tool cupboard door, like my flashlight, spirit‑level and tape‑measure.
A smaller utility knife is useful for finer jobs.
If you are not familiar with them, I would recommend against using scalpels. Scalpel blades are designed to be removed from handles by snapping them in two. They have weakened fracture lines designed into them.
If you have a tendency to use more force than finesse, the scalpel blade may snap when you least expect it and this can cause injuries as you lose control of the tool.
For similar reason, I recommend a tool such as a Stanley knife for general use in preference to the box-cutters that use snap-off blades.
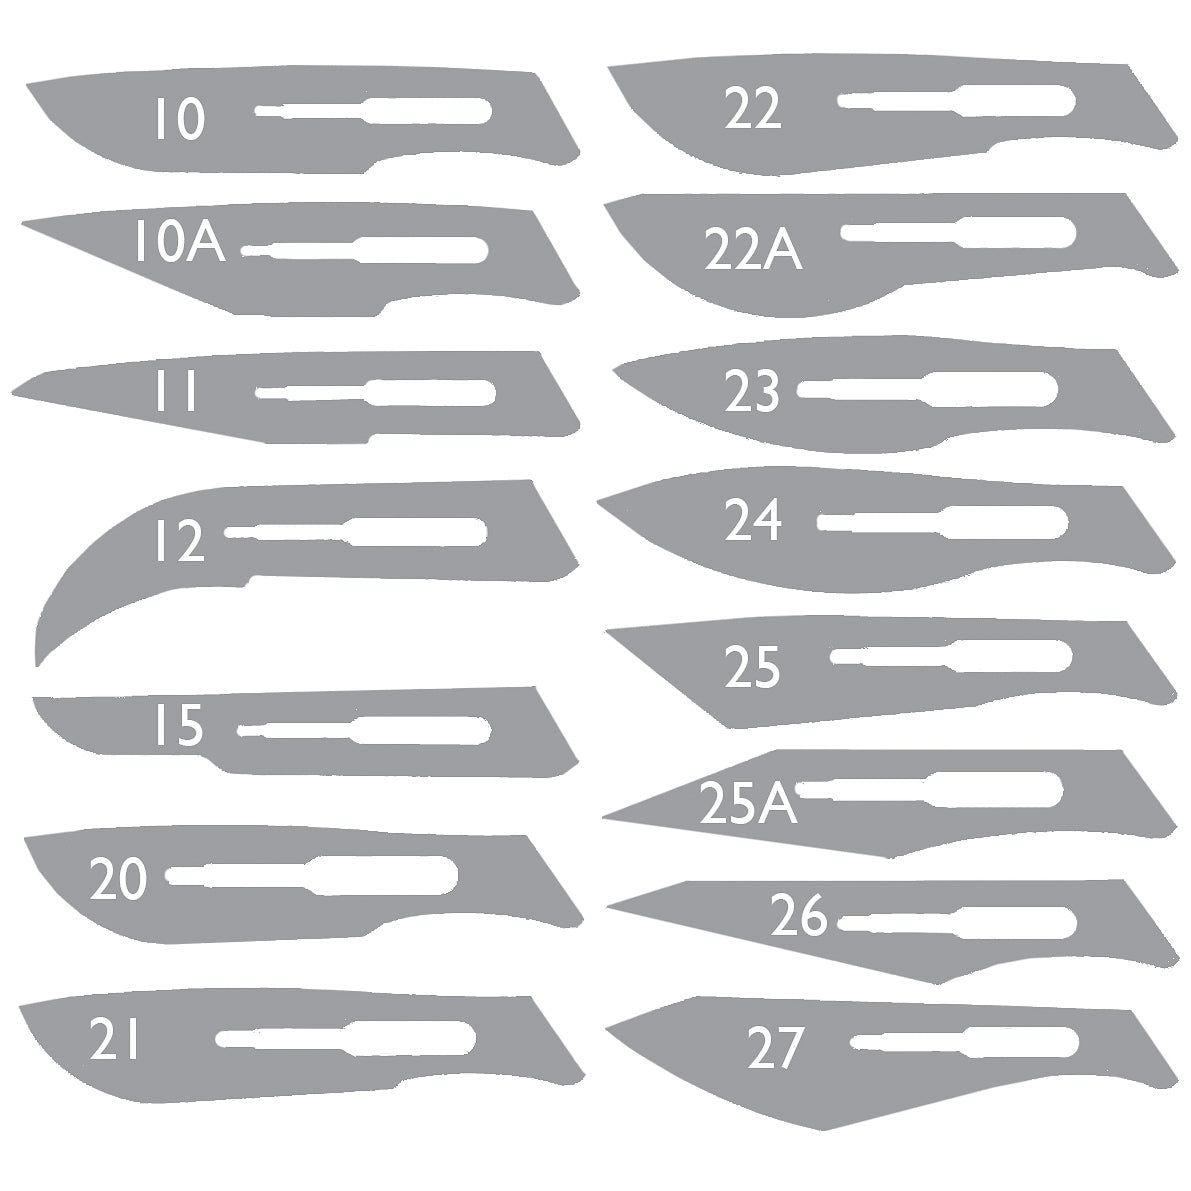
You should also be aware that different scalpel blades need different handles. The no.11 blades take a number 3 handle, while blades such as the no.22 need a number 4 handle.
Many scalpel blades are now manufactured with plastic handles already attached. These handles are designed to be disposable and are not very durable. They will snap if you use too much force.
The flattened end of a metal scalpel blade may be put to various uses. It may be used as a spatula to flatten hot plastic or the heated ends of paracord. They are also handy for levering open the lids of paint tins, although a slot screwdriver is probably a better option.
The no.11 scalpel blade is possibly the most useful for general usage. The hooked no.12 may be useful to jobs such as unpicking stitches. Curve-edged blades like the no.22 may be better for cutting some materials.
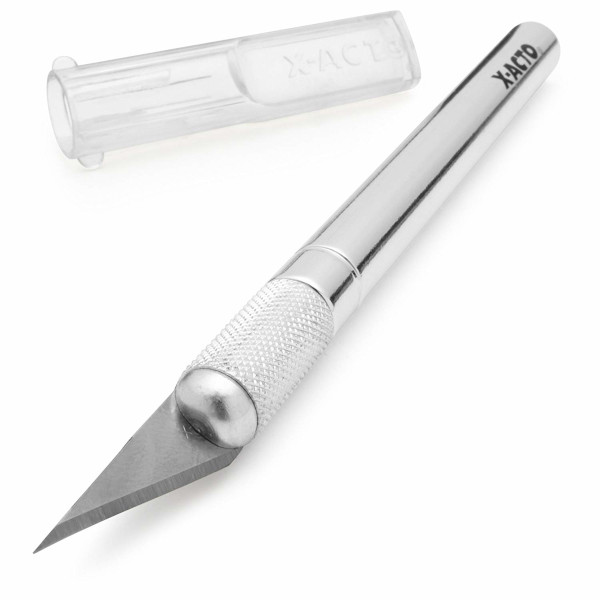
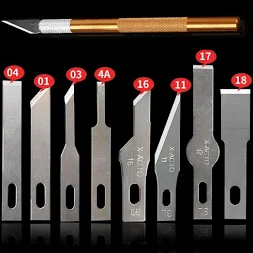
Rather than a scalpel, you may be better off using a small craft knife, such as an X-acto. These come with a range of blade shapes, although most are just variations of a straight‑edged triangular blade. The configurations resembling a chisel may have some applications.
Most X-actos and their copies have a rod-shaped handle. This may roll out of reach on some surfaces. If you websearch on ideas to on “how to stop pencils rolling” you may find suitable solutions.
As an aside, I very rarely use a modelling knife when modelling. A set of needle-files and a pin-vise with small drill-bits is better for most jobs.
My more common problem with an X-acto is sometimes not being able to easily see if the blade is cutting-edge up or down. I sometimes use the knife under poor lighting conditions, such as the inside of a garment when cutting stitches.
Like Stanley blades, blades for smaller utility knives may be resharpened or touched‑up during extended use.
Adding some tape to the handle and positioning the tag in relation to the cutting edge may solve two potential problems at once!
Add a “stitch ripper” to your home sewing kit, but some jobs still need a very small pointed blade to get started.
It is not the worst idea in the world to also have a general‑purpose Mora knife as a home utility blade too.
Kitchen Knives
I have written about kitchen knives before, so will refer you to those pages for more detail.
A professional chef visited me a few years ago. His first request was to see the Chinese cleaver I had told him about.
Very cautiously, he placed his fingertip across the edge. A nod of approval and a knowing grin. As he had expected, it was very sharp.
Most of my cutting is done with my Chinese cleaver, also known as a vegetable cleaver and not to be confused with the heavyweight Western items. Mine has been in use for more than thirty years.
For cutting acidic fruits and vegetables, I have a serrated bread-knife, which, not surprisingly, is also used to cut bread!
Between them, these two knives handle more than 90% of my cutting tasks in the kitchen.
If such a combination is a little too unconventional for you, and you are just starting out equipping your kitchen, I suggest buying one of the basic wooden blocks of knives sold by many stores.
I got my block of knives to stop my sister-in-law mucking up my cleaver. Since the block sits there on the counter, she was unlikely to look for my cleaver in a cupboard or drawer.
The countertop block is so handy I ended up using its knives a lot myself.
The block has six knives, including a chef's knife, carving knife and bread-knife.
The chef's knife can do many of the tasks I would have used the cleaver for.
The smaller knives are a straight-edged knife, a small serrated knife and a hook-bladed paring knife.
The small serrated knife is used for acidic fruit and veg, and supplements this use of the bread-knives.
The knife that sees the most frequent use is possibly the paring knife. The claw-like blade is very useful for opening packaging. Sitting in the knife block, it is readily to hand whenever it is needed.
What other knives you use in the kitchen depend on your cooking style. I have a very nice boning knife, but seldom use it since I generally don't debone meat. My lady is a big seafood fan, so I expect I may have to buy a filleting knife or two soon.
A butcher's steel keeps most of my kitchen knives sharp. I also have a diamond stone and some ceramic sharpening rods in a cupboard in the kitchen, should they be needed.
Letter Openers
In one of the unnecessary Rambo sequels, Rambo enthuses to his daughter about the letter opener he is making for her.
“No one writes letters any more” she comments.
But most of us shop via the internet, which means most of us probably receive more parcels than we might have in previous decades.
Such parcels are much harder to open than a simple envelope. I often find myself reaching for a knife or other sharp edge to open my mail.
Food packaging these days also seems to be harder to get into than in the past. If anything, I am stronger now than I used to be. Exerting enough strength to pull a packet open often results in the contents fountaining all over the room. Again, I find it easier to have a sharp edge within reach.
“Traditional” designs of letter‑opener are designed to open envelopes and may be blunt‑edged tools made from plastic, ivory, brass, pewter or wood. Parcel tape and other modern packagings my require something more capable.
Many of the knives described elsewhere in this series of articles are up to this task. The paring knife is often used for parcels that get opened in the kitchen.
For a blade you will probably have in sight in your living space or office area, you may desire something more decorative and less aggressive‑or utilitarian‑looking than the blades with your camping gear or toolbox.
My current “parcel opener” is a miniature tanto/aikuchi with shirasaya‑type sheath and grip, but in a dark wood. Edge is sharp enough to deal with modern packaging, and the point acute enough to get beneath envelope flaps.
If I did not have the aikuchi, I might use a sufficiently attractive puukkot instead. Various other designs of fixed blade or folding knife are possible alternatives. Some “neck knives” have hooked blades.
I would recommend a stainless steel blade for a parcel opener.
Such a knife is of no use unless it is readily within reach. Mine does not look out of place sitting on the carved wooden box I brought in Hong Kong. This box is on a table beside where I usually sit.
Home Penknives and Multi-tools
I will talk about penknives for everyday carry (EDC) in part two.
It is worth having an extra penknife or two at home, and readily to hand.
I have a couple hanging on a hook inside the kitchen drawer.
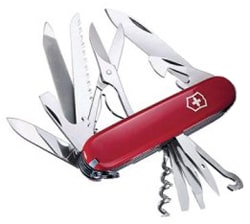
The larger of these penknives is an eleven-bladed model that is too bulky and heavy to carry on my person. This includes a set of pliers and various screwdrivers, which have proved handy tightening up the handles of various cooking pots. The reamer has also proven useful for various jobs, including fitting the screw-hooks inside the drawer the penknives hang from.
These particular penknives were donated by the lost property box.
It is quite possible that you have penknives or other multi-tools that you have purchased or have been given that you have decided are no longer your first choice as EDC or field tools.
Some such items may be repurposed as home tools. The trick is to keep them somewhere that they may easily be located when needed. Mine are in the kitchen drawer. Hanging them inside the door of your tool cabinet is a good option too.
Gimlet
The gimlet is not by any stretch of the imagination, a knife. I have included it in this discussion since its use compliments that of the reamer on a penknife. Also, it is a tool that is often overlooked and I suspect there are many tool boxes out there that do not include this very useful implement.
Many home-improvement jobs involve the instillation of screws, nails or hooks. Such tasks are often easier, more accurate and neater if a pilot hole is created first. The reamer on your penknife is a good way to start such a pilot hole, and in some instances may be all that you need.
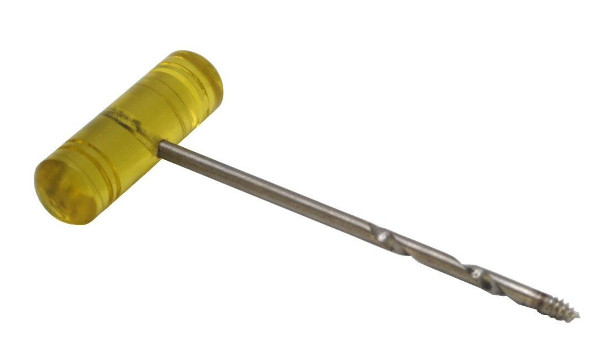
When this is not the case, a screw gimlet comes in very handy.
A typical screw gimlet resembles a corkscrew, with a handle set at a right angle to the shank. The shank of mine begins in a screw thread and becomes a spiral cutting groove like a drill bit. Mine has a shank diameter of 4.5mm, which has proved to be a good size for general use at home.
My gimlet recently proved to be the ideal tool for cutting a lanyard hole in the handle of a Mora knife.
It is probably prudent to keep a gimlet with your DIY drill(s). Most jobs you may need the drill for may be started with a gimlet. Often you may find the gimlet was all that was actually needed.
Another useful feature of a screw gimlet is that it can be used in locations where there is insufficient space or awkward to use a power drill or hand drill.
Gimlets are very reasonably priced. Old gimlets are sometimes sold mislabelled as “corkscrews”!
Looking on-line, there are gimlet sets of several sizes that often include an awl and/or bradawl.
If you drill close to the edge of a piece of wood there is a chance of splitting the grain. In such a situation, start the hole for your gimlet using an awl, reamer and/or bradawl. Create a hole large enough to accommodate the screw-threaded section of the gimlet.
Unlike my power drill, a gimlet never needs recharging whenever I need it! Thinking back, I suspect many of the jobs in the past I used a drill for might have been done easier and more quickly with the gimlet!
Gimlets are also a relatively safe tool compared to many of the alternatives. If you are introducing your child to carpentry or similar crafts, I would suggest thoroughly familiarizing them with the gimlet before they start using potentially more dangerous tools such as drills.
Sometimes, when out in the wilds, there is a need to bore a neat hole or two in wood, bone or hide. The reamer on your penknife is often up to the job. You may need a deeper, more regular hole. In “Survival Weapons” I describe a more capable tool I call a “brog”.
A gimlet is a possible alternative, and takes up very little room in your pack. Cover the point with a length of tube, section of stick or a cork.
Stay Sharp
I have had to work with a lot of stupid people. Reflexively, I cautioned my girlfriend: “Careful, that is sharp!”
She gave me an eloquent stare that both said “I am NOT an idiot!”, but also “Of course it is sharp! You will have sharpened it!”
Blunt knives are dangerous. They encourage the user to apply more force than is needed and increase the chances of mistakes or injuries.
You should have items for resharpening you knives and other tools in your home. These should be easily accessible from where you might need them, to encourage you to use them when necessary.
As already noted, I keep some sharpening items in my kitchen. Others are in or with a flannel bag in my tool cupboard. There are also items with my outdoor gear. On my person I carry a small diamond impregnated sharpening card. An old brass key on my keyring may be used to “steel” an edge for a quick touch up.
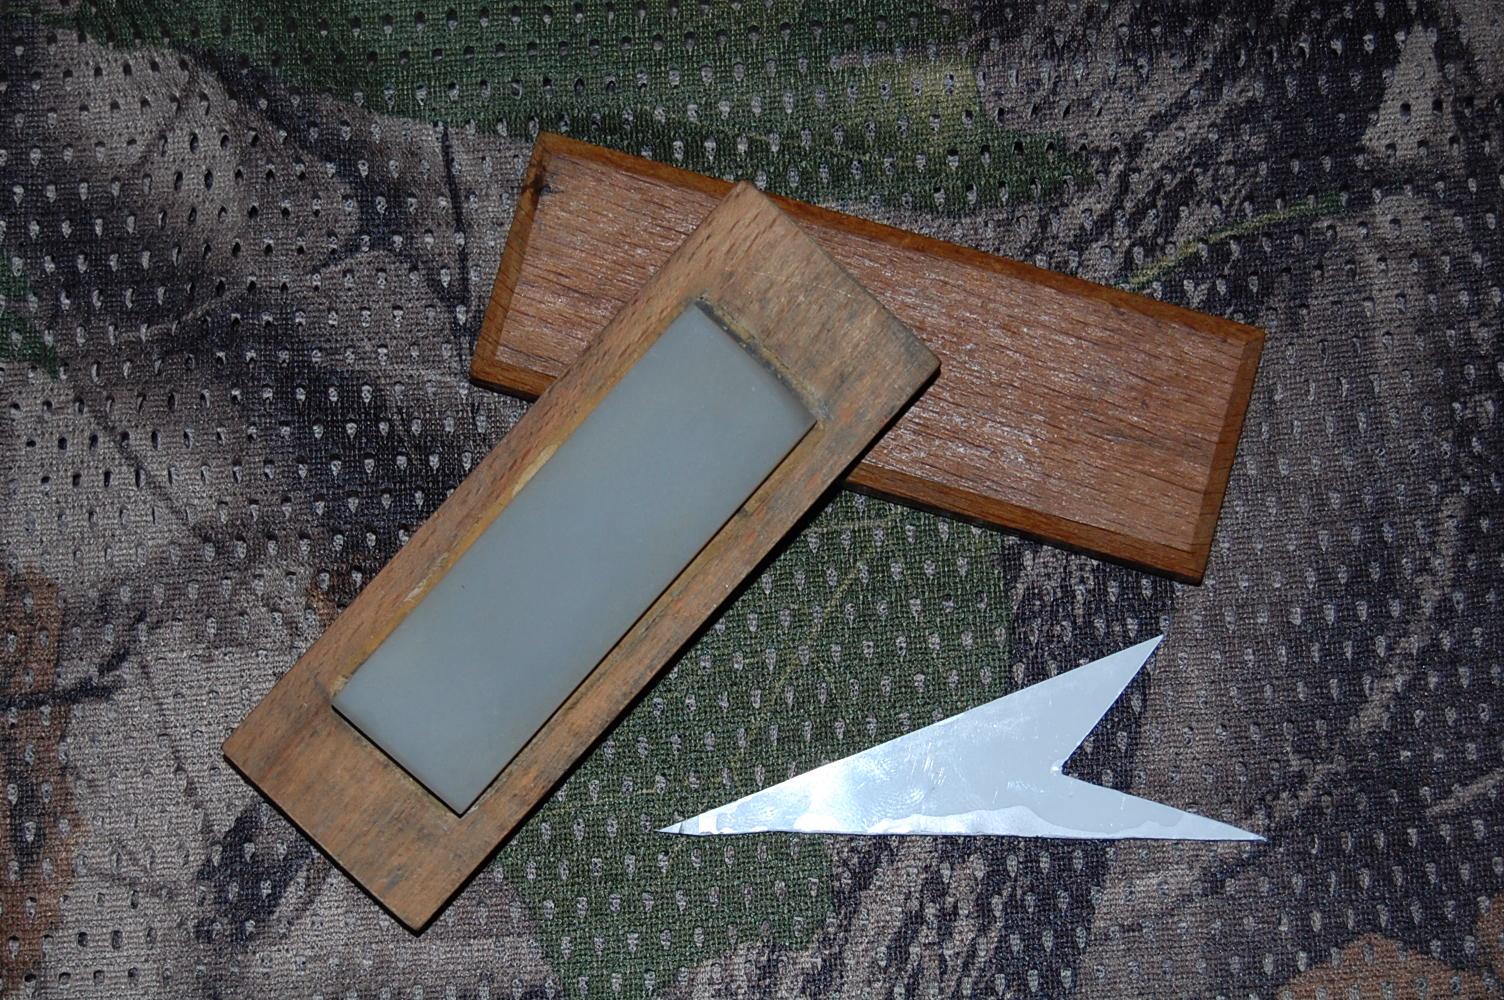
For home use, a set of ceramic rods that fit into a base are very good. I have a set in the tool cabinet and a more basic set in a kitchen cupboard. A set of rods like helped me learn sharpening.
Since I am a “pull‑sharpener” by preference, I like to have a small stone or triangular rod I can easily hold in my hand and move across an edge. For the latter, I generally either use a small fine Arkansas stone I inherited, or a triangular Lansky rod with plastic ends.
There are many alternate options. Most suitably sized triangular sharpening rods will be suitable providing they are not too course.
The trick to avoid sharpening becoming a tedious chore is to never let an edge get really dull. Sharpen lightly and often, as needed.
While tools should be sharp and accessible, they must also be stored responsibly so they cannot cause injury to family, other residents or visitors.
Rummaging through a on-line drive the other day and I came across a filename that was just a string of numbers and letters.
This turned out to be a copy of Air Force Survival Manual AFM 64-5. I had not originally paid much attention to this particular work when I downloaded it along with some other military survival manuals.
Unlike most works of its ilk, AFM 64-5 is concise and very readable. It also contains a number of items of information that do not usually appear in many of the survival manuals that will be more familiar to the reader.
One of the many things that interested me was the manual emphasised that a survivor only needed about three ounces of protein a day.
A surprisingly sound and up-to-date piece of nutritional advice in a book that dates back to the 1950s.
It also flies in the face of the current food-fad of boosting the protein content of everything!
For those of you who did not pay attention in school, your daily protein needs are relatively modest.
Even if you are a body-builder, you are not likely to grow more than a few grams of muscle a day.
Having a little extra protein is not likely to harm you. Most of it just gets peed out.
Foods rich in protein have been noted to increase satiation, which is why items such a nuts are sometimes recommended for snacking.
Excessive quantities of protein consumption may have medical effects, however.
Most protein sources also include fats, oils, salt and other things we generally consume too much of already.
I have become more interested in portion control since I was declared diabetic. Like so many of us, I could do with losing a few kilos. This may help me keep the diabetes under control.
Also, on a planet where much of the population is either going hungry or obese, it seems morally abhorrent to deliberately be eating much larger quantities of food than I need.
Portion control has obvious applications for survival, hiking or prepping. It allows you to more accurately judge how much food per day you will need for a journey or a stockpile.
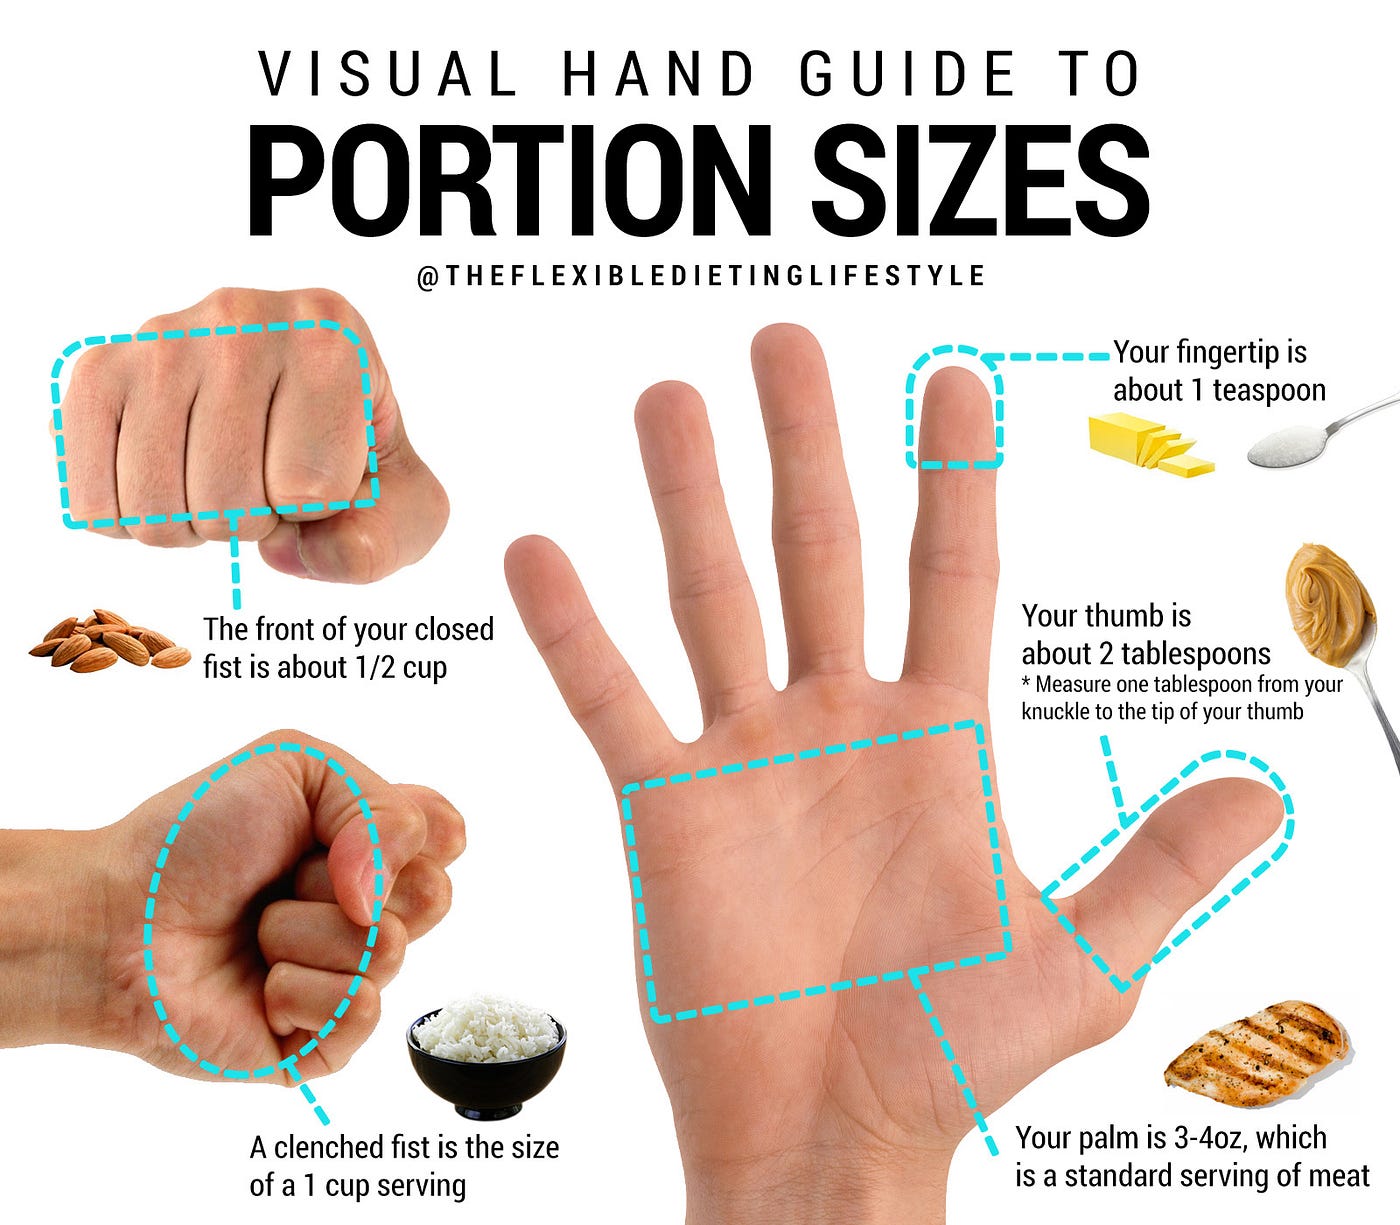
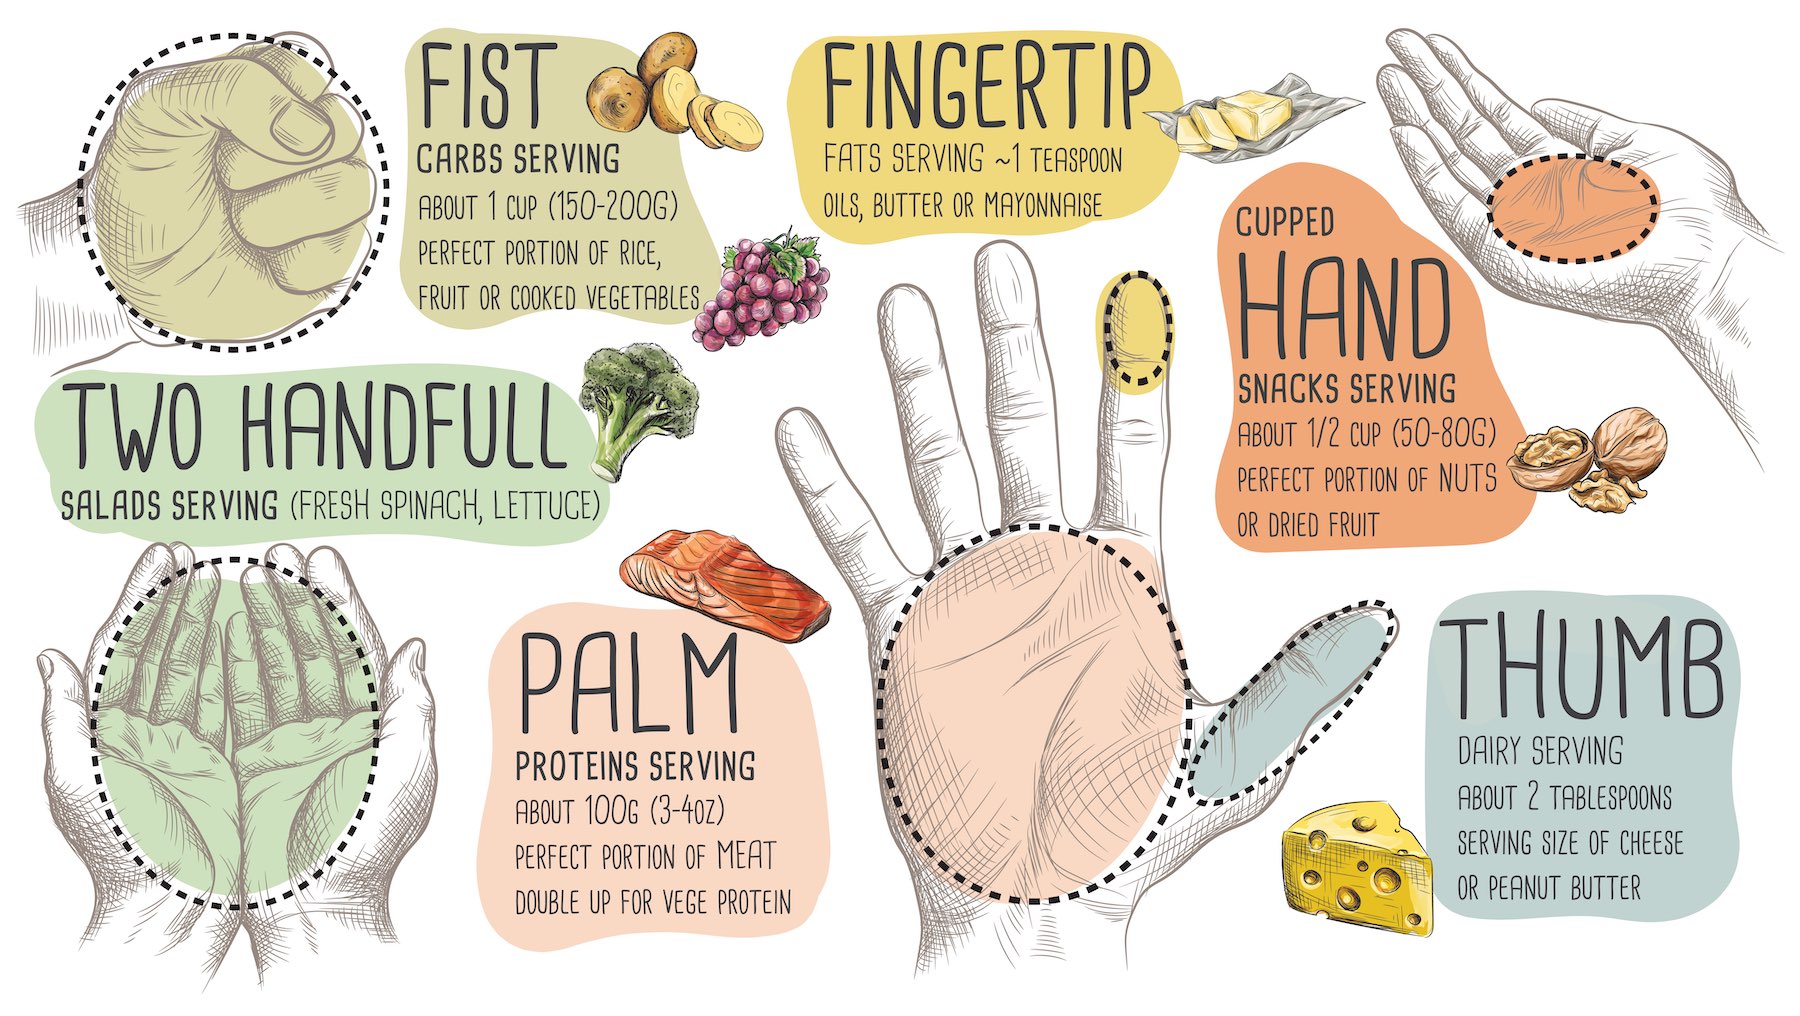
Reading about daily recommendations for protein introduced me to the concept of estimating portions relative to the hands. You will find many websites and illustrations of these. Some differ on the fine details and recommended quantities. My personal take-away may be summarised thus:
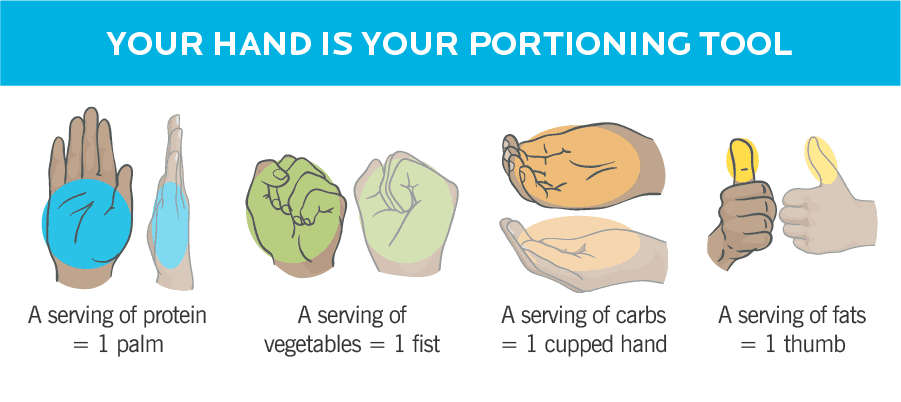
Protein
A portion of meat should be about the size of the palm of your hand. This is about the size of a burger, one or two sausages, a small chop or chicken quarter.
Lean meat, and meat cooked by methods that minimise fat content are obviously preferable.
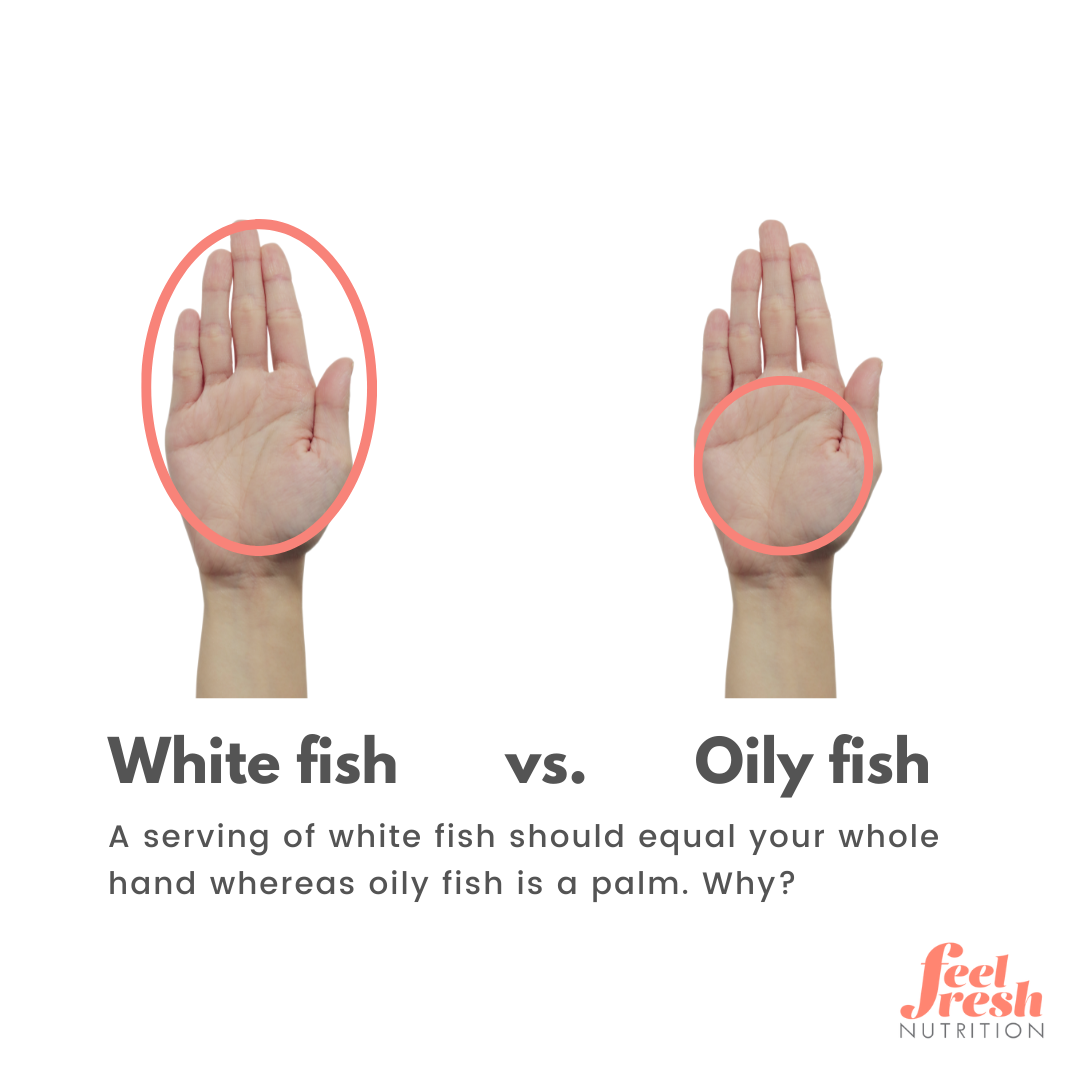
Oily fish has oils and fats, so is treated the same as meat, with a portion about palm-sized.
You may have a larger portion of white fish. A piece should be about the size of your open hand (i.e. palm and fingers, a hand-length). If you like your fish battered or breaded, I recommend baking it in a halogen oven rather than frying it. Quick, easy and delicious!
An old book I have suggests that meat should be used like a condiment, and only consumed in quantity one a week.
I feel that remains sound advice.
Carbohydrates
The carbs that you are most likely to be eating are mainly derived from cereals and grains. This class also includes beans, potatoes, and some vegetables such as sweetcorn. These are all rich in starches, which digest down into sugars. Sugar is also a carbohydrate, but we will deal with that separately later.
The carbs component of your meal should not exceed a cupful.
A clenched fish is equivalent to about a cupful (236-250 ml). The “face” of a fist is about half a cupful.
An alternate/additional approach to estimating a portion is that your carbohydrates should occupy about a quarter of the plate.
Some carbs, such as brown rice or wholemeal bread or pasta are a little richer in fibre or nutrients, but there is more merit in having a variety of types.
Fruit and Vegetables
Or more specifically, plant foods that do not count as being high in starch.
Some fruits are high in sugars, which some readers may need to bear in mind.
Generally, the recommended portion size for the non-starchy veg is two handfuls, or about half the plate. And unlike the above, this is a minimum recommended portion.
If you want to add more low-calorie foods such as vegetables, pile them on.
Have a good variety of vegetables to prevent eating them becoming monotonous.
Fingers and Thumbs
Other meal components such as sugar, salt, oil/salad dressing should be used in moderation.
A fingertip is about the equivalent to a teaspoon (5 ml). A thumb is about two tablespoons (30 ml), so half a thumb one tablespoon/15 ml.
As an aside, I was bemused to see my local pharmacist offering a bag of glucose/dextrose (with a hefty markup!) as “an alternative to sugar”.
Back to school again! Glucose/dextrose is a monosaccharide of glucose. Sucrose is a disaccharide of glucose and fructose. All are digested by the same route and have the same food value. You will see marvellous claims made about honey, but foodwise it is mainly glucose and fructose.
I like a sprinkle of sugar or drizzle of honey on my porridge, but make sure it is only a teaspoon.
Americans tend to write recipes in volumes (cups and spoons), while Brits are more likely to use masses.
If you are a Brit and considering paying more attention to your portion sizing, I recommend investing in a set of measuring cups and spoons.
Very soon you will understand equivalents like that a 40 gram portion of oats is about half a measuring cup, and how much this is compared to your fist.
One of the beauties of the hand measuring system is you always have it “handy”.
Spice is the Variety of Life
It is a good idea to have an assortment of sauces, spices and salad dressings to add extra variety to your meals from day to day.
This recommendation applies to both your home kitchen and your backpack. When you are out in the sticks and may need to eat the same food several days running, a dash of sauce or sprinkle of curry powder or chilli can make a lot of difference.
Snacking
One definition of a snack is eating for entertainment or a non-essential meal. I therefore try to limit my snacking.
Sometimes, however, you do need something quick to tide you over until dinner, or ward off a imminent migraine attack.
The recommended portion for a snack is a handful (about a quarter to third of a cup, or 30-55 mls may be a better measure). This may be a piece of fruit such as an apple or orange, or a handful of nuts, sultanas, cherries or similar.
Protein containing snacks may satiate you better. At other times you may need the carbs and sugars.
A handful of fruit makes a nice dessert to end a meal.
The important point is to stick to the handful portion size. This takes a bit of self-discipline, but you are unlikely to lose weight without this. Self-discipline is a personal property that grows with exercise and practice.
If you are prone to snacking, I suggest you stock up on some dried fruit (apricots, sultanas, etc) and some nuts and seeds.
I found that a plastic sauce container from the takeaway holds about 30-55 ml of nuts, sultanas etc. I keep one with my snacks as both eating bowl and measure.
Packaging and Portions
Actually achieving the above in practice is a little more complex. Often food is marketed in large packets.
For foods such as rice, sugar and porridge that has a long shelf-life, this is great. For other foods, it is problematic.
For example, the recommended serving for a low-fat yogurt (which may be quite high in sugars) is four tablespoons or 60 ml. It is sold in 500 g pots, with the advice to consume within “three days of opening”. Theoretically, for many households, if this advice is followed, most of this yogurt would be thrown-away rather than consumed.
Many snack foods are sold in large packets, and their is a great temptation to finish the packet rather than consume just a handful.
Bread and vegetables are often sold in plastic bags. These bags retain moisture and encourage food to rot or go mouldy. So you throw it away, waste your money and go back to the supermarket for more.
If you find yourself wasting food (or eating too much!) I suggest you invest in a variety of storage containers.
Remove the plastic packaging from perishable foods and store in containers. It is surprising how much better a lettuce keeps in box rather than a bag.
Some foods keep well in the fridge, others do better at room temperature.
Occasionally, inspect the contents of a box and shake out or mop-up any condensation and excess moisture that has accumulated.
This is also the solution to those large bags of snack food. A sealed storage box will keep them from going stale, and let you enjoy the occasional handful over a more reasonable time interval.
Ween yourself onto healthier alternatives such as nuts, seeds and dried or fresh fruit.
Chop Chop
If you have done any Chinese cooking, you will know that food chopped small takes less time to cook and is less likely to be underdone. This applies to the oven, pot and frying pan as well as the wok.
A palm-sized portion of meat or fish goes much further when diced or sliced.
All the ingredients cooked in this fashion may be served mixed together in a single bowl, which I find makes a meal more interesting and varied to consume. Many of my meals involve just a single bowl in one hand, a spork in the other.
If cooking without vessels, divide your food into small pieces before threading it onto sticks for grilling before a fire. Briefly pass the food through the flames or place it on the coals to sear and seal the outside.
Eat the Rainbow
“Eat the Rainbow” is a phrase I only encountered recently, but nicely summarizes something that I have been practicing for decades.
Consider a meal of something like chicken and chips, which is just yellow and brown or orange. Suppose we make it multi-coloured by adding some sliced baby tomatoes, coleslaw, shredded lettuce, a little onion, some mushrooms. Suddenly this meal has got a lot more interesting and more nutritious.
Not only does such a meal look better, it is also more interesting to eat, with a greater variety of tastes and textures.
Tip: Ramekins (or Gü jars!) are useful for one-person oven cooking.
I was reading some pretty useful advice on how to collect water while minimizing the chance of sediment and other large materials.
Hold the mouth of your bottle a fist-width below the surface to avoid floating debris (and mosquito larvae!). Hold it off the bottom to avoid stirring up silt. If the water is flowing, point the nozzle downstream to reduce the change of solids being washed in.
Cover the water bottle neck with a section of bandanna to filter water going in. Use a clove hitch or slip knot to secure the bandanna. This also puts a safety lead on your bottle to avoid loss!
Cover your canteen cup with another part of the bandanna and pour the water in the bottle through the bandanna into your cup to filter it a second time. Pour a little of this water into the bottle, to rinse out any particles that got in. Now sterilize your water.
The flaw in these instructions is that most water bottles are at least a quart or a litre, and canteen cups generally about half that! Biggest that springs to mind is the British Crusader MK.II cup at 800 mls.
I will come back to this topic presently.
After you have filtered your water, you still need to sterilize/pasteurize it. One of the most effective ways to ensure water is safe is to bring it to a rolling boil. Many foods you will encounter in a survival scenario will need cooking to make them safe or more palatable.
While there are ways to cook and even boil water without a metal vessel, life is a lot easier with one!
What Is Wrong with the Canteen Cup?
In his recommendations for SERE, Robert DePugh notes “Such cooking as may be essential can be done in the canteen cup.”
Many preppers and soldiers wishing to lighter their load are of a similar opinion.
The catch is that as they come, most canteen cups are wanting in certain respects.
The most obvious of these is most lack a lid. Lids save fuel and time. They keep bugs, dirt, dust and rain out of your food. In an escape and evasion situation, a lid may reduce tell-tale cooking odours.
Most canteen cups also require a stove. If you have to cook over a fire, you will need to jerry-rig some form of pot-support, or wait until the fire dies down to coals.
Not only do the side handles get hot, but your hand comes dangerously close to the fire.
How simpler things would be if your cooking vessel had a bail handle so you could hang it over a heat source!
It is possible to make or buy lids for your canteen cup. Similarly, there are a number of ways to add a bail handle.
I currently have three canteen cups sitting on the work table awaiting conversion. Each month I do not seem to have either the money or the time to gather the necessary tools and materials.
There is an obvious need for a low bulk cooking vessel. Can we do better than a canteen cup?
Suppose I told you that there is a superior alternative that is widely available and ready to use off the shelf, complete with bail handle and lid?
“European” Mess Kits
Instead of a canteen cup, why not carry a mess kit?
Specifically, I am suggesting the sort of military mess kit that looks like a binocular case, being either oval or kidney shaped in cross-section. I have seen these called “European” mess kits, although the Chinese and Imperial Japanese Army seem to have used the design too.
The bottom portion of the kit is a billy, with a bail handle. The upper part typically is a small pan with a side handle. This pan also serves as a lid during cooking or transport.
Many of you will have a passing familiarity with these mess kits. Their potential may have escaped you.
For a bug-out bag, where most of your cooking will simply be boiling or reheating, a mess kit of this configuration is ideal.
I have used my Swedish set for winter day hikes, since it fits nicely inside a daysac. With the snow thick on the ground, I have paused to cook myself some hot noodles.
The armies of most nations have used “binocular case” mess kits at one time or another. Many nations continue to use this design.
Most of the kits of this type available are described as German or Austrian, or “M31 pattern”. Do not confuse these with the pair of cups that fit outside of the German Army M59 water canteen.
The more recent Bundeswehr mess kit variants are to be preferred, since these have handles that can be locked upright or out to one side, away from the flames.
The German kit (and some other examples) includes a third part which is a metal bowl/insert. The hook at the end of the lid handle engages a slot in the bowl, so the two may be carried together, or the pair balanced across the top of the billy.
There are also Chinese manufactured kits that appear to be the same design as the German. These appear to be of new manufacture, rather than military surplus.
Russian, Romanian, Hungarian and Polish surplus examples are also stocked by some suppliers.
At time of writing, prices are comparable to those of many metal canteen cups that come without lids.
Most of these kits must be brought army surplus, so you roll the dice on condition and actual design. If you want something unused, the Chinese-made copies of the German sets are an option.
To these options, I will add the Swedish M40 AL/M44 mess kit set that includes a windshield and spirit burner.
The Swedish kits have become more widely known and popular in recent years. Prices have skyrocketed since I bought mine, decades ago. I am not sure if these are still issued or in production. One company makes a stainless steel copy of the Swedish kit. An aluminium version with a non-stick coating would be very welcome.
The Case Against:
• Let us get one objection to this idea out of the way! This is that a mess kit will not fit neatly around a water bottle in a belt pouch like a canteen cup will.
Firstly, while carrying some water on your person is prudent, you should minimize unnecessary weight. To my mind it is more sensible to carry a canteen cup or equivalent in your pack, not on your belt.
Secondly, water is better carried in a bladder than a bottle. Water in a bottle may slosh around, and that noise may give you away while hunting, nature-watching or in a tactical situation. Excess airspace is seldom a problem with a bladder.
If you do carry water in a bottle, repurposed soda bottles work fine, and are lighter and cheaper than military style rigid water bottles. Soda bottles are much more flexible than thicker bottles. If the contents of a bottle freeze, the ice can be broken up without damaging the bottle.
In sub-zero conditions, carry your water bottles and bladders in the warmest part of your pack. Invert them so that the drinking tube or cap is lowest. Ice floats, so the lowest part of a container will be the last to freeze solid. Ice expands, so leave some airspace within a container if freezing is likely.
If you expect freezing temperatures overnight, pour some of your water into a cooking vessel. Ice in a pot is easier to melt than snow or ice within a bottle.
In very cold conditions, when you heat water, use what you do not use to top-up/warm-up your water containers.
If you do not carry a canteen cup on your belt, and you do not carry a military canteen, it does not matter that your cooking vessel will not nest around a canteen!
• Second objection is that most of these vessels have bare aluminium interiors. If you wade through the media sensationalism, groundless opinion and scare-mongering, you will find the evidence on possible health risks of using aluminium cookware is still inconclusive.
The surface of a cooking vessel is actually aluminium oxide, which serves as a protective coating. Prudence suggests that if you avoid cooking anything particularly acidic in an aluminium vessel, avoid prolonged cooking, or a combination of the two, you should be safe. If you use a very abrasive cleaner on your cookware, leave a short interval for the oxide coating to reform.
For a cooking vessel in an emergency kit, or one that is only used occasionally for trips out, bare aluminium is a legitimate choice. Remember that actual cooking in a survival or E&E scenario will be fairly basic and unsophisticated. Mainly just heating and boiling.
• Third objection to the mess kit is that it is larger than a canteen cup.
In a survival or E&E situation, most of your food will be from plants. These tend to be low in calories, so you will need to eat a lot of them. Bear in mind that in a survival situation, you may have to also cook for someone other than yourself. A cooking vessel larger than a canteen cup may be an advantage.
As my introduction has suggested, being able to heat treat more than half a litre of water at once is useful.
While it has more bulk, a European-style mess kit is still compact enough to fit in most daysacs. The interior space of a mess kit may be packed with food and other useful items, so effectively becomes zero bulk.
Generally, a mess kit is heavier than a canteen cup too, but bear in mind this is for two or three cooking vessels rather than a single one. My German mess kit is 400 g. 350 g if the metal bowl/insert is left at home. My Swedish five piece kit is 875 g, including windshield, burner and empty fuel bottle. Billy and lid on their own are 450 g.
The billy of my Swedish mess kit has a capacity of about 1.3 litres. The equivalent part of the M31 is 1.5 litres. It includes a measuring indent each 500 mls. Oddly, the German kit looks slightly smaller than the Swedish. Both kits can boil more than a litre of water to sterilize it.
For completeness, the lid of my Swedish Kit holds 550 mls. Both the lid and the insert/bowl of the German kit hold 400 mls each.
My Polish mess kit resembles the German model but is smaller. There is no insert and the bail handle lacks any locking mechanism. The billy has a capacity of one litre and the lid 500 mls. It masses 300 g. There is a measuring indent at half a litre.
One odd quirk of the Polish set is that it is top heavy when empty.
Note that masses and volumes on this page were measured using items I personally own. Figures may differ from those given by vendors.
The Case For:
To my mind, it is not a billy if it does not have a bail handle. The bail handle is a simple feature that makes a camping cooking vessel infinitely more practical and versatile.
The bail handle of a billy lets you hang it over a fire. If your stove is a bit wobbly, you can use a tripod or crane for added security of your vessel.
In a previous post, we looked at how useful a bucket might be. A billy is essentially a bucket you can cook in. It may be used to fetch water or to gather berries. You can use it to transport a meal, even while the food is still hot. If you expect rain, leave it outside your shelter to collect fresh water.
An effective cooking vessel should be one of the foundations of your bug-out bag, 72-hour pack or survival kit.
The capacity of a European mess kit makes it more useful and versatile than a canteen cup, yet still compact enough to fit inside a relatively modest capacity bag. Or, looked at another way, it leaves room for something else you will need.
The lid of a European mess kit serves as a pot. This is often described by reviewers as a “frying pan”. It will hold a rasher of bacon, a couple of sausages, or a small piece of fish! More practically, the lid may be used as a drinking vessel, saucepan, plate or bowl. It could also be used as a ladle for bailing water out of an Indian well, or as a snow scoop for adding the final touches to a winter shelter.
Cooking vessels with a tightly fitting lid are recommended if cooking with hexamine.
The handle of my German kit lid folds easily, so care must be taken when drinking from it. Perhaps hitting the rivets would tighten this up. but I doubt it. Alternatively, drink from the insert/bowl. The handle of the Polish kit is better, but will still fold if held at the wrong angle.
If your cooking ability is limited to warming a can, a mess kit is wide enough to accommodate at least one. Discard the water used to warm a can this way. It will be contaminated with whatever was on the outside of the can, the glue from the label etc.
There are ways to warm a can without using a vessel, but that is outside the scope of this article.
Swedish soldiers call their mess kit a “Snuskburk”, which translates roughly as “dirty bucket”, “filthy jar” or similar. Apparently soldiers often neglect cleaning them after use. I do not really see why this should be the case.
If you have large hands. you may find it difficult to clean the inside of a canteen cup. This is another advantage of the larger capacity of a mess kit.
Your cooking kits should include a small sponge, such as the sort with a nylon scourer pad on one side. You can also use this sponge to mop up dew if you are short of water.
With the sponge, have a small bottle of washing-up liquid. I use a 50ml centrifuge tube such as a skirted Falcon.
If you have read my blog on a more efficient way to wash-up, you will know you only need a couple of drops of detergent and a few splashes of water to keep the inside of a mess tin clean. Should you lose your detergent, ashes from the fire may be used instead.
Since the main parts of the mess kit do not nest in anything, keeping the outsides pristine is not a priority. Once cooled, just give the outside a rub with some grass or similar to dislodge any loose soot.
Another advantage of a mess tin is that you get much more bang for your buck. For a similar outlay to a canteen cup, you get a pair of larger capacity cooking vessels. You do not need to buy a lid as an accessory, nor source a hanging device.
Packing and Carrying
Traditionally, a European mess tin is held together with a strap and carried on the outside of a pack or belt kit. Some armies issue pouches, but these generally follow the tradition of “an elephant is a horse built to mil-spec”.
A more effective solution is to make or buy a suitably dimensioned stuff sack. This sack can carry associated items you do not want to carry inside the mess kit, such as your stove and fuel bottle. Double-plastic bag the latter in case of leakage.
To this, add your container of washing-up liquid and your sponge.
Add a spork for eating with and stirring the pot. Since the mess kit does not have a non-stick coating, I use a metal spork that can also be used to lift a hot bail handle. The spork also serves as a can-opener, but I also have these on my keyring and my Swiss Army knife too.
A triangular bandage, bandanna, tenugui, or piece of old tee-shirt may be used to stop any parts rattling. This also serves as an “oven glove”, water filter and drying cloth.
Fill the interior of your mess tin with items such as a brew kit, packet soup, instant noodles, hot chocolate mix, quick-cook rice, porridge, OXO cubes, water purification tablets, a source of ignition such as a lighter or fire kit and so on. A bit of variety in your diet will always be welcome.
If you are more a cook, a European mess kit is nicely complemented by a US meatcan.
Stoves
There will be times when you cannot use an open fire to cook on.
The Swedish mess kit comes with its own stove in the form of a spirit burner and a windshield/stove.
Do not store fuel in the burner. It will eventually eat through the seals and leak into your bag.
The German mess tin is too big to use in the Swedish windshield. It will fit, but be too tight. Trying to remove the hot billy from the burning stove is not recommended!
European mess kits will work with a wide variety of other stove types. Some may need to be turned down a little to compensate for the pots' non-circular shape.
A hobo-stove made from a soup can will be of a good size for a European mess tin.
Spirit burners may be easily made from aluminium cans, such as shown here and here.
Some other homemade stove designs are shown by my pages here.
Many of the designs of stove intended for use with canteen cups or other designs of mess tin will work well with European mess kits. For example, the Crusader Mk II stove, which can use either hexamine solid fuel blocks or alcohol gel. The stove is designed so that the canteen cup nests slightly inside when in use. The mess billy is a little too big for this but will sit comfortably on top.
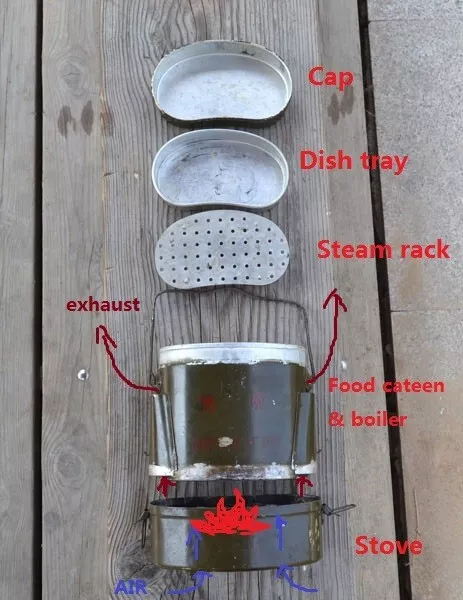
Shown about is an interesting Chinese-issue mess-tin with stove. The stove is not unlike the Crusader cup models, but clips to the bottom of the mess-tin for carriage. There are air holes drilled in the underside, and the mess-tin has two side channels as “exhausts”.
Improvements
As I have discussed in a previous blog, mess tins are not as widely used by the military as they once were. Many soldiers now make do with just a canteen cup. Most of us, however, do not enjoy the extensive logistical support most soldiers have.
One company is already offering a stainless steel copy of the Swedish mess kit, so I think there is a good case for commercial versions of the European style mess tins.
I think many of us would be interested in an aluminium version of the Swedish kit with a non-stick or hard anodized coating. Essentially, the same materials and finish as the Crusader Mk. II cup.
Some of us would probably prefer a Swedish mess kit that was a little more compact. On the other hand, I think there would also be potential users that want it a little bigger.
An improved version should probably be available in one litre and 1.5 litre variants. The most practical way to do this would be to have two billies which only differ in depth. All other components would be the same for both variants.
Features I like from the German mess kit are the measuring indents, the locking mechanism on the bail handle and the insert. An insert for the Swedish mess kit might be useful, particularly if available in alternate materials such as plastic.
The stove for the improved mess kit should be capable of taking several fuel types. For example, hexamine, alcohol gel and spirits. Something along the lines of a scaled up Crusader Mk II stove, perhaps.
The first photo shows the kit partially packed up.
To the left is a heavy duty stuff sack that just happens to be ideal for carrying a plate-like object.
The frying pan sits on a repurposed, out-of-date triangular bandage. This has various uses, including as a tenugu-type dishcloth. In transit it is wrapped around the outside of the pan.
To the right are two bottles, one for detergent, the other for cooking oil.
In the pan we can see a spork and spatula resting on top of the cutting board. The white is the eating plate, and the green of the cleaning pad can be seen showing through.
Second photo:
The kit unpacked.
Top left, the cutting board, cut to shape to fit in the frying pan. This is a thin plastic cutting board sold as part of a set of several for kitchen use. Resting on this is a combined sponge and scrubber.
Top right, the spork and spatula rest on the plate. The plate is enamelled metal, and deep enough to hold liquids. Inverted it may be used as a lid or cover for the frying pan.
Botton, a view of the frying pan itself. Most frying pans sold for camping use are way too small.
Mine was made from a cheap non-stick item, and is just under nine inches in diameter.
The original handle was removed and replaced with a square-section fitting. This socket may be used to fit the frying pan to a pole or branch. It is also the mounting for the folding and detachable handle, which locks in the open position.
Third Photo:
The spatula and the inverted plate.
The edge of the plate was drilled with a ceramic bit, and a hole made through the metal. This was used to add two wire loops made from paper-clips. These loops are used to lift the plate when it is used as a cover or lid.
The spatula serves as a turner, stirrer, scraper, server and many other roles. It is a cheap beechwood item that has been modified and treated with boiled linseed oil. Since the pan is non-stick, spork and spatula must be non-metal.
The handle has been shortened so that the item fits within the frying pan when packed. The cut end was reshaped for increased functionality. The cut notch may be used to lift billy lids or pick up hot billies.
A loop and hole was added so that the spatula may be hung up to keep it out of the dirt.
My friend Sam had the concept of “Sam’s Van”: that one should not have more than could be moved in a single vanload, an example of quantity-limited minimalism.
In all honesty, I cannot call myself a minimalist. My girlfriend is probably having a hearty laugh at the very notion!
I have, however, attempted to make use of some of its techniques.
Don’t Count!
A very useful piece of advice I came across was “Don’t Count!”
“I only own n number of things” makes for a great blog title, but if many of us try to apply this in practice it can lead to unhealthy obsessiveness, or goal-post shifting.
Well done to those who have reduced their belongings to just n-items, but bear in mind a more productive application of the exercise is to reduce your belongings to only the things you need, rather than an arbitrary number.
Some possessions naturally begat others. I have knives and other edged tools for my kitchen, hobbies, toolbox, camping and EDC. It would be very foolish for me not to own at least one other possession to keep them sharp, for example.
Sometimes a simple single addition may make a lot of difference.
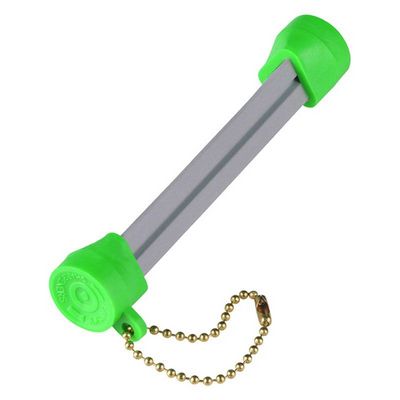
I carry my keys on a carabiner. Not all of my trousers have loops in the best position for this.
I brought myself a robust key-hanger that fits on my belt. The hanger even has a couple of stout press-studs so I am able to place it on my belt without needing to unthread it. Now the keys always hang directly over the pocket. An additional possession well worth having.
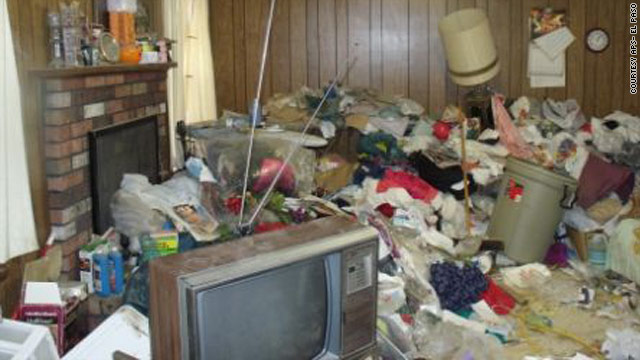
Clear the Decks
Another good tip I have encountered is to “clear the decks”.
Ideally, nothing should be on your floor except your furniture.
Once you have relocated or discarded the stuff that was taking up your floor-space, move on to the other horizontal surfaces and declutter them.
Minimalism for Preppers
Applying minimalist techniques can be a very useful exercise, especially for preppers.
You can apply them just to your backpacking or bug-out outfit, or to your life in general.
I come across a lot of lists of equipment. Many of the “essentials” are actually only conveniences or “nice to haves”.
I have read a minimalist list where the person owned one bowl, one plate, one mug and one glass. Presumably their mates never came around for a cuppa or a drink. Or perhaps their mates were all minimalists too and were expected to bring their own cups!
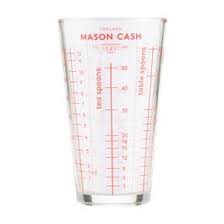
The same list included a set of measuring cups for cooking. Perhaps a single measuring jug is more minimalist than a set of cups? Perhaps they could drink out of the measuring jug! I was rather pleased to see someone offering a graduated drinking glass!
Kitchenware
If you are on the move, your minimalist cooking kit is a spork and canteen cup or mess tin. Many canteen cups now have non-stick coating, so use a non-metallic spork.
Stephane Reynaud wrote a cookbook called “One Knife, One Pot, One Dish”. Not as minimalist as some would want, since the “pot” in different recipes may be a casserole, frying-pan, saucepan, baking dish, bain-marie or even a food processor.
If you want a very minimalist cooking outfit for home, a frying pan/skillet and a flameproof casserole is not a bad option.
Since you will be spending less money on kitchenware overall, you can probably afford quality examples of what you do select.
The casserole should be of the sort that you can use on either the hob or in the oven. If you use a halogen oven, you will obviously need a casserole that can fit inside of it and when filled is not too heavy for you to lift out.
An oven-baking dish is a useful supplement to the casserole. If you have a halogen oven, make sure your dish is of a size and shape that fits it. Most halogen ovens include a suitable baking dish with their accessories.
Select a spatula that can serve as a turner, server and a stirrer.
I like to cook and get a little creative in the kitchen, so I do not think it is too great a disaster if I have a couple of extra pots and spatulas.
A small saucepan will probably see lots of use. You will probably find you do not need more than two or three of varying size. Two frying pans of different sizes is sometimes convenient, although I use my wok and frying pans a lot less since I got the halogen oven.
If you do use a halogen oven, you will know that tongs are pretty useful for removing or turning hot food. You could use a pair of spatulas, I guess, but chances are your halogen oven came with a set of tongs, so why not keep these?.
You will need a chopping board and/or a set of flexible cutting board sheets for use with your knife.
I would opt for a Chinese cleaver, but you may then need a small knife for those rare jobs the cleaver is not good for. You should also have a serrated knife for cutting bread and fruit.
It is useful to have scissors and a spare penknife in the kitchen. Then again, my kitchen also has a buck-axe and Mora-knife!
I quite like the sets of measuring cups and spoons I have hanging up in the kitchen. I try to use them to stop over-serving myself portions. The minimum is probably a measuring jug.
Have at least one mixing bowl. Perhaps invest in an ovenproof one that may be used in the microwave or halogen oven.
Usually I drain food using the pot lid. A sieve, strainer or colander may sometimes be needed. The perforated steamer and mesh dishes from my halogen oven may substitute.
I could probably use a larger selection of storage boxes for the fridge, and make the ones I have more accessible.
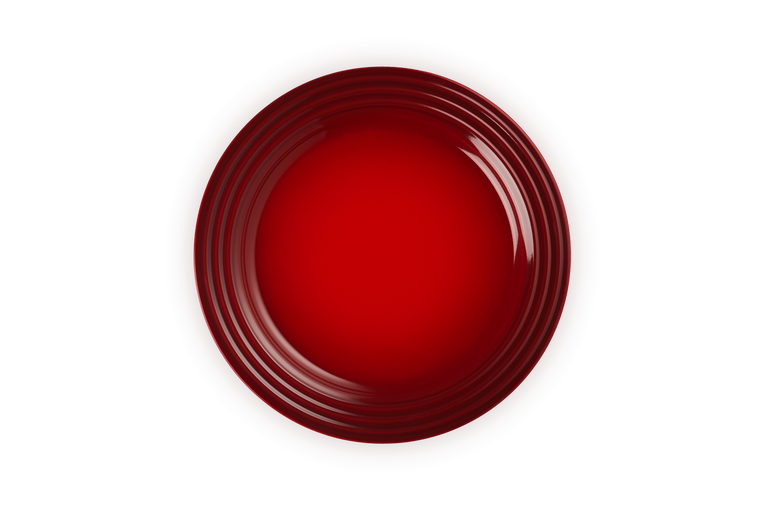
For each person, there should be a bowl, plate, mug and drinking glass.
If you are a big tea drinker, you will want your mug made from glass. A glass mug is a good all-rounder for all kinds of hot or cold drinks.
For cold drinks you may want something taller with more volume and room for ice.
Ideally, have two sets of tableware for each person. You will need to wash-up less frequently and you can accommodate guests. If there are more than two of you, the extra plates and bowls are useful for serving. Bowls also get used for mixing, marinating and microwaving.
For each person, a set of utensils: knife, fork, spoon. All-metal, single-piece sets are more durable. The knife should be of a form that can cut cooked food and spread butter. Have a couple of spare sets for guests.
You may want a steak/cutting knife and teaspoon for each person or guest too. Personally, I like to have at least half a dozen additional teaspoons. A teaspoon is far better for spreading jam or marmalade than a knife, incidentally.
Adopt my methods of quick, economical washing-up and you will find it easy to maintain a stock of clean cutlery and dishes.
I have a dish-drying cloth, but seldom use it since letting washing-up drain and air-dry is cleaner and more convenient. It gets used more often to swat flies. Drying my hands is more common, and this only needs a small hand-towel. Same hand-towel is useful for handling hot dishes and pots.
What Do You Really Need?
It is foolish to think what applies to yourself is true for everyone else. That is quite a useful thing to remember in everyday life. Keep this in mind when you read minimalist lists.
Sometimes I find that I do not need some of the items on minimalist’s lists. Having a good penknife does away with the need for many other implements.
My girlfriend recently tidied-up a bedroom that had been used for storage.
“Transformed” is probably a better term. It was hard to believe it was the same room!
I was looking around for a rug with a two-metre high pile of junk swept under it.
One of the few items she declared surplus to requirements was a desk-lamp. She had absolutely no use for this, she declared. Neither had I, I realized.
I have two desk-lamps, both fitted with daylight bulbs. I only ever use them when I am photographing something.
I mention this, since several minimalist lists of belongings include desk-lamps or floor-lamps as essentials. Perhaps their home is considerably darker than mine and they do actually need them.
Most of us do our writing and reading on computers these days, so I would venture that many of us do not need a separate desk-lamp. I certainly do not need a lamp to “create mood”.
Sometime ago I got rid of a freestanding lamp since I never used it.
I think television shows create a false impression here. Often on the box, we see an interior with multiple lamps, all of them lit in the middle of the day!
Don’t use lights you do not need, and reduce your energy bill. Sell or donate lamps you never use.
Another item that is surprisingly common on minimalist lists of “necessities” is bathroom scales. Personally, I have never owned a set of bathroom scales. I do not need a set to tell me I am carrying extra weight, I can see it! Similarly, weight-loss that the scale claims has no value. What matters is that which I and others perceive.
Wastebaskets? I have certain in-laws that cannot grasp not to use a bin without a liner. My rubbish for recycling goes into a repurposed plastic bag. This usually hangs from one corner of a kitchen chair, so I need no bin.
Foodstuff that might attract flies goes into a bag in the freezer until it is thrown out into the bins outside.
Not that I get many flies, since I fitted all the windows I might open for ventilation with insect mesh! Simple addition: big change!
Something I don’t see on many lists is a dressing gown. I spend most of my time at home wearing little else! One of the pleasures of a nice shower is drying off in a snuggly dressing gown!
My older dressing gown has fallen to bits, so I may replace it with a longer, hooded fleece gown for the colder months, and to wear when the other fleece gown is being washed.
The dressing gown is supplemented by a fleece blanket in the lounge. I spend most of my time alone, so heating the whole house if it is a little chilly is stupid. I often watch television or play video games with a blanket thrown over me. If it gets colder, I throw a poncho-liner over this too.
Constructive Minimalism
In an apparent paradox, if I have been reading a minimal list of belongings, it is more usual for me to think about buying something rather than discarding something.
This illustrates how minimalist lists can be a useful tool for making you concentrate on what are your essentials and highlighting where you might make improvements.
I have, however, taken to practicing a self-imposed “cool-down” period. I wait at least 24 hours before I click “buy”. I may miss the occasional bargain, but generally I save more money by avoiding spending it on stuff I can manage without.
Thinking of your possessions as “collections” or “kits” can be productive in rationalizing what you have.
Bedding
Considering bedding, it occurred to me my life would be a lot easier if I had two brand-new sets of sheets and duvet covers. Some of my older stuff did not quite fit the mattress I now have.
Two sets give me one new set on the bed while the other is in the wash.
I have an extra duvet and pillow, so I can use my older stuff for these, again giving a set in use and one in the wash.
Stationery
If I consider the topic of “stationery”, what do I actually need, compared to what I have?
Most writing is now done on the computer, so pens and paper are seldom used.
I have blank A4 paper for the printer (although the printer seldom behaves well enough to print anything! The device is mainly used for scanning.). That blank A4 paper can be used for various other things. A pad of lined paper and/or a notepad or two. Pad of post-it notes. Stick of paper glue.
You may have uses for a highlighter, stapler or some paper-clips.
Seldom do I need envelopes these days. If I do need one, I can fold a piece of paper into one. I do occasionally send packages, so some tape is useful.
I have plenty of knives, so I could do without a pencil sharpener, although there is little point in discarding the couple that I have.
I have some super glue and blu tac, although these reside in my modelling supplies.
Erasers, pens, pencils, of course.
Go through your pens and discard refills or disposable pens that no longer work.
Some forms require you to fill them in in black ink, so make sure that some of your pens are black.
Recently I had to send a parcel and was unable to find a thick pen to write the address with. So I bought a pair of black Sharpies, adding one to my EDC and keeping the other for home use.
Sometimes it is a matter of organization.
I had lots of pens and pencils, but distributed in various diverse locations. Pool most of your erasers, pencils and pens into a box or a large pencil case. You can still have a pen and/or pencil in places you are likely to need them, but if you do need something you only have to look in one place.
I have a pen and pencil in a box in the lounge, a pen and pencil in a kitchen drawer, and everything else in a large pencil case in my room. A handful of paper-clips form the zip-pull.
Ruler, protractor and a pair of compasses can be handy at times, and also serve in the “tools/DIY” category.
DIY Tools
The DIY tools I probably use the most are a tape measure and a drill. There are often screw-hooks that need putting up.
A awl, gimlet or bradawl is useful for beginning drill holes. The reamer on a penknife is good for many jobs, but the T-handle location means it is awkward in restricted spaces.
Many jobs I have used a drill for actually only need a gimlet. If just starting out, invest in a set of gimlets. Only buy or borrow a drill when you encounter a job that really needs one.
A penknife reamer makes a pilot hole large enough for the screw-section of a gimlet and reduces the chance of splitting the grain.
To start accurately drilling metal, a centrepunch and hammer is useful. A nail or scriber may substitute for a centrepunch for some applications.
On the back of my tool cupboard door hangs a tape measure, small spirit level, a Stanley knife and a hand-crank flashlight. The flashlight is mainly used for exploring the depths of the cupboard, but may be used for other household applications.
With the abundance of small electronic devices in modern life, a set of fine screwdrivers will prove useful. Add tweezers and magnet(s) as suggested. You may wish to add a spudger. One screwdriver should be large enough for rewiring plugs (3 mm slot). If this is not the case, buy a small electrician's screwdriver.
You will probably need some pliers. Needle-nose and chunky, possibly curved too. Your hobbies may require additional smaller examples.
Eastwood's character in “Grand Torino” opinions that all you really need is duct tape and mole grips. A related witticism “If it rattles and shouldn't, duct tape it. If it doesn't rattle and should, use WD40”.
Scan It and Toss It
As mentioned, my printer is also a scanner. It can feed-in and scan whole stacks of papers automatically. Or at least, it did until Epson discontinued the software needed to do this for my model!
A scanner may be very useful for decluttering your life.
When I moved in with my girlfriend, I scanned scores of folders of documents, magazine articles and old papers. This allowed me to throw out several sacks of the old papers and makes it easier to find the information I want when I want it.
Bag and Box
Bag or box stuff when you can. You will save yourself time if these bags and boxes are transparent or mesh.
For example, stick all of your pairs of gloves that are not in jacket pockets in a mesh bag in a drawer or on a wardrobe shelf. When you need gloves, just one place to look, and no hunting for a glove hiding in with the socks.
Things that are wanted but seldom used may be tucked away on a high shelf or bottom of a wardrobe. Conversely, some things that you might make more use of may currently be hidden out of sight and out of mind.
Put your teaspoons in a small jar on the countertop rather than hidden in the bottom of a crowded drawer. Makes them much easier to find.
My final advice is to understand that decluttering is likely to be a “work-in-progress”.
Many times you will think that you are nearly done, but are not! Changing one thing will put other things in a new context.
Scanning the last of my old papers got me thinking about the various plastic and card folders they had been in.
I have lots of books and DVDs. While I like to call the exercise “decluttering”, there is no way my home will ever look uncluttered.
It might be argued that much of my minimalism is “below the surface”.
There is now less in the cupboards and drawers. What is in there is now more logically organized and more easily found.
It is quite probable that no-one will notice the difference except myself.
Watching the TV the other night, and an advert for washing-up liquid urges me to wash-up with cold water! Really? That's a new one, I thought.
On the other hand [pun intended!], I have been washing my hands in cold water for more than a decade. I got into the habit in Brazil, where it is common for sinks to have only a cold-water tap.
Money is tight and fuel prices have jumped. Anything that saves the use of hot-water is attractive both ecologically and economically.
I try to approach decisions scientifically, so I did a little research. I found this interesting article on the BBC website:
Washing-up detergent and scrubbing is more important than water temperature! As a microbiologist, among other things, I was already aware that washing-up water is generally not hot enough to kill many bacteria.
It just happens that currently I am reading Alexander Kira's fascinating study “The Bathroom”. This is recommended reading and some aspects from this book will doubtless feature in future posts in this blog.
Kira notes that washing under running water generally uses less water than filling a hand-basin. He also points out that showering is more efficient at getting you clean than having a bath. Baths are primarily for relaxation, and you are actually soaking in any dirt that was removed. If you want to be clean after a bath, finish your routine with a shower.
There is an obvious parallel here: I expect we all know someone who continues to wash dishes in water that resembles weak chicken soup!
Another gem from Kira is that effective washing is in four stages: wetting/pre-rinse, soaping, scrubbing, and rinsing. Note that only the first and last of these needs running water. You can turn the tap off when soaping and scrubbing, so the tap is only running a few seconds for each item you wash.
Armed with new knowledge, I began washing the dishes.
Here, I must confess! I often eat alone, so cooking and eating often generates just four or five items to wash. Not enough to fill up a sink for, so I will often leave the job until there is more.
Very quickly, dishwashing becomes a big job, and one that it is temping to put off. Yes, I can be a bit of a slob when my lady is absent!
There were thus no shortage of items on which to try running cold-water washing! There was a baking tray, some plates, bowls, a cup and cutlery.
The first surprise was how much less time washing-up seemed to take. I seemed to have done it all in less time than it would have taken for the water to run hot and fill the sink.
All items were clean, some possibly cleaner than if they had been washed in a sink that had already cleaned other items. As a bonus, the sink was not coated in grease!
Effectively, you are giving your dishes a cold Navy shower!
Quicker, cheaper, easier and probably cleaner. What is not to like?
Even if you tend to put-off washing-up, you will know that you will save yourself effort in the future if you rinse the food off the plates before it dries. What “Rick and Morty” calls “schmutz”.
Consider this: By the time you have rinsed a plate and scraped the food off, you are already halfway through a running cold-water wash-up! Add a little washing-up liquid, another scrub and rinse and the job has been done. No more washing-up to do later for that item!
The speed of this method lets you prevent washing-up from piling up. You can wash-up a couple of items while waiting for the kettle to boil, or during the advert break of a movie.
An added bonus of this technique is that I find I tend to pay more attention to each item. Not only do they get cleaner, but the chance of breakages and chips seems less.
Another labour-saving tactics is to let the wet stuff drain and air-dry. Only use a tea-towel when an item is still wet when you put it away or need it.
Detergent
Running cold-water washing may result in you using more washing-up liquid than you used with traditional washing. You will need to experiment to optimize your use of detergent.
Placing the detergent on the sponge or brush may make it go further. Some items, such as a oily grill pan, seem to clean better if a pea-sized amount of detergent is placed on them directly and then worked around.
A running cold-water wash may not be ideal for all items, but works well for most of the items that you commonly wash.
Hot and Cold Soaking
Some items may need a hot-water soak. The heat can be beneficial in softening food deposits and melting fats. If you boil a kettle for tea or coffee there is usually some hot water left unused. Put this to good use on your washing-up.
Rather than fill a whole sink with hot-water and detergent, try filling a smaller bowl or pan and soaking the items in there. My only caution is not to place metal objects in a pot with a non-stick finish.
Do not hot-soak any vessel that has been used to make dough or batter. Flour and hot-water is effectively glue!
Soak the interior of such vessels in cold-water and you will find them much easier to clean when you wash them.
Greasy Frying Pans
In“Camping and Woodcraft”, Kephart gives us some valuable advice on how he cleaned his utensils deep in the woods. Game is generally deficient in fats, so cooking in the frying pan with bacon or bacon-fat was the norm:
“First, as to the frying-pan, which generally is greasiest of all: pour it nearly full of water, place it level over the coals, and let it boil over. Then pick it up, give a quick flirt to empty it, and hang it up. Virtually it has cleaned itself, and will dry itself if let alone. Greasy dishes are scraped as clean as may be, washed with scalding water, and then wiped. An obdurate pot is cleaned by first boiling in it (if you have no soap powder) some wood ashes, the lye of which makes a sort of soap of the grease; or it may be scoured out with sand and hot water. Greasy dishes can even be cleaned without hot water, if first wiped with a handful or two of moss, which takes up the grease; use first the dirt side of the moss as a scourer, then the top.”
You probably don't have a lit camp-fire at home, and we are trying to save fuel. A similar trick can be used at home, however.
Once you are done cooking, turn off the heat, and add a few mils of water to the frying pan. Adding a large volume may drop the temperature too quickly and may damage the pan. It is very likely to crack glass and ceramic vessels, so I will stress using a very small volume of water for this method, and usually for metal pans only.
A small amount of water, added in this manner, will “deglaze” a pan. This is a quick way to make sauces or gravies, but can also pre-clean a pan.
The water takes the heat of the pan, loosening food particles and floating fats. Give the pan a quick scrub with a soft-brush and discard the water, fats and debris. Let the pan cool down while you eat your meal.
Deglazing makes washing the pan later considerably easier.
And Finally
Some items are best cleaned with a brush, others with a sponge or fibre-pad. Have a selection of scrubbing tools available.
Once you have finished dish-washing, do not forget to wash the sponges, fibre-pads and brushes that you used for scrubbing. Work some detergent into them and rinse and squeeze-out as much grease as you can. Place them were they can dry.
One of the interesting things I have learnt during lock-down was that I could be happy with much smaller portions of food than I was accustomed to.
Before lock-down, I had already stopped including pasta, potatoes or rice in my meals.
Meals at home would be just meat and vegetables.
During lock-down, many meals became just a portion of meat or fish (battered fish bakes very nicely in a halogen oven!).
Other nights, dinner might just be a bowl of sweetcorn with a dash of Tabasco. The roast potatoes I had left after Christmas dinner formed a couple of nights' dinners on their own.
While individually, many of these meals were not balanced, things seemed to even out nutritionally over a week or more.
Generally, these relatively modest portions satisfied me.
If I felt peckish later on, I would eat some fruit. If a fancied some desert, this would often be fruit.
Some nights, when I did not feel hungry, dinner might just be fruit.
Typically I only ate twice a day.
Breakfast/brunch was usually a serving of porridge with a few sultanas.
Less Plate, More Satisfaction?
I am reminded of this since recently I heard someone comment “People eat too much because plates are too big! Use smaller plates and they will eat less.”
Often when eating my modestly sized meals, I have used the small 21cm diameter side plates rather than the full-sized dinner plates.
When food does not need cutting up, I usually use a 16cm/ 500ml bowl.
My small meals had satisfied me both physically and psychologically. Enough really is as good as a feast!
I did a little research, and the idea of using smaller plates has some support.
I also came across the suggestion that plate colour may also have an effect on satisfaction. My small plates and bowls are black, which is a good colour for contrast. Red is apparently even better.
There seems to be something to all this.
The “first bite is always with the eye”, so there seems to be some logic that the presentation of a meal has some effect on psychological satisfaction with portion size.
If you want to drop a little weight, a few red bowls and small plates may be a useful investment. I would advise getting those that can be used within a microwave oven.
After you eat, it is a good idea to drink a glass of tap-water and clean your teeth.
Smaller Pots
To the above, I have an additional suggestion.
If you cook your own meals, try using smaller cooking vessels.
It is all too easy to increase the quantity you are cooking if you use large capacity pots. And once the food is cooked, it would be sinful to let it go to waste! Instead it goes to waist.
I have put my large pans back in the cupboard and dug out a couple of small saucepans, each about one-litre capacity and around 17cm diameter.
For meals for a single person these should be quite adequate for anything you need a saucepan for.
I have an even smaller “milk pan”, but this is in daily use cooking my porridge. Also milk pans generally do not come with lids, and a lid is often needed for more efficient cooking.
A smaller pan may mean you have to cook on a smaller hob than you usually used.
I have also noticed I need a slightly lower flame setting to prevent flames wastefully lapping up the sides of the pot.
Thus, using a smaller pot is saving me some fuel and money. Smaller capacity saves both time and water.
And if further incentive were needed, mastering cooking with small pots is good training for when you may have to cook in just a canteen cup or mess tin.
I have been using the past few months productively. I may not be able to go out much, so why not use the time to finally get around to all those little jobs that stack up? I have washed my down jacket, replaced the zips in two jackets and the cuffs in another.
It is also a good time for various experiments! I love my coffee, and I do mean coffee, not the horrible instant chemicals that masquerade under the name. It seems a great shame that our young men and women risk their lives serving their country and the last thing they may drink is such crap.
While researching how to made a decent cup of coffee in the field, I came across this interesting website. How you go about making coffee (or tea, for that matter) can have a considerable influence on the taste. Relatively recently my coffee machine broke down and I went back to using a cafetiere (aka “French Press”). The first few cups I made were unimpressive. It makes all the difference if you wet the grounds with a small volume of boiling water and let them “bloom” for 30 seconds. This is probably a good technique to try with coffee bags.
Coffee bags seem to finally be becoming more widely available. Your brew kit probably already includes tea bags, so there is not reason not to carry coffee bags instead of sachets of foul smelling instant muck. But what if you cannot get coffee bags?
This page has a very useful description of five ways to “Make coffee without a maker”. This includes ways to improvise filters and coffee bags. Adding a piece of cloth to your brew kit is worth considering.
Many of these methods work best if you have one vessel for boiling water and another for drinking or brewing in. Let us assume you have listened to all my advice on saving weight and just have a canteen cup.
Making Greek/Turkish coffee is a little involved, so the method of choice for canteen cup brewing is “cowboy coffee”.
How I did it was thus: Fill your (metal!) canteen cup to about a centimetre above the second mark. I am using a Crusader 2 and each mark is equivalent to about a mug-full. Try this at home in the kitchen. Put your canteen cup on to boil. I will assume you are only using your canteen cup. If you boil up the water in a more efficient vessel the volume you add to the cup will need to be less.
Wait for your water to boil. If you think a watched kettle takes ages, a watched canteen cup takes longer! Wait for a “rolling boil”. This is the point where the surface of the water gets stirred up by bubbles. Remove your cup from the heat and dump in about two and three-quarter tablespoons of coffee. Some say wait 30 secs before adding the coffee. Good coffee needs water at about 90-95 centigrade rather than full boil. Give each spoon of coffee a good stir so the spoon/ spork comes out clean each time. Cover your canteen cup and let it sit for about four minutes. It needs time to brew and it will be too hot to drink yet, anyway.
And it is ready! Ideally you can decant the coffee into another cup for drinking, but in our canteen cup scenario that may not be possible. Most of the grounds will have settled out. They will not be a problem unless you try and drain the cup to the bottom. In some westerns they mention settling the grounds by adding crushed eggshell to the coffee. Good luck finding one of those out in the field! “Jack Knife Cookery” also suggests you can use “spotlessly clean gravel” to settle the grounds. More practically, a dash of cold water will settle the ground and cool the coffee to drinking temperature. I don’t usually bother, but you may feel different if you have to drink direct from the hot canteen cup. Remember, a little bit of foil over the cup edge can save burnt lips.
“Jack Knife Cookery” gives a slightly different method for making coffee. Take a fistful of coffee for each individual and add cold water. Allow to sit for a while. Then bring your coffee just to the boil. Remove from heat and place the pot at a distance from the fire so that it is just simmering.
“Of the berry, browned and ground, take six heaping tablespoonfuls, and add three [US] pints of cold water; place the kettle over the fire and bring to a sharp boil; set it a little aside where it will bubble and simmer until wanted, and just before pouring, drip in a half gill [about two fluid ounces/70 ml] of cold water to settle it. That is all there is to it. The quantity of berry is about twice as much as usually given in recipes; but if you want coffee, you had better add two spoonfuls than cut off one.”
Tea:“To make it as it should be made, bring the water to a high boil, and let it continue to boil for a full minute. Set it off the fire and it will cease boiling; put in a handful of tea, and it will instantly boil up again; then set it near the fire, where it will simmer for a few minutes, when it will be ready for use. Buy the best green tea you can find, and use it freely on a hard tramp. Black, or Oolong tea, is excellent in camp. It should be put in the pot with cold water and brought to the boiling point.”
A couple of tricks inspired by Greek/ Turkish coffee are worth mentioning. This coffee is often made with coffee ground to very fine powder. This seems to help the grounds settle at the bottom. If you like your coffee sweet, add the sugar to the water before you make the coffee, like the Turks and Greeks do. Stirring and coffee grounds do not mix, or rather, it does!
“For every cup of water allow a tablespoonful of ground coffee, then add one extra. Have water come to boiling point first, add coffee, hold it just below boiling point for five minutes, and settle with one fourth of a cup of cold water. Serve. Some prefer to put the coffee in a small muslin bag loosely tied.”