Several countries have introduced laws requiring supermarkets to charge for plastic bags.
This has encouraged many people to reuse their bags.
Hanging near the door of my home are several reusable bags.
It is more common for me to go shopping on the way home from work, so many of my jackets contain one or two folded carrier bags.
The other day, I realised that I wanted to buy something on the way home. I had been shopping the evening before, and had left my carrier bag on the kitchen table.
How could I carry my shopping home?
I generally wear a keffiyeh in hot weather. A quick search on the internet gave me a method for knotting my keffiyeh into a useful carrying bag.
In fact, the method I found was more complicated than was needed. It had me knotting each corner into a hitotsu‑musubi before joining each pair of tails together.
I still occasionally use my keffiyeh as a carrier when I buy more than planned.
Furoshiki
If you have ever watched any films or TV shows set in Japan, you may have noticed cloths used instead of wrapping paper, or sometimes quite large bundles carried wrapped in cloth.
This is “furoshiki”, and includes a number of useful techniques for either wrapping and/or carrying loads.
To reduce the use of plastic bags, the Japanese Ministry of the Environment published an instruction sheet showing 14 methods of using a furoshiki. And they have produced a version in English so the rest of the world may benefit too.
Many of the purpose‑made furoshiki are very beautiful, but may come with a high price tag.
Any square of material of around three quarters of a metre to a metre may be used, providing it is thin enough to knot easily. Bandannas are useful for smaller packages.
Apparently, some furoshiki were originally made from sections of kimono. Furoshiki is a great way to repurpose old clothing, bedding, or a damaged tent or tarp.
Creating a square of material is simple. Bend a corner at 45 degrees so the shorter side lies along a long side, and cut or tear off the excess.
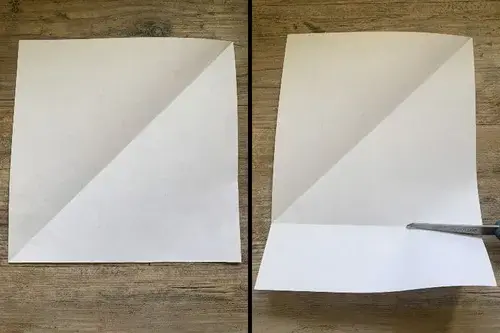
Interestingly, Yamada (q.v) states furoshiki are not perfectly square.
Furoshiki techniques have many potential applications for campers, backpackers, preppers, survivalists or just everyday use, such as my shopping trip.
• Bedsheets, curtains, scarves, tablecloths or similar may be turned into a carrying system in an emergency.
• When travelling, small squares of cloth are a lighter and cheaper alternative to stuff‑sacks or packing cubes. You probably already carry some spare bandannas, so put them to additional use to pack your socks, underwear and other items. By using different colours you may tell at a glance which bundle is which.
• Marie Kondo suggests using furoshiki or a scarf to compress jumpers and fleeces when they are stored out-of-season.
• I have some triangular bandages I use as towels/tenugui with my cooking items. These may be used as containers for such items too. Some of them are actually triangular rather than folded squares, so not ideal for some furoshiki constructions.
• Furoshiki is literally “bath wrap”, and reflects the use of a cloth to store clothing instead of a locker.
• I carry some cordage in my left pocket. Very occasionally, a hank manages to work its way out. I have now knotted the bandanna in that pocket into a pouch to hold all the cordage.
• Using a cloth to carry your lunch also gives you a crumb-catcher, picnic cloth and napkin.
• Need to leave the house fast? Dump spare clothing and other essentials in the middle of your bedsheet and knot the four corners. Sort it out later when you are somewhere safe.
Learning Furoshiki
There are many useful websites and videos about furoshiki.
The books “Wrapping with Fabric” by Etsuko Yamada, and “Furoshiki Fabric Wraps” by Pixeladies are both worth reading.
The second book has less techniques, but includes one or two not in Yamada. The Pixeladies book also has some very clear drawings of techniques and some useful advice on making furoshiki.
The Knots
The good news is furoshiki is really easy to learn.
You only need to learn two and a half knots, which you should already know.
The Japanese name for the most used knot is ma‑musubi. This is the reef knot, described in the second part of scrapboard knots. Americans sometimes call this a “square knot”, but that name is shared with a number of other knots, so reef knot is preferred and will be used hereafter.
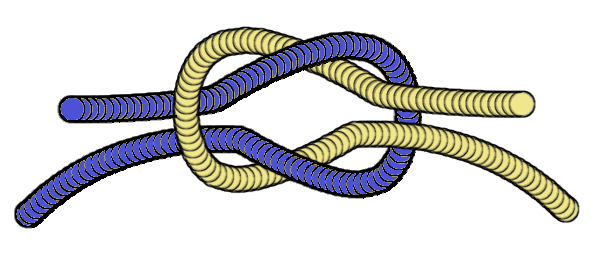
So long as you always tie a reef knot rather than a granny knot, you have pretty much mastered furoshiki.
The second knot is hitotsu‑musubi. This is simply to take a corner of a cloth and tie an overhand knot to create a sort of “tail”.
The last knot is made by beginning to tie a reef knot and stopping halfway through. Some people call this a simple knot or overhand. Essentially it is just twisting two cords or cloths around each other. It is debatable if this is actually a real knot. I think this is best thought of as a “half‑reef knot”.
A Wrap and Three Bags
There are probably scores of ways to use furoshiki. This blog will teach one wrap and three bags, with some variations.
◦ As a general guideline, tie diagonally opposite corners for a closed package, and adjacent corners for an open carrier. The “drop bag” and “drawcord” bag are obvious exceptions to this.
◦ When wrapping, position your cloth as a rhomboid, relative to the item being wrapped.
Yotsu Musubi: The Basic, Four Knot Wrap
This is used for the bundles of clothing or gear within your rucksack.
Tie two diagonally opposite corners together in a reef knot, and pull snug over the object(s). Tie the remaining two corners together in a reef knot over the first knot.
Most wrappings use this technique or some variation of it. For example, the first two corners may be wrapped around the object rather than tied together (otsukai tsutsumi, sao tsutsumi).
Bento tsutsumi twists the second pair of corners before knotting to create a carrying handle.
Tessage Bukuro: Basic Carrier Bag
This is the technique I should have originally used with my keffiyeh.
Place the cloth square to you.
Take two adjacent corners, such as top left and bottom left, and tie the tips together in a reef knot.
Repeat on the right side.
My keffiyeh is not ideal for this use, since the tassels get in the way when tying the knots and the knots may be surprisingly bulky.
Using a square of scrim net creates a mesh bag, useful for carrying items that may need to dry or air.
The suika tsutsumi “water melon carrier” is the same bag as tessage bukuro, but with one handle slipped over the other. Knots may be adjusted to make the non-carrying handle a better fit over the carrying loop. The carrying handle sections may be twisted before joining together.
The kinchaku-style tesage bukuro drawcord bag is the same as the basic tessage bukuro, but adds a half-reef to each side of the opening before joining the ends with reef knots.
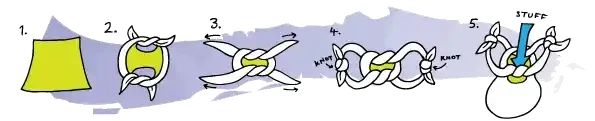
Tie two adjacent corners in a half-reef. Repeat on the other side. The two half-reef knots should be mirror images of each other.
The two half-reefs will form a reef knot of the pouch opening.
Pull the corners out for the handles. Use a reef knot to tie the corner on each side to the corner of the other half-reef on that side.
Do the same with the corners on the other side.
The handles may be twisted before tying the reef knot.
I used this technique on a bandanna to make a cordage pouch for my left pocket.
Katakake Fukuro: Shoulder Bag
For a katakake fukuro “drop bag”, fold the cloth into a triangle, “wrong side” outward. Tie each side corner into a hitotsu‑musubi, the tail nearly reaching the apex of the triangle.
You may fold the triangle vertially to check that both tails are similar length.
Turn the cloth rightside out so the tails of the hitotsu‑musubi are inside the bag. Join the remaining corners that were the apex of the triangle in a reef knot. The bag is drop-shaped and may be carried from the shoulder.
You may also make this bag using a separate piece of cloth for the strap.
For a shallower bag (kakushi tsutsumi), shorten the tails and/or omit the turning rightside out phase.
Another variation of this bag is the twisted handle odekake tesage bukuro.
This bag tyrpe comes with a couple of warnings.
◦ Do not carry valuables in a bag you cannot secure closed. You might try blanket pins, but this type of bag is not particulary secure.
◦ Everyday I see women carrying oversized and overweight shoulder and bucket bags. Shoulder bags should not be used for heavy loads.
Furoshiki Backpack
One of the ways to make a furoshiki or other cloth into a backpack is shown below.
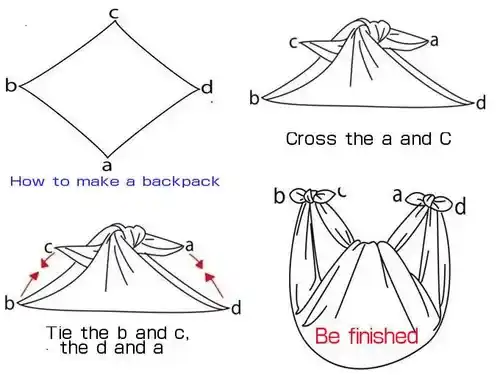
Yamada’s book (p.64) shows a variant of this where a second rolled/folded furoshiki creates the arm straps (video).
The first furoshiki is folded into a triangle and the apex tied in a reef not. The second furoshiki is placed on the apex knot and the ends of the knot tied in a second reef knot. The ends of the second furoshiki are tied to the outside corners of the first.
The second furoshiki could be wrapped around a rope for more strength, or a pair of fabric pieces twisted together. The “compartment” part could use heavier or more robust cloth such as a pieces of shelter cloth, poncho, damaged tent or similar.