“All warfare is based on deception”
Sun Tzu
Camouflage is an important survival skill.
When hunting, camouflage will help put food on the table.
If hunted, knowing how not to be seen or found will save your skin.
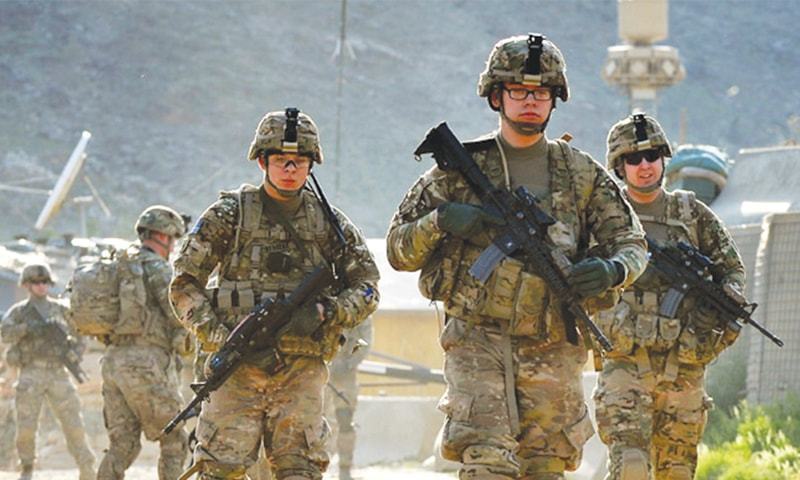
Many preppers take their cues from military practice. Sometimes this may not be the best option.
As I have discussed elsewhere, many armies do not seem to practise camouflage as seriously as it was taken a few decades ago.
Stretching a net or camo cover over your helmet and wearing the latest camouflage pattern in vogue does not make you adequately camouflaged.
USMC MCRP 3‑01A Rifle Marksmanship, Chapter 10: “Target indicators are anything that reveals an individual’s position to the enemy.
“These indicators are grouped into three general areas: movement, sound, and improper camouflage…There are three indicators caused by improper camouflage: shine, outline, and contrast with the background.
“Most targets on the battlefield are detected due to improper camouflage.”
Camouflage is commonly taught as “the five S” or sometimes, “seven S”. What these S actually stand for varies. “Movement” and “Aircraft!” are sometimes included, flying in the face of alliteration.

Silhouette
You probably understand this as a caution not to silhouette yourself on a skyline. And that may be the limit of your thoughts on the topic.
For example, you can silhouette an enemy by adopting a low observation position, which may skylight them even if they are not walking along a ridge line. “Skyline” is sometimes an alternate category.
Silhouette involves more than just skylines, however.
If you are dressed darkly, but before a light background, or dressed lightly, and before a dark background, you have also become a silhouette.
Walking past a window may silhouette you to a viewer outside or inside.
A ship underway on the ocean is silhouetted by its wake.
Muzzle flash in the dark will silhouette you.
If you are utilising an object for concealment, position yourself so that you do not create a separate silhouette. Looking around concealment will make you less obvious than looking over it.
Background
Paying attention to your background is one of the fundamentals of good camouflage.
Remember that backgrounds appear lighter with increasing distance. Most backgrounds are lighter than is assumed.
If you are attempting to avoid observation, you must constantly be mindful of your background, relative to an observer. If the observer is airborne, your “background” may be beneath you.
The availability of small drones/UAVs means that the capability to observe an object from the air as well as ground level has become commonplace, even for individuals.
As an aside, during the Second World War, “Project Yehudi” investigated camouflaging aircraft by mounting lamps on them, so they did not appear as dark objects in light skies. With new technologies such as variable LEDs controlled by photocells, it would not surprise me if this idea was not soon dusted off and applied to military drones.
Many a would‑be ninja, gangsta or Rambo will dress in black. They will appear as a dark spot against most backgrounds.
If you do not know where an enemy is, “shooting the shadows” and putting a round in any particularly dark spots may yield results. This is a variant of the “shooting cover” tactic used by Rhodesian soldiers.
Remember, concealment is not necessarily cover.
Shine
“Shine” is another concept not fully appreciated.
Obviously, shiny reflective objects catch the light and attract attention.
In TV and movies, sun glinting off an optic constantly gives snipers away. Choosing a position where they are not firing into the sun does not seem to occur to fictional snipers!
Tights/pantyhose material may be used to reduce reflections from scopes, binoculars and goggles.
Goggles should be kept covered until needed. This will also reduce the chance of the lenses becoming scratched.
Buckles and other metal gear should have a non‑reflective finish.
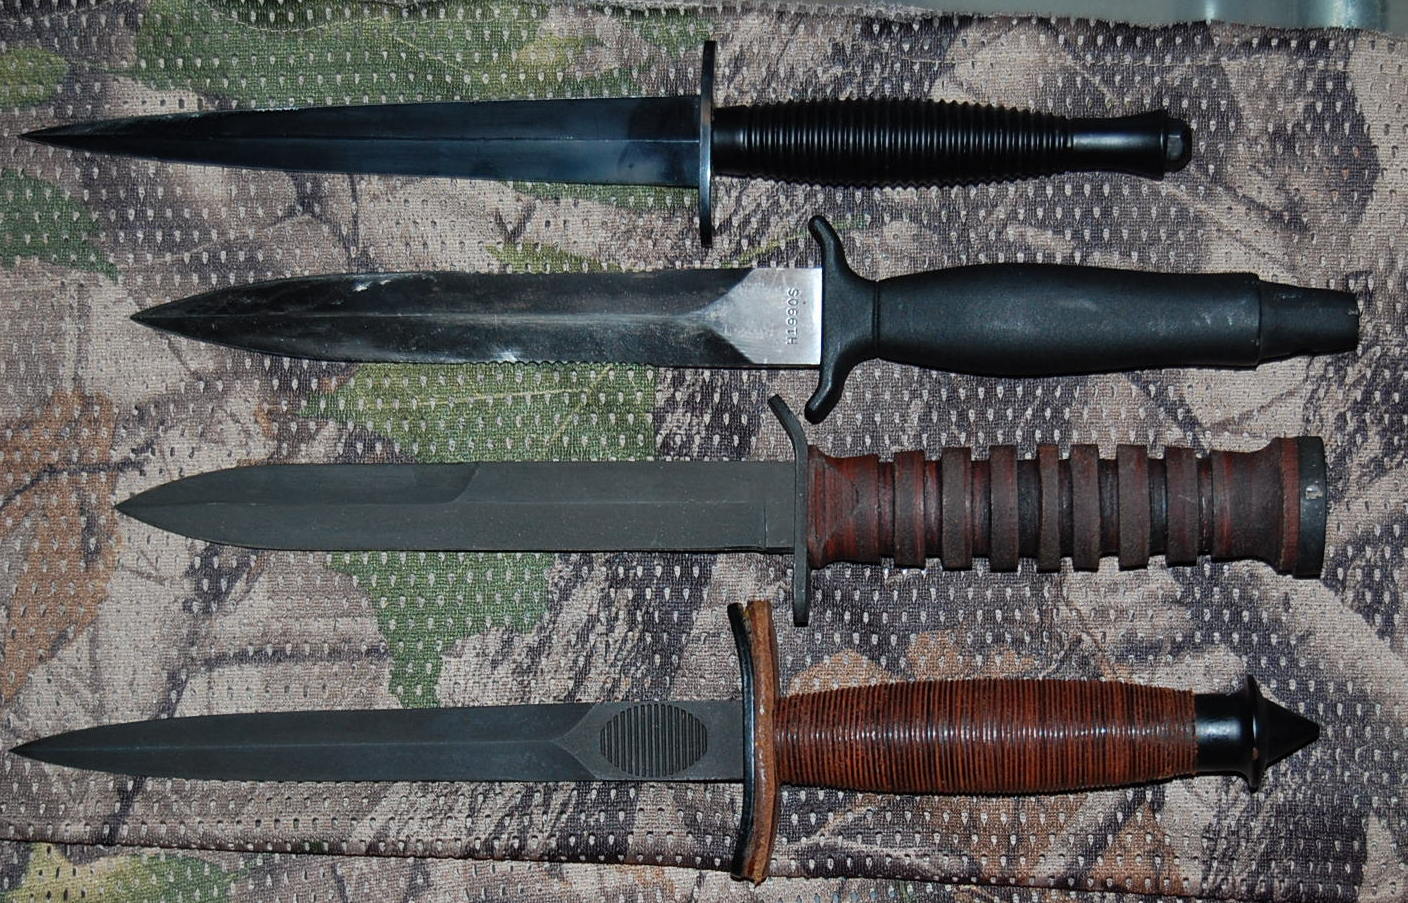
A polished knife blade or handgun may catch the light at night. Smearing it with mud or dirt may help, or keep it holstered until needed.
Some clothing, such as waterproofs, have a shiny surface, which looks unnatural.
The clear areas of map cases or watch faces may catch the light.
Large pieces of foliage used for camouflage may also have a shine.
Areas of different colours may reflect the same if viewed at certain wavelengths.
The natural oils of the human skin give it a sheen which may be distinctive, even under moonlight. Skin should always be covered by some means.
If you have ever dropped a well‑polished object in long grass, you will understand that being reflective can contribute to camouflage.
Suppose you are wearing a beige outfit and laying in a grass meadow on a sunny summer day. Will you appear as a brown spot in a green field? No. The sunlight reflecting off the grass will gain a green hue, and that light being reflected off your light-coloured clothing will make your outfit appear green too.
In certain conditions, the reflectance of light colours may contribute to camouflage.
Shade
Shade is actually two topics. Some sources do have shade and shadow as separate considerations
Many amateur camouflage designers agonise over the colours they select.
In real life, the appearance of a colour will depend on many factors, including light level, colour of light the cloth is reflecting, what colours it is in proximity to, fading from washing, wear, whether the garment is clean or muddy and so on.
Shade or tone of a colour is actually a more important consideration than precise hue. An object of a different hue may be overlooked if it is of a similar shade or intensity to its surroundings. Light shades may reflect the colours surrounding them.
Matching shades with your surroundings overlaps with the observations already made about matching backgrounds. Indeed, it will be seen that many of the categories discussed here intersect and overlap.
Why many modern camouflage patterns fail is because the colours selected do not differ sufficiently in shade. Beyond a certain distance, these patterns “blob‑out” and the wearer appears as an obviously human figure who seems to be wearing a single colour outfit.
Shadow
If you should be mindful of your background, you should also be attentive of shadows.
There is a Western where a character explains to another why they are walking down the dark side of the street.
If you are in the shadow, you can see what is within the shadow and also into the lit areas. If you walk in the light, you may be unable to see clearly into the shadow.
This is good advice, and works for both day and night. On a very sunny day, keeping to the shadows keeps you cooler too!
The most basic way to not be seen is to hide behind something.
When this is not possible, taking to the shadow of a terrain feature is a good strategy. This may be combined with utilising a suitable background too.
Suppose you have to cross a forest road or clearing and fear observation? If possible, cross within the shadow of a tall tree. Crouch over with your hands close to the ground and you may be mistaken for an animal if you are observed.
While shadows can hide you, they may also reveal you too.
Shadows are actually one of the main challenges when attempting camouflage.
When the sun is low in the sky in the early morning or towards sunset, it will create very long shadows. A relatively small projection may have a shadow metres long pointing to its location. Aerial reconnaissance photos were often taken at these times to exploit this. A similar effect may occur in bright moonlight too.
Depending on time of day, time of year, and latitude, an object may cast a shadow three to six times its height.
The Afrika Korps and Italians fighting in the desert used a style of entrenchment that lacked a pronounced parapet and parados. This made the positions less obvious. The hole itself would still show as a dark area when viewed from the air unless covered by camouflage netting or a shelter cloth.
The flatter something is, the less shadow it creates. A camouflage net over a foxhole makes it appear less like a dark hole in the ground.
A rectangular object like a building or vehicle will create a distinctive shadow. Covering the object with a well‑sloped camouflage net will reduce the object’s shadow and create a shadow/shape closer to that of a natural terrain feature.
A standing man will throw a longer shadow than a prone one. The prone man will still create a shadow, and parts of the body will create distinctive shadows that will make them recognisable as human body parts.
By using some means such as a cloak or blanket, the prone man can “flatten‑out” his apparent shape and conceal some of the more distinctive shaped areas.
Shadows and shades play an important part in our perception of objects. How we distinguish between a white marble statue and a white paper silhouette is by the shades and shadows of the former.
Have a look at videos of the “Hollow Face Illusion” for an example how the brain uses such cues and how it may be sometimes fooled.
Given the above, it is surprising that this effect is not more often exploited for camouflage systems.
A human body is effectively a collection of cylindrical shapes. If the camouflage pattern on clothing was structured more like a shaded relief map, it might do a more effective job at disguising the actual shape of the wearer. Shading would make flat or concave areas of cloth appear as either depressions or projections.
Butterflies hold their wings vertical when at rest. Moths hold their wings horizontal. Most moths are active at night. Butterflies are active in the day and holding their wings vertically minimises the shadow they create, reducing the attention of predators.
Shape
One of the primary rules of personal camouflage is don’t look humanoid.
The human brain has specialised areas for recognising human body shapes and particularly human faces. This is part of the explanation for phenomena such as pareidolia.
Headgear, pouches and weapons also have distinctive shapes that an enemy will notice.
Shape and silhouette are related. The less human a silhouette appears, the greater the chance that it will be mistaken as something else.
Covering your face and adopting postures that are not obviously human will contribute to better camouflage.
“Camouflage uniform” is an oxymoron. Good camouflage avoids regularity in colour and outline. To quote Langdon‑Davies: “as unlike a Savile Row tailor’s suit as possible.”
One of the ways to disrupt outline is to use a disruptively patterned material.
Many man‑made camouflage patterns lack sufficient contrast to disrupt the outline, simply resulting in a human shape wearing a patterned outfit.
Many camouflage recent patterns use small elements, which increases the tendency for the pattern to blob‑out, creating a human shape apparently wearing a single colour outfit.
In nature, many animals that utilise disruptive colouration enhance the contrast between the elements. Rather than being uniform, light areas become lighter towards the edge, dark areas darker toward their edge. The patterns of some snake skins are a good illustration of this.
The other approach to disrupting shape, which may be used in addition to disruptive cloth patterns, is to break up the outline with irregularities and protuberances.
This three‑dimensional approach has the advantage that it works when light‑levels are too low to distinguish the patterns on a cloth. It also helps disrupt the apparent surface texture of a uniform item.
The best known way to do this is the addition of natural materials such as leaves, twigs or tufts of grass.
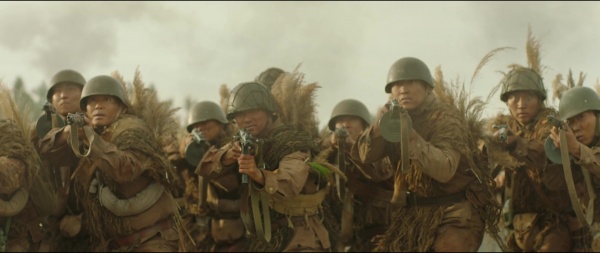

Some clothing items include nets or loops for the attachment of such materials. Pockets, button‑holes, waist‑bands, webbing, collars, shoulder‑straps and similar may also be used.
Natural materials will tend to wilt or discolour, so need to be replaced often.
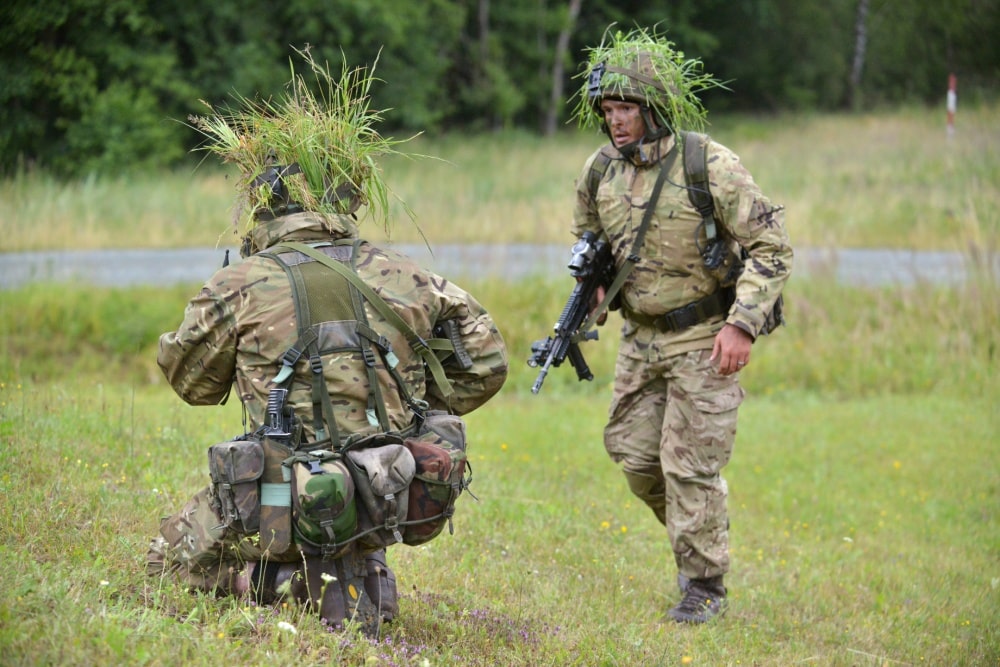
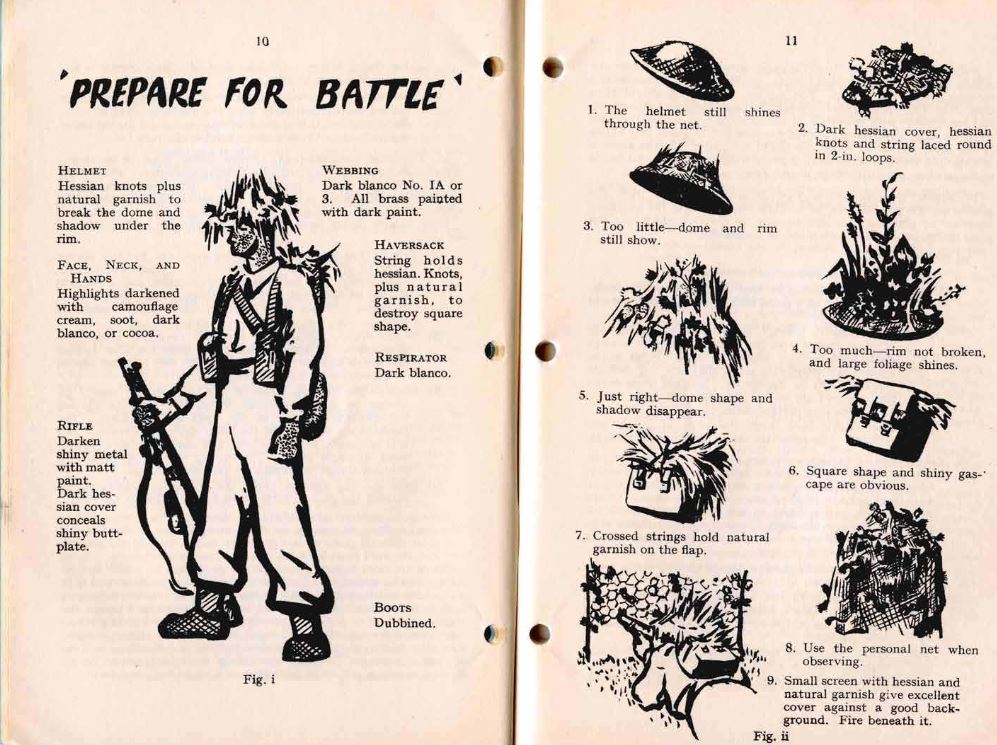
Adding foliage to helmets or other headgear may still be encountered, but often the shoulders, upper arms, backpacks and other visible areas are neglected.
You will spend a lot of your time walking or prone. Your backpack will often be the thing that observes see first. Add some foliage and textilage.
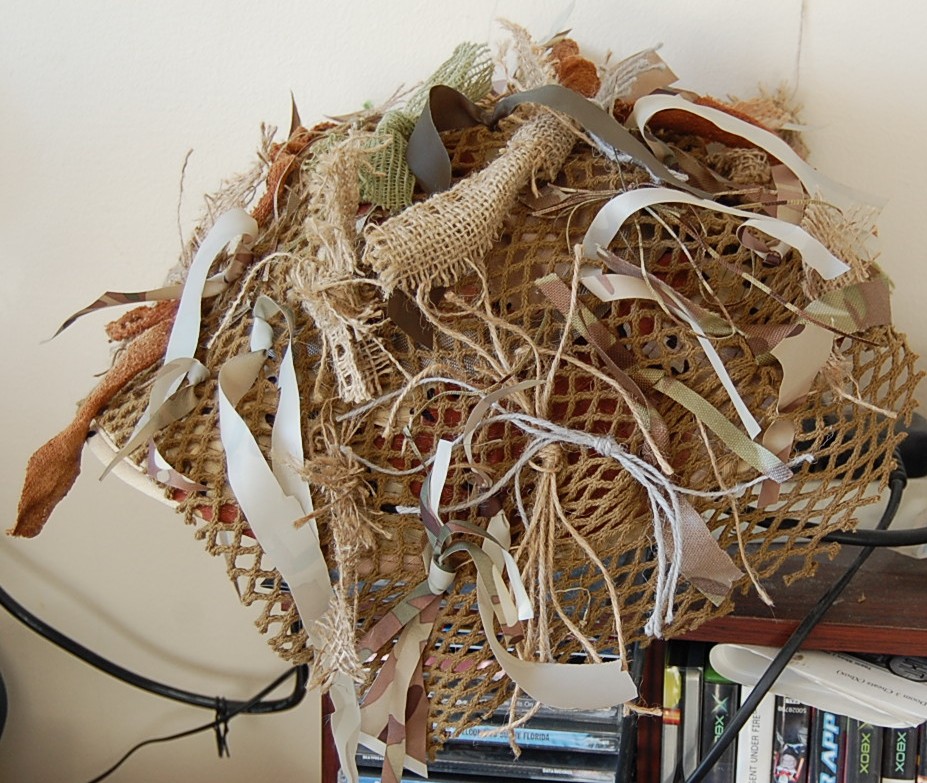
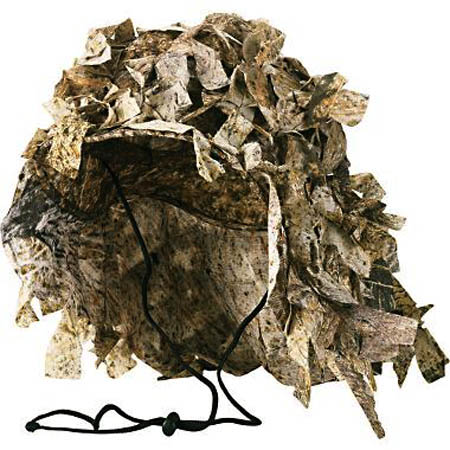
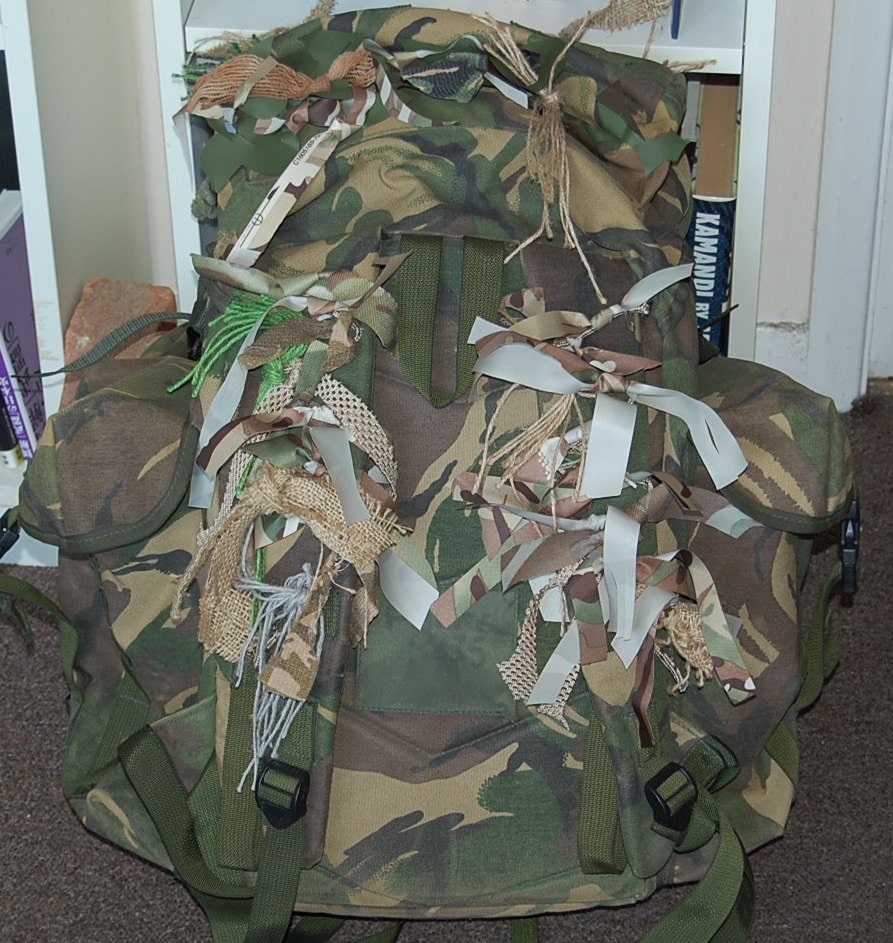
Create an irregular-shaped hat/helmet cover as described here and here. Use a metre square piece of scrim or net to create a coif, shawl or mantle for the shoulders and add textilage and foliage.
Note how the British MTP pattern blobs-out to a single colour.

Natural materials may be supplemented by “textilage”. Strips of cloth, scrim, hessian, string etc. that are knotted to the garment to create irregular shapes.
Shorter pieces tend to stand up, and are useful for upper surfaces, while longer lengths droop and hang down, which is good for other areas.
Disruption without concealment is not camouflaged.
A basha‑sheet pitched in the middle of a field will be easily identified, no matter how good the camouflage pattern painted on it. A basha pitched in a wood, under cover, coloured to match leaf litter, will work much better.
As already mentioned, “Shape” also applies to posture.
A standing individual is difficult to conceal. A prone figure is less obvious, particularly if they utilise any terrain features within the area. Flatten yourself against walls or similar objects to reduce creating a distinctive shadow or silhouette.
The example above of crossing an open area moving like an animal is another example of shape and posture used for camouflage.
Scenery
I will admit I have never seen “scenery” as one of the 5 or 7 S.
Hiding behind or below cover or concealment is one of the fundamentals of not being detected. Yet the 5/7 S make no direct reference to it.
A hunted squirrel will move around a tree trunk so the trunk is always between squirrel and the hunter or dog. Keep the direction of a potential observer in mind.
Surface
“Surface” or texture is often a clue to something being out of place.
A flat, painted area will not resemble grass, even if the exact colour of surrounding vegetation could be matched.
No matter what pattern it is printed in, most camouflage clothing has a smooth uniform texture. The addition of foliage and textilage help reduce this.
Camouflage requires disruption of depth perception as well as disruption of shape.

Speed
It is very difficult to conceal a moving object or individual.
I suspect this may have been used as an argument for the obvious current neglect of teaching sound camouflage practices to modern soldiers.
However, currently in the Ukraine, one of the main defences against enemy drones is ceasing movement so as not to attract attention.
FM 3‑21.75: “If moving where it is easy to blend with the background, such as in a forest, and you are caught in the light of an aerial flare, freeze in place until the flare burns out…If you are caught in the light of an aerial flare while moving in an open area, immediately crouch low or lie down. If you are crossing an obstacle, such as a barbed‑wire fence or a wall, and are caught in the light of an aerial flare, crouch low and stay down until the flare burns out.”
In nature, freezing is a very common behaviour for creatures that depend on their camouflage for protection.
When they do move, animals that rely on camouflage tend to move slowly and smoothly without becoming unbalanced. Some animals such as certain lizards and insects, utilise a swaying movement, mimicking the movement of leaves stirred by a breeze.
If you move, move slow and steady. This also reduces sweating and the chance of overheating.
Move for 20 minutes, rest for five. When still, watch, listen, smell.
Many armies teach a variety of crawling techniques that allow a soldier to exploit any concealment and cover. Langdon‑Davies taught some intermediate techniques such as the monkey walk that allowed faster movement when higher cover or concealment was available.
Sound
Speed and sound are related, in that fast or hasty movement is often noisy. Slow and careful movement is often quieter.
Loose coins, keys, certain types of clothing, chewing gum, a partially filled container of matches or pills, a half‑full water bottle, dog tags, sling fittings etc may all cause noises that will give you away. Phone on silent, or switch it off if you can.
Certain types of terrain or animals may create noise that will betray your presence.
Jump up and down, and see if there is any other noise than that of your feet hitting the ground.
Sometimes noise may be masked by other noises such as passing traffic or artillery.
Smell
Most hunters know to position themselves so the wind is blowing from the intended prey towards themselves.
Smell is less of a consideration to many soldiers, but can be a factor in camouflage.
Having eaten certain foods, body odour, sweat, wearing perfumed aftershave or other skin and hair products, may give away your presence.
Smoke
Smoke is related to Smell.
Smoking or chewing tobacco, or just having the smell of it on your person may also betray you.
A glowing cigarette tip not only gives away your position, but makes a good aiming point. So does the screen of your phone!
Smoke on the battlefield, be it deliberate or accidental, may be used for concealment.
Similar natural occurrences such as mist and fog may also aid concealment. Fog also tends to dampen the transmission of sounds.
Spacing
“Regular”, “neat”, “symmetrical”, and “uniform” are the opposites of good camouflage. This applies to clothing, formations and just about everything.
Summary and Suggestions
When it comes to camouflage, it becomes obvious there is no single answer.
Note that many of the strategies described above are actually behavioural. For example, minding your background, using the shadows, keeping behind or beneath concealment, dropping down when not moving, and slow and smooth movement, among others.
These things are easier if you are not dressed in day‑glo orange, of course!
Wearing neutral or natural colours will help, particularly if you avoid very dark shades which will stand out against many backgrounds.
Adding contrasting patches and pockets offers the potential of a variation of “boroboro”!
Tassels like a buckskin shirt may help disrupt shape.
Camo‑gear is an option, but have no illusions as to how effective it will be. A human‑shaped garment can only do so much, no matter what pattern it has.
Many of the modern patterns do not perform that well.
Dressing in nothing but camo “army gear” may attract more attention than you intended.
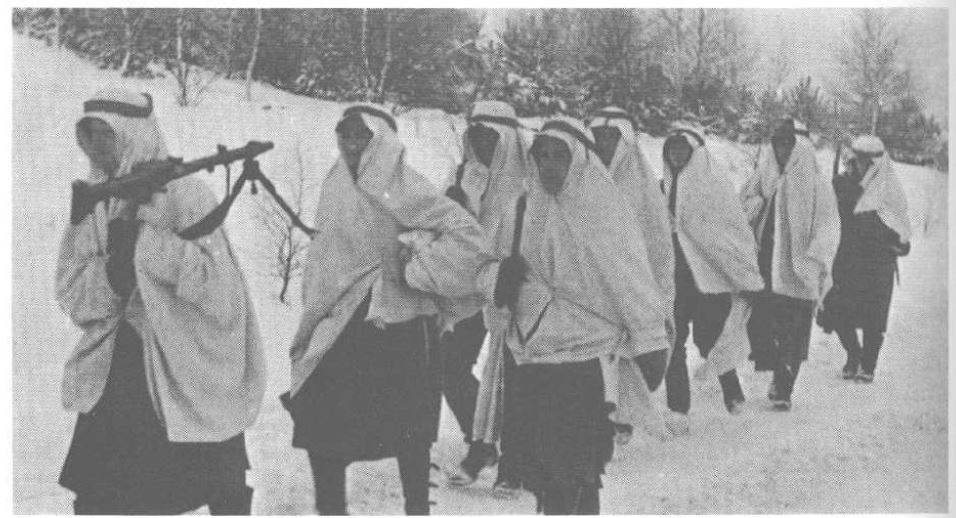
Some time ago, I came across some photos of soldiers fighting in the streets wearing snowshirts. If there had not been snow, would it have occurred to them to wear similar items in greys and browns, I wondered?
A “shapeless” smock along the lines the Langdon‑Davies suggests could be tried. This has the advantage that it may be removed when looking more regular and conventional is required.
Snow
On the topic of snow: white only works as camouflage if it is clean.
A garment that is both white and warm will be worn when there is now need for camouflage and soon become dirty. Being insulated it will be difficult to clean and slow to dry.
Snow camouflage and warm clothing should be separate items..
Cover Your Skin
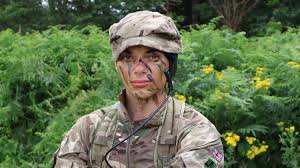
Camouflaging yourself is pointless unless you include usually exposed areas such as hands, neck and face. Most of us don’t have hair in camouflaged colours either.
In an emergency, mud may be used to dull down your hands, neck and face. Camo‑cream, soot, dirt, cocoa or burnt cork have their drawbacks if you need to remove your camouflage quickly and appear like a regular person.
A suitably coloured or patterned hat and gloves may be used for the hands and hair. Textilage may be added and provision to add foliage included.
During the Second World War, troops were taught not to look up at enemy aircraft. To the aircraft, a single uncamouflaged face stood out like a flashing light. A whole company of curious faces looking up, an invitation to strafe or to call in the artillery. The “anti‑aircraft” section were advised to use bandannas or veils.
In a more modern context, facial‑detection and face‑tracking software is already being used to help pick out humans from terrain. The ability to also recognise weapons is inevitable.
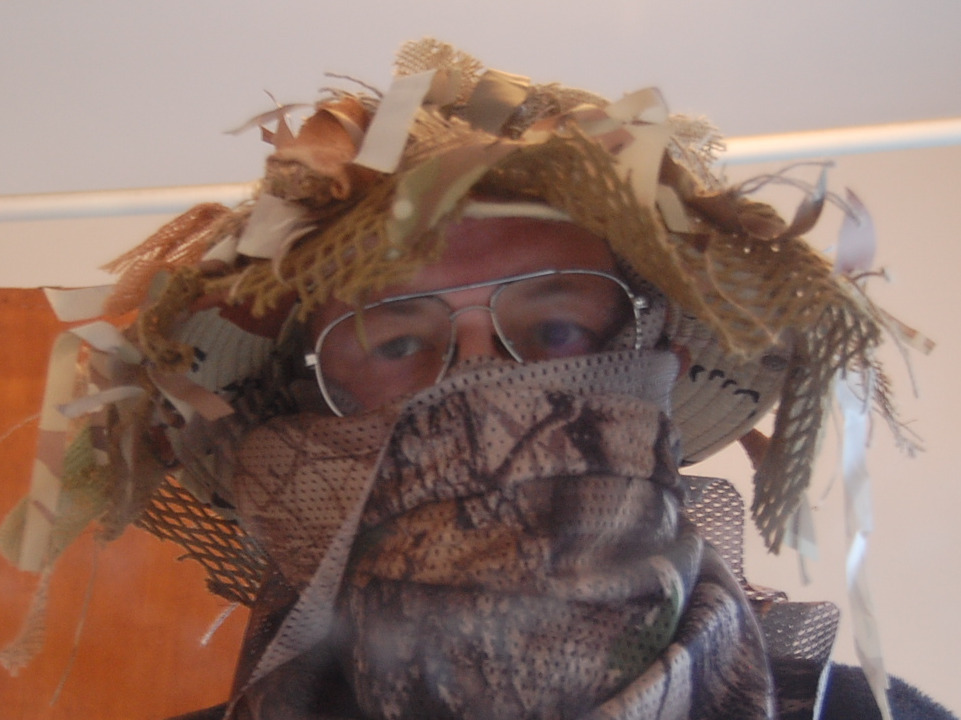
For the face, a balaclava or neck gaiter, preferably with a suitable camouflage, shade, pattern and colours, may be used, but may be uncomfortable in certain climates.
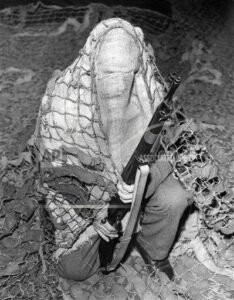
A bandanna, keffiyeh or scrim can be wrapped around the lower face, although most keffiyeh are not in camouflage colours.
The SOE Syllabus suggests a mesh of black or dark green: “The veil should be of double thickness over the whole face except for a belt of single thickness running round the front from ear to ear. It is not sufficient to leave eyeholes of single thickness as it will be found that vision is very much restricted at the sides. The veil must be made to tie on securely or it will be easily displaced when crawling or passing through thick cover.”
Apparently this tied at the front, where the knotted belt presumably helped break up the shape. The above seems to suggest that the cloth covered the eyes.
A veil that covers the face below the eyes downwards may be more practical, black insect netting helping cover the eyes.
If you do not have to look through such a veil, light and mid‑browns may be a better option than black or dark green.
Another interesting design is show here. The face cover has irregular leaf-like flaps that hang down and allow the escape of breath.
In low-light conditions you would not want your eyes covered.
The shade of a hat brim will help conceal the eye region. A mosquito head‑net is useful, even if the mozzies, gnats and black fly are thankfully not about.
A camouflaged overvisor may be utilised in daytime and static positions.
If using goggles and/or an overvisor, a fringe of fibres or cloth strips added to the bottom may help conceal the lower face.
Cloaking Technology
When stationary, one wants to eliminate any distinctive shadows. The flatter you can look, the better. Some form of cloak or sheet may be utilised.
Unless operating in a permanently verdant environment, a brown-dominant pattern will probably prove most versatile.
This item must be big enough to cover you when prone, including your feet. When lying on a slope, your feet may appear higher than your head to an observer. A net or sheet should not be so big or bulky that it is an encumbrance when moving, or being carried.
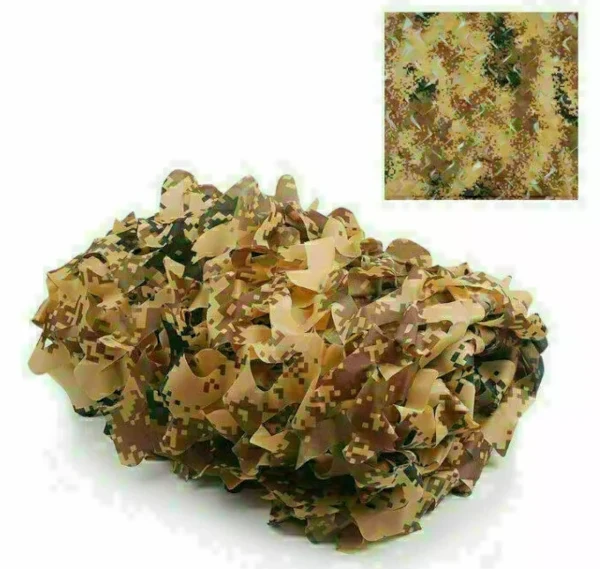
Some camouflage nets on sale on the internet are available in 1.5 x 2 m sections. I have seen 8 x 4 feet suggested as a good size too.
A sheet of hessian, such as sewn‑together sandbags or sacks, may be used instead of a net and may be more effective in some situations.
When the snow lays on the ground, a white sheet or net may be required.
In the movies, the police helicopter will often spot the rooftop sniper. Hiding under an old tarp would have prevented this.
The shape of the net or sheet may be broken up by pattern and textilage, and there should be provision for adding natural materials. Do not overdo such additions, or the item will become heavy and look unnatural.
The edges should be irregular.
If not too large, such a cloak or net may be worn when moving, and helps camouflage your pack and other gear. In other posts, I have described the Inverness and another mode of wearing a blanket or similar as a hooded cloak.
Optionally, one may add a head opening so that the cloak may be worn poncho-style. Cinch it to reduce the length.
In dense terrain, when thorns and twigs will constantly catch on a net, it may be packed away in a suitable protective bag.
A cloak configuration allows you to access ammunition held in a chest rig. Since the chest region is often shaded, a chest rig should be of a light shade and colour and its shape disrupted with textilage. Beige or a light brown-dominant pattern is probably the most versatile choice for a chest rig.
By adding tapes or cords to the net or sheet, it can be secured around the limbs and worn when crawling.
The net may be erected to cover your sleeping position, or rigged as a screen before a firing position.
Mantle
Wearing a full-sized net may not be ideal when on the move. A short cloak or mantle can be constructed from a piece of material such as a metre-square piece of scrim with textilage added.
The main function is to break-up the shape of neck and shoulders. It may be modified with ties or loops so that is covers part or all of the arms.
There are also ghillie bases that are just a set of sleeves that cover the arms and shoulders. Some of these have hoods. Cut the hood off to make a helmet or hat cover.
Camouflaging Weapons
In some armies, camouflaging your weapon is frowned upon! You need it looking nice and tidy for parades!
Take a length of cord and tie some suitably coloured or patterned strips of cloth along its length. When in the field, spiral this cord along your rifle foreend. If you use a twisted cord, pieces of natural material can be inserted too. This “bunting” may be easily removed when necessary.
Extra Head Camouflage
When stationary, hide beneath your cloak/net/sheet. Your head and weapon may benefit from additional measures.

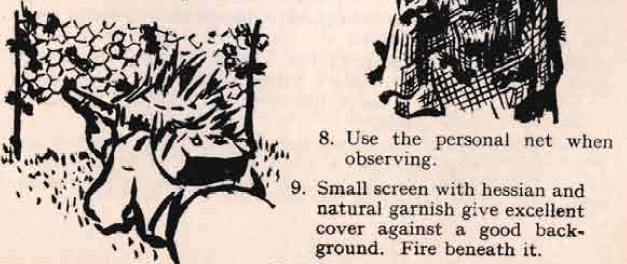
The SOE Syllabus recommends a sheet of moss, as is commonly found on stones or round tree roots. This is widely available, and needs virtually no further preparation. It may be combined with other means of head camouflage.
A piece of scrim may be draped over the weapon and/or head. If you need to see through it, this will probably need to be a dark colour such as dark green. That may stand out in certain environments. Pieces of foliage may be added to the scrim to make it less uniform. On the other hand, this area will be well-lit, and a darker colour will help compensate for this.
Scrim is often worn as a neck cloth rather than a keffiyeh. Alternately, carry your binoculars in a larger pouch and wrap them in a scrim for protection and padding. You will generally need the two together.

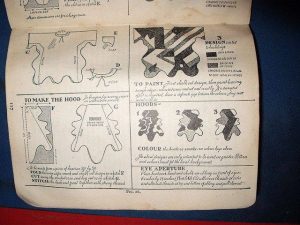
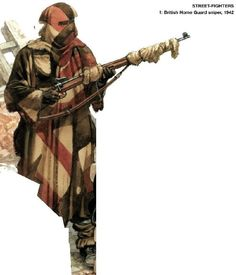
A hood for static duties is another option. One version is shown in the illustration, with additional explanation here. An alternative design is given on this page.
A hood attached to a garment has a number of disadvantages. It can get caught or reduce situational awareness. A better option is a helmet or hat cover that hangs down at the sides and rear.