Categories
Barata

Fishing with a Soda Bottle, Done Right!

As mentioned in my previous review, the section on fish traps was one of the more deficient sections of “The Official John Wayne Handy Book of Bushcraft”. There is a mention that one of the means you can make a fish trap from is from a water bottle. It is also stated that traps will only catch very small fish.
A friend of mine recently mentioned using soda bottles as fish traps.
Typical plastic soda bottle fish trap
The way this is usually shown, a cut is made just below the conical section of the bottle. This part is inverted and inserted into the rest of the bottle.
Obviously, only fish small enough to swim through the nozzle can enter the trap.
Not much of a meal!
I began to think about ways to improve on this. The obvious one was to cut off the nozzle and provide the trap with a bigger entrance.
Keep the neck to make a useful clip.
Before I could think too long on this, I was reminded of one of my favourite youtube channels.
This features a very ingenious lady in Cambodia.
Check out some of her other videos, which feature PVC fishing bows, recipes and many other varieties of traps.
◦ Note that the screw‑threaded part is removed and the area around the new opening cut into “petals”. In this video the petals are clearly shown being cut into points.
◦ Holes have been made in the base of the trap so water flows through. This lets the smell of the bait out to attract fish. This also allows them to drain as they are removed from the water.
◦ Each trap has a closed smaller bottle attached to it to act as a float and suspend the trap clear of the bottom.
If aiming for bottom dwelling fish, you may need to weight the trap.
◦ The funnel part of the bottle is secured to the larger part. This is a good precaution if aiming for larger fish.
When I first started watching this I thought she was cutting “V” shaped tabs in the outer part to hold the funnel in. That should work.
What she is actually doing is making holes and securing the two parts with cord [or you could use grass or plant stems].
Reaming matching holes and using wooden pegs carved from a stick would make the trap easier to take apart to remove the fish.
This site shows the innovation of a flap cut in the funnel for easy removal of fish.
Such a trap can easily be made with just a penknife with a reamer.
Four good‑sized fish from three traps is pretty good going!
For many other uses for plastic bottles, take a look at Plastic Bottle Cutter's channel!
Categories
Phillosoph

Debugging Your Bug-Out Bag: 2 Sustenance

Food and Cooking

A bug-out is not going to be three square meals a day with a choice of ice cream flavours!
For a bug-out bag, most of the food should be capable of being consumed without cooking. A significant part should be food you can consume on the move.
Long shelf-life without the need for refrigeration or freezing is a priority.
MREs are an expensive and somewhat bulky way to stay fed for 72 hours. You will also be lugging around weight and junk you do not need such as multiple spoons, instant coffee and chewing gum.
Soldiers often strip down their MREs before a patrol. Vast amounts of fuel and money could be saved if many of these items were not included in the first place!
Stripping down the MREs for a bug-out bag beforehand is not really practical since you will violate the packaging and affect the shelf-life.
Possibly the best feature of MREs is the provision of flame-less heating pouches.
There are lots of other foods that meet the above criteria, many of them available down the supermarket. I suggest you read DePugh’s comments on food selection.
Some possible things to provision your BOB include:
Dried or semi-dried food such as sultanas, apricots and banana flakes.
Matzos.
Rolled Oats/Porridge: One of the few grains that can be eaten without cooking.
Cured or smoked sausage.
Tinned meats such as Spam, corned beef etc.
Trail mix (has a relatively short shelf life, but use it if you have it).
Home-made Jerky (a good stock of the store bought stuff may be expensive, so make your own!)
Cereal bars.You can make your own.
Lifeboat Biscuits.
Pinole (easily made from polenta).
Malt barley.
Note that many of these are “go-foods” which may be consumed on the move.
If you are not in immediate danger, add fresh foods you may have in the house. Priorities are fruit, cheese, bread, jams, butter, and cooked meats.
Carbs, fats and sugars: The end of the world is no time to keep to the diet!
Carry a bag of hard candy/boiled sweets. One of these can give you a quick boost when you are flagging.
Don’t waste space and money on vitamin supplements. Vitamin deficiency is not going to be a major threat in 72 hours!
While carrying a bug-out bag and its contents will consume energy, many reading this will be used to eating larger meals and more frequently than they need to. You can go a lot further on less than you might think.
In addition to the above, you may wish to put together a “brew kit”. In certain conditions hot liquids are much more than just a morale boost.
Have tea bags and coffee bags. If civilisation is ending you don’t want the last thing you drink to be yucky instant pseudo-coffee!
Add some variety such as hot chocolate mix, stock cubes, packet-soups and even some blocks of instant noodles.
If water supplies are a concern, sugars and starches take less water to digest than fats. Eating tends to stimulate thirst. Eating less food if water is restricted is usually prudent, and appetite is often reduced in vary hot weather, so the quantity of food may be reduced in favour of more water.
Many of us are carrying extra weight around our middles, so a couple of days on light rations will not harm us. A couple of days without adequate water will!

Boiling Water

Even if you do not carry a brew kit, some means to heat water to render it safe to drink will be needed.
This is another area where bad advice is common. I have seen recommendations to boil for twenty minutes and allow to stand for another twenty! The WHO standard specifies a rolling boil for ten minutes.This is not a strictly scientific criteria and is deliberate overkill. (This criteria may have been updated since I was educated!) Ten minutes is not really practical if your fuel supply is limited.
Generally, your actual requirement is to pasteurize your water (kill pathogens) rather than sterilize it. This may be done by heating water to 65°C for six minutes. More practically, since the pasteurization process is exponential, bringing water to a rolling boil (100°C) for a few seconds has the same effect. That is how humans have been pasteurizing water (and making tea) for thousands of years.
I am a qualified microbiologist (be it an old one!), but don’t take my word for it, do some research of your own. Many sites on solar cooking have information on water pasteurization and SODIS, and may have links to scientific papers on the topic.
German Mess Kit with Insert
A European mess kit is a better choice for cooking and boiling than a canteen cup. It will treat a more useful quantity of water and may be hung above a fire. It may also be used as a bucket to fetch water, collect berries and similar.
The interior of your mess kit may be packed with your brew kit and other items.
I would not recommend carrying your stove and fuel inside your cooking vessel, even if bagged up.
A mess kit or canteen cup is a pack item, not belt-kit.

Stove

A stove will be needed for when a fire cannot be used.
Alcohol gel stoves are probably the best option for your bug-out-bag.
Some of these resemble small paint cans with a pot stand. Other models of stove, such as the Crusader cup stoves, mini-Trangia and Trangia Triangle will work with either alcohol gel or solid fuel blocks. The Trangia stoves and the Esbit folding stoves can be modified to use gel by adding a metal dish for the fuel. Some solid alcohol blocks work with the standard Esbit stove.
Solid fuel blocks or gel may also be used to help light more traditional fires.
Other designs of stove, pot support or burning dish are easily constructed.
You may use your stove while the pot handle hangs from a stick or other support. This is useful when your cooking space is not totally level, or your pot is likely to get knocked.
Air Ministry Pamphlet “Desert Survival” 225:
Paragraph 11. The following items, in addition to water, should be carried if possible: heliograph, signal pistol and cartridges or flares, a small reliable compass, maps (indicating roads and sources of water if possible), tinted flying goggles or sun glasses, head covering, knife, matches, salt tablets, a minimum of concentrated emergency rations, first aid kit, anti-burn cream, torch, warm clothing (for use at night), and.a pair of strong boots. A useful maxim to bear in mind is “always fly in the boots in which you intend walking home”.

Water

You will need some means to carry water, the quantity depending on climate and availability. In arid and semi-arid conditions water is one of your priorities. In the jungle or Pacific Northwest there may be more water around than you care for.
Water consumption should not exceed water loss. When water supplies are a concern, minimize water loss. “Ration Sweat”. Cover your head and exposed skin. Stick to the shade. Hike or work at night.
When water is scarce, priority is for drinking rather than washing or cooking. Washing should be restricted to washing wounds and cleaning the hands before eating or medical procedures.
Each litre of water you carry will weigh one kilo/ 2.2 lbs, not including the container.
A water bladder with a drinking tube is recommended, since it allows you to drink on the move without needing to remove or unpack your pack. Stay hydrated!
A hydration pack is a water bladder with carrying straps, so it can be worn as a small pack when you are not wearing your rucksack. The hydration pack should either fit in or onto the outside of your rucksack when you are wearing the latter.
You only really need one bladder with a drinking tube in your bug-out-bag. The rest of your water may be carried in containers such as large soda bottles, which saves a few pennies. Refill your water bladder from the soda bottles as needed.
There are various pros and cons regarding keeping the water bottles in your bug-out-bag already filled.
Firstly, any water kept for an extended period should have a few drops of unscented bleach added to it. This sterilizes the water and harmlessly decays down into water and hint of salt over time. I would not keep water in water bladders when they are not in use.
Plastic components leaching into the stored water has been raised as an objection. According to scientific studies this is a very minor worry. If a nearby volcano or the local nuclear plant is about to blow, this may be fairly low on your list of worries!
There may not be time to fill-up your water bottles before you go. The mains water supply may have been cut off, or toxic waste dumped into the water supply by your friendly local industry may be the reason you are evacuating.
Filling the bottles in your bug-out-gear in a supply of water you stored for the purpose has been suggested. Presumably some people intend to use non-plastic bottles. Finding non-plastic storage bottles larger than a litre may be difficult. That may be a lot of bottles you will need to find room for!
Obviously, if storing water long term, use water that is as clean and clear as possible. Preboil it if possible. Reoxygenate it as described on the SODIS protocol before topping up and adding bleach or purification tablets.
Leaving the filled and sealed bottles standing in strong sunlight for a day or so will not hurt.
While most of your water should be in your pack, you should have a reserve on your person to carry when you are away from your main pack.
Hydration packs or canteens with slings are good, but there will be temptation to put them down. Slings or carrying straps may get caught on undergrowth and branches.
A canteen in a belt pouch may make sloshing noises that will give your presence away or alert game. A water bladder in a belt pouch may be a better option.
Smaller bottles, such as the US pilot’s flask (One US pint) can be carried in a large pocket.
With your water supply you might decide to carry a dew-sponge, length of plastic tube, and a bandanna/cloth to be used for initial filtration.
Your bug-out-bag should have a good supply of water-purification tablets for instances when you cannot heat treat your water. Get the sort intended for travellers, where a single tablet treats one litre of water. Some varieties treat 5 or 200 litres per tablet!
Water purification pumps are possibly not necessary for an individual travelling light in a 72 hour scenario, but useful for a squad or group or for a longer trip. Such water will still need chemical or heat treatment. Filtration will remove many harmful organisms but cannot remove all viruses.
Simple Spring Snare Trap
Recommendations for trapping and fishing gear for a bug-out bag can also get quite extensive.
In many bug-out scenarios there may not be time or suitable conditions for trapping and fishing. Trapping and fishing involves staying in an area for some time, when in a bug-out travelling may be a priority.
My EDC includes a six-span length of braided fishing line and 22 hooks on nylon. If I was expecting to venture into the wilds, I might add some additional gear to my EDC. I will talk about that another day. Today I am discussing what to carry in your bug-out-bag.
Brass wire suitable for making snares may be used for repairs or for other purposes, so a ten metre coil has a place in your bug-out bag.
A generous amount of braided fishing line also has many other applications. You might as well pack whatever was left on the reel once you had constructed your EDC fishing lines.
Some advise to also have a spool of light monofilament or flurocarbon line for when fish are shy of a braided or heavy line. All my hooks are on nylon and in a survival/bug-out situation I am most likely to be night fishing, so I expect line visibility will not be a major problem.
It is not a bad idea to fill the nooks and crannies of your bag with various types of cordage: ball of cotton string, bundle of bankline, hank of paracord.
Fishing hooks and lures cost little and take up little room, so have a good supply. They will be no great burden even if you do not have a chance to use them. All should already be tied to nylon leaders or fitted with snap-swivels.
A bundle of wire leaders will be useful if you find yourself lucky enough to be fishing for bigger, sharp-toothed fish. Long leaders may also be used as snares.
I am a little dubious about carrying fishing rods and other items intended for active angling. There are easier methods for catching fish. If travelling the most likely technique will be setting a night line while sleeping.
A fishing gig and a net are useful if you are certain that you will be fishing.
Most gigs I have seen have a screw fitting. You will need to modify this so you have a socket that may be mounted on a stick.
In Brazil, my girlfriend would use a net she called a “pulsa”. Her description sounds like a circular lift net, but it would be thrown out over the water like a frisbee and then hauled back, effectively trawling. Similar nets fold up to a size compatible with a large pack.
As far as active hunting goes, you may not have time if the emergency requires you to move fast or travel far.
All the chaos and human activity may make game shy, or they may have bugged out themselves before humans woke-up to the danger.
A hand catapult takes up little room in a bag, although you may have little opportunity to hunt with it. It could be useful in driving off aggressive dogs.
A .22 hunting rifle may not see much use either.
In a 72 hour bug-out scenario, other human beings are likely to be more of a problem than hunger. This should be figured into what firearms you decide to take with you.
Part Three
Categories
Phillosoph

A Handful of Advice on Food

Measure food portion with hand
Rummaging through a on-line drive the other day and I came across a filename that was just a string of numbers and letters.
This turned out to be a copy of Air Force Survival Manual AFM 64-5. I had not originally paid much attention to this particular work when I downloaded it along with some other military survival manuals.
Unlike most works of its ilk, AFM 64-5 is concise and very readable. It also contains a number of items of information that do not usually appear in many of the survival manuals that will be more familiar to the reader.
One of the many things that interested me was the manual emphasised that a survivor only needed about three ounces of protein a day.
A surprisingly sound and up-to-date piece of nutritional advice in a book that dates back to the 1950s.
It also flies in the face of the current food-fad of boosting the protein content of everything!
For those of you who did not pay attention in school, your daily protein needs are relatively modest.
Even if you are a body-builder, you are not likely to grow more than a few grams of muscle a day.
Having a little extra protein is not likely to harm you. Most of it just gets peed out.
Foods rich in protein have been noted to increase satiation, which is why items such a nuts are sometimes recommended for snacking.
Excessive quantities of protein consumption may have medical effects, however.
Most protein sources also include fats, oils, salt and other things we generally consume too much of already.
I have become more interested in portion control since I was declared diabetic. Like so many of us, I could do with losing a few kilos. This may help me keep the diabetes under control.
Also, on a planet where much of the population is either going hungry or obese, it seems morally abhorrent to deliberately be eating much larger quantities of food than I need.
Portion control has obvious applications for survival, hiking or prepping. It allows you to more accurately judge how much food per day you will need for a journey or a stockpile.
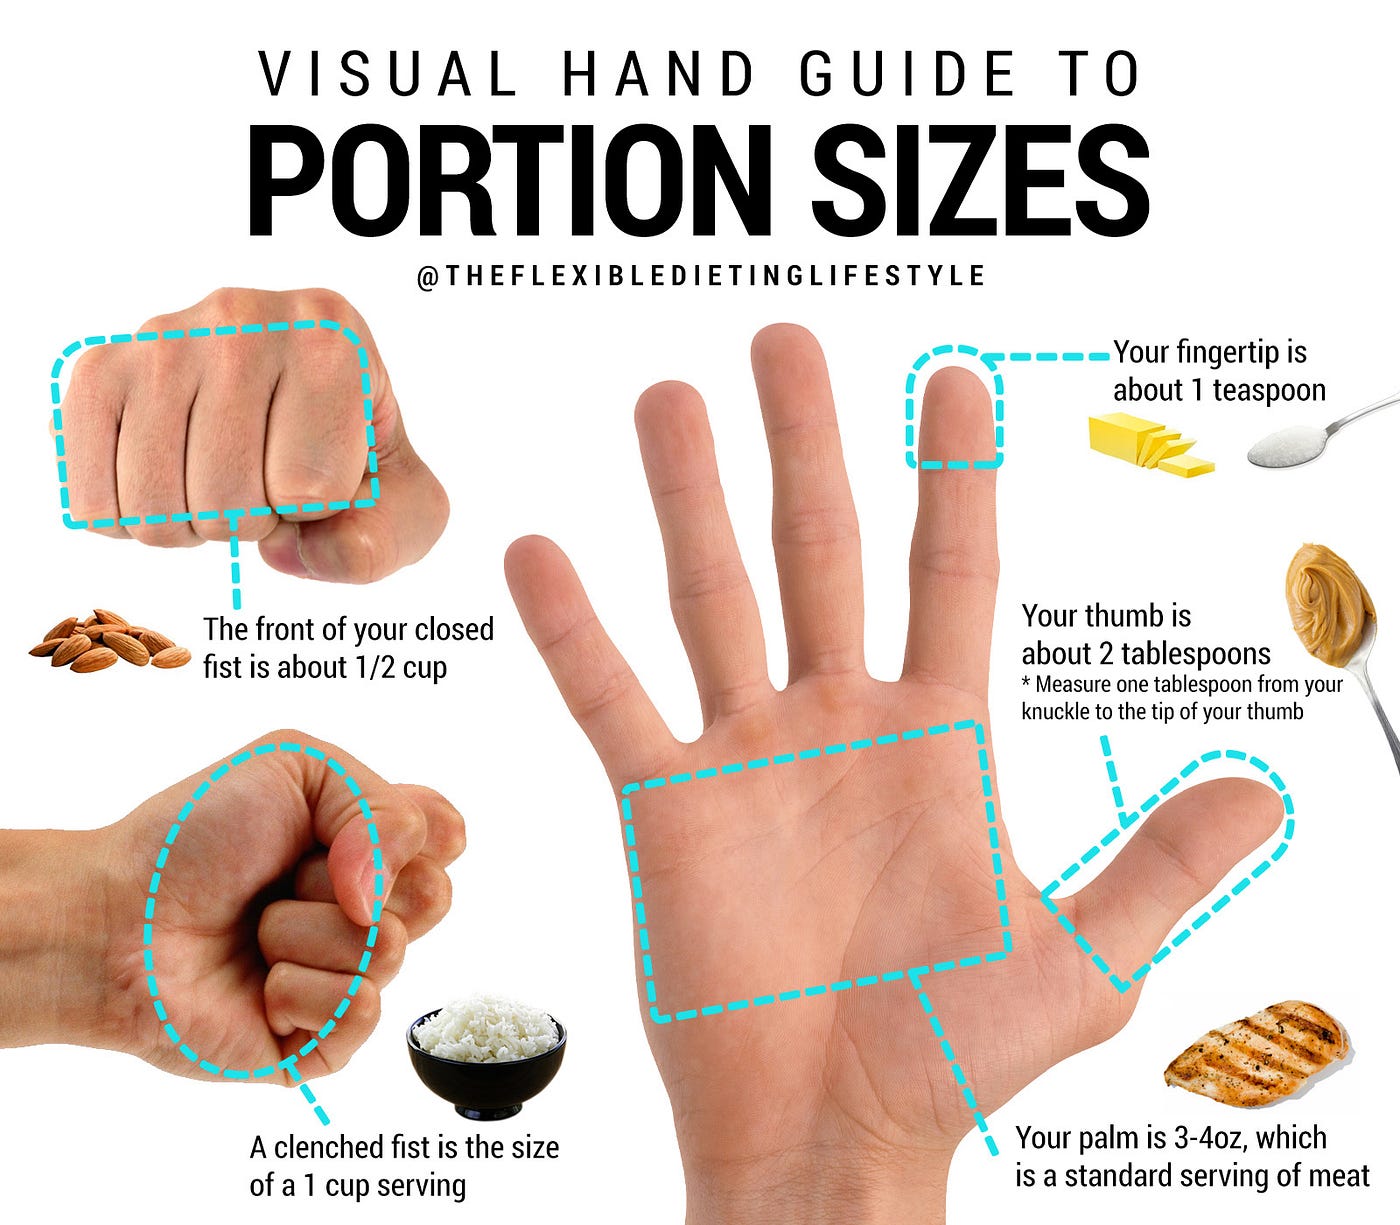
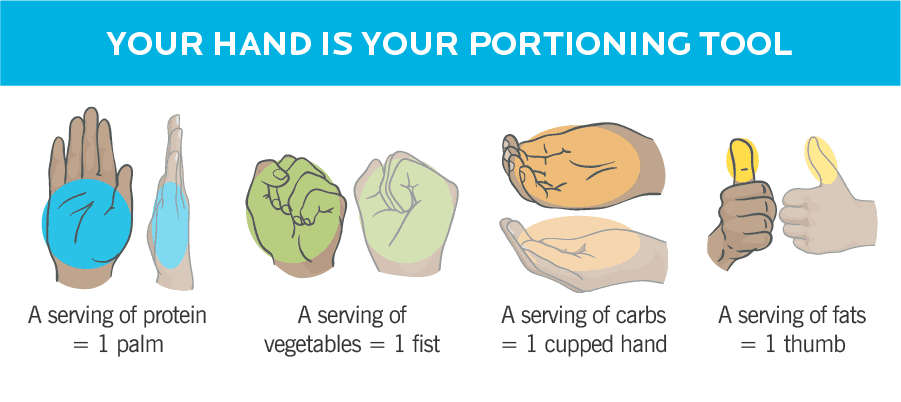
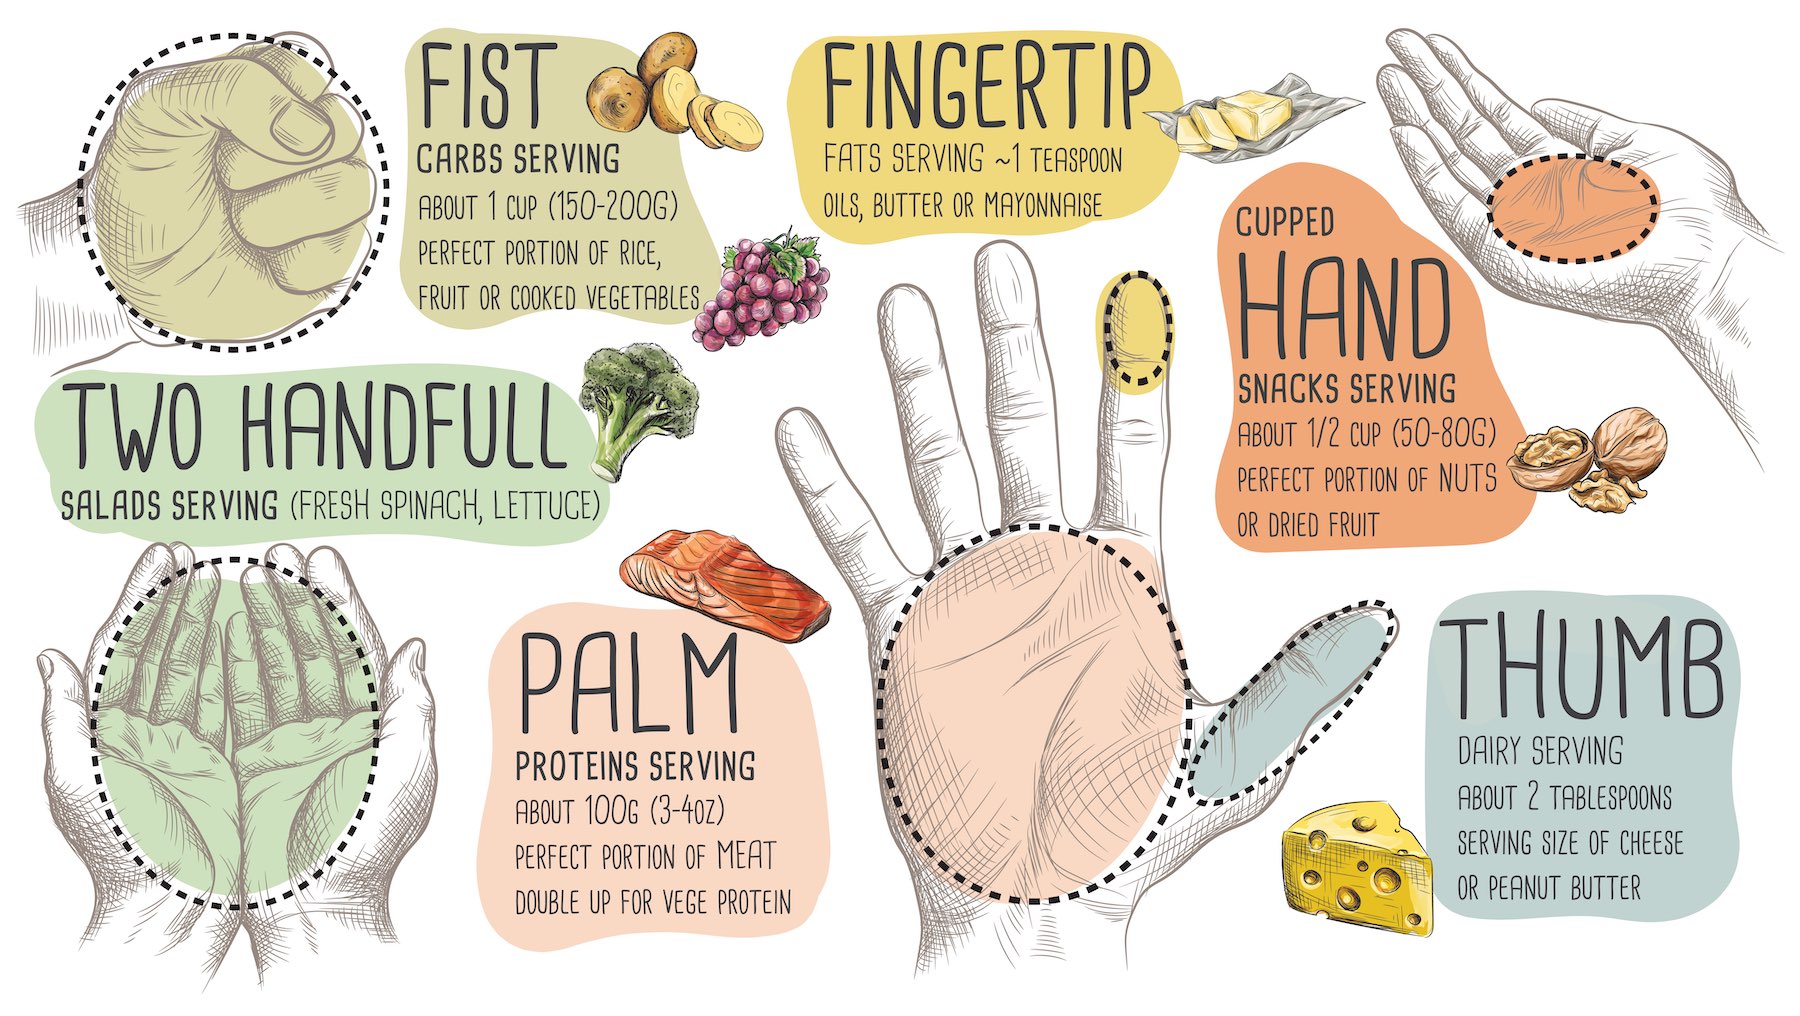
Reading about daily recommendations for protein introduced me to the concept of estimating portions relative to the hands. You will find many websites and illustrations of these. Some differ on the fine details and recommended quantities. My personal take-away may be summarised thus:
Hand measures of food

Protein

A portion of meat should be about the size of the palm of your hand. This is about the size of a burger, one or two sausages, a small chop or chicken quarter.
Lean meat, and meat cooked by methods that minimise fat content are obviously preferable.
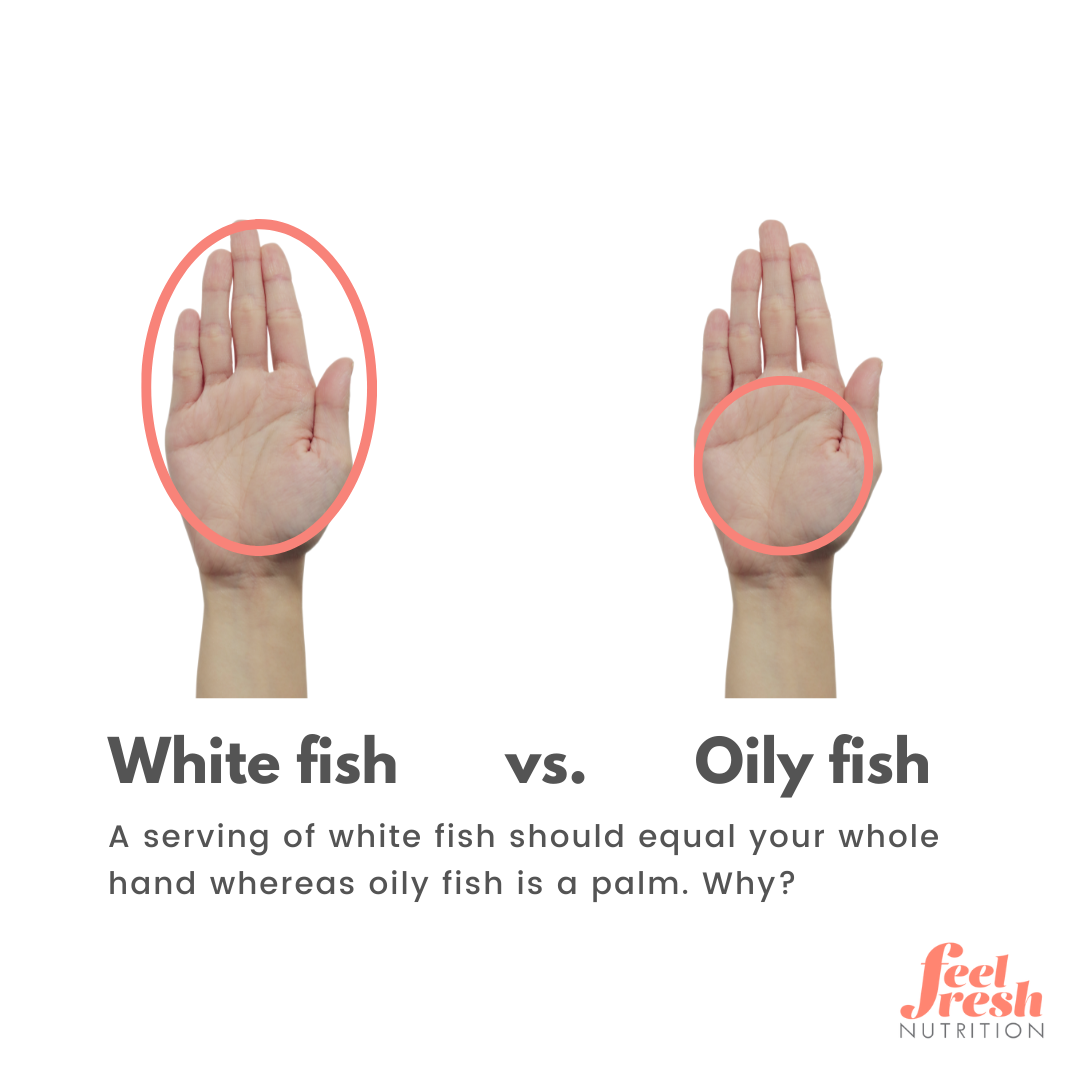
Fish is a little more complicated.
Oily fish has oils and fats, so is treated the same as meat, with a portion about palm-sized.
You may have a larger portion of white fish. A piece should be about the size of your open hand (i.e. palm and fingers, a hand-length). If you like your fish battered or breaded, I recommend baking it in a halogen oven rather than frying it. Quick, easy and delicious!
An old book I have suggests that meat should be used like a condiment, and only consumed in quantity one a week.
I feel that remains sound advice.

Carbohydrates

The carbs that you are most likely to be eating are mainly derived from cereals and grains. This class also includes beans, potatoes, and some vegetables such as sweetcorn. These are all rich in starches, which digest down into sugars. Sugar is also a carbohydrate, but we will deal with that separately later.
The carbs component of your meal should not exceed a cupful.
A clenched fish is equivalent to about a cupful (236-250 ml). The “face” of a fist is about half a cupful.
An alternate/additional approach to estimating a portion is that your carbohydrates should occupy about a quarter of the plate.
Some carbs, such as brown rice or wholemeal bread or pasta are a little richer in fibre or nutrients, but there is more merit in having a variety of types.

Fruit and Vegetables

Or more specifically, plant foods that do not count as being high in starch.
Some fruits are high in sugars, which some readers may need to bear in mind.
Generally, the recommended portion size for the non-starchy veg is two handfuls, or about half the plate. And unlike the above, this is a minimum recommended portion.
If you want to add more low-calorie foods such as vegetables, pile them on.
Have a good variety of vegetables to prevent eating them becoming monotonous.

Fingers and Thumbs

Other meal components such as sugar, salt, oil/salad dressing should be used in moderation.
A fingertip is about the equivalent to a teaspoon (5 ml). A thumb is about two tablespoons (30 ml), so half a thumb one tablespoon/15 ml.
As an aside, I was bemused to see my local pharmacist offering a bag of glucose/dextrose (with a hefty markup!) as “an alternative to sugar”.
Back to school again! Glucose/dextrose is a monosaccharide of glucose. Sucrose is a disaccharide of glucose and fructose. All are digested by the same route and have the same food value. You will see marvellous claims made about honey, but foodwise it is mainly glucose and fructose.
I like a sprinkle of sugar or drizzle of honey on my porridge, but make sure it is only a teaspoon.
Americans tend to write recipes in volumes (cups and spoons), while Brits are more likely to use masses.
If you are a Brit and considering paying more attention to your portion sizing, I recommend investing in a set of measuring cups and spoons.
Very soon you will understand equivalents like that a 40 gram portion of oats is about half a measuring cup, and how much this is compared to your fist.
One of the beauties of the hand measuring system is you always have it “handy”.

Spice is the Variety of Life

It is a good idea to have an assortment of sauces, spices and salad dressings to add extra variety to your meals from day to day.
This recommendation applies to both your home kitchen and your backpack. When you are out in the sticks and may need to eat the same food several days running, a dash of sauce or sprinkle of curry powder or chilli can make a lot of difference.

Snacking

One definition of a snack is eating for entertainment or a non-essential meal. I therefore try to limit my snacking.
Sometimes, however, you do need something quick to tide you over until dinner, or ward off a imminent migraine attack.
The recommended portion for a snack is a handful (about a quarter to third of a cup, or 30-55 mls may be a better measure). This may be a piece of fruit such as an apple or orange, or a handful of nuts, sultanas, cherries or similar.
Protein containing snacks may satiate you better. At other times you may need the carbs and sugars.
A handful of fruit makes a nice dessert to end a meal.
The important point is to stick to the handful portion size. This takes a bit of self-discipline, but you are unlikely to lose weight without this. Self-discipline is a personal property that grows with exercise and practice.
If you are prone to snacking, I suggest you stock up on some dried fruit (apricots, sultanas, etc) and some nuts and seeds.
I found that a plastic sauce container from the takeaway holds about 30-55 ml of nuts, sultanas etc. I keep one with my snacks as both eating bowl and measure.

Packaging and Portions

Actually achieving the above in practice is a little more complex. Often food is marketed in large packets.
For foods such as rice, sugar and porridge that has a long shelf-life, this is great. For other foods, it is problematic.
For example, the recommended serving for a low-fat yogurt (which may be quite high in sugars) is four tablespoons or 60 ml. It is sold in 500 g pots, with the advice to consume within “three days of opening”. Theoretically, for many households, if this advice is followed, most of this yogurt would be thrown-away rather than consumed.
Many snack foods are sold in large packets, and their is a great temptation to finish the packet rather than consume just a handful.
Bread and vegetables are often sold in plastic bags. These bags retain moisture and encourage food to rot or go mouldy. So you throw it away, waste your money and go back to the supermarket for more.
If you find yourself wasting food (or eating too much!) I suggest you invest in a variety of storage containers.
Remove the plastic packaging from perishable foods and store in containers. It is surprising how much better a lettuce keeps in box rather than a bag.
Some foods keep well in the fridge, others do better at room temperature.
Occasionally, inspect the contents of a box and shake out or mop-up any condensation and excess moisture that has accumulated.
This is also the solution to those large bags of snack food. A sealed storage box will keep them from going stale, and let you enjoy the occasional handful over a more reasonable time interval.
Ween yourself onto healthier alternatives such as nuts, seeds and dried or fresh fruit.

Chop Chop

If you have done any Chinese cooking, you will know that food chopped small takes less time to cook and is less likely to be underdone. This applies to the oven, pot and frying pan as well as the wok.
A palm-sized portion of meat or fish goes much further when diced or sliced.
All the ingredients cooked in this fashion may be served mixed together in a single bowl, which I find makes a meal more interesting and varied to consume. Many of my meals involve just a single bowl in one hand, a spork in the other.
If cooking without vessels, divide your food into small pieces before threading it onto sticks for grilling before a fire. Briefly pass the food through the flames or place it on the coals to sear and seal the outside.

Eat the Rainbow

“Eat the Rainbow” is a phrase I only encountered recently, but nicely summarizes something that I have been practicing for decades.
Consider a meal of something like chicken and chips, which is just yellow and brown or orange. Suppose we make it multi-coloured by adding some sliced baby tomatoes, coleslaw, shredded lettuce, a little onion, some mushrooms. Suddenly this meal has got a lot more interesting and more nutritious.
Not only does such a meal look better, it is also more interesting to eat, with a greater variety of tastes and textures.
Tip: Ramekins (or Gü jars!) are useful for one-person oven cooking.
Categories
Phillosoph

Survival Spears

In my recent post about throwing sticks and stones, I mentioned that creating a good spear was not as easy as some survival manuals make out, and that the throwing stick might be a better investment of your time and energies.
I had wanted to link this comment to an article that I had written back in my early days on the internet. However, the throwing weapons group I had originally written it for had long since disappeared, and to my surprise, I had not placed a copy on my other website.
Below is the original article from many decades ago, with some minor updating and editing.
Since I wrote this, I have discovered several of my original articles are preserved on this site.

A Short Essay on Spears

Sometime ago, I started putting together notes on easily-made weapons and started off with spears since most survival books make this out to be quite simple. Just grab a length of wood and sharpen one end, and off you go!
Not quite!
Assuming that you do have a handy forest nearby, you won't see that many six foot+ lengths of timber of suitable width just growing from the ground, not anywhere I've been, anyhow.
If you do find something without needing to chop down a tree, it probably won't be straight, so you have to beath it.
Beathing involves gently roasting the wood over a fire or in hot ashes to make it temporarily supple. After this, you will probably have to hang your spear up to dry a day or so. Hanging a heavy weight from it may help the shaft stay straight. Bell towers were sometimes used to make and store pikes and spears.

Throwing Spears

For a throwing spear, just sharpening a point on one end and throwing it may not be enough. The spear will probably yaw like crazy and you may miss your mark by at least a foot.
Your spear needs flight stabilization.
Although fletching is sometimes used, most throwing spears are stabilized by drag, for which the front half needs to be heavier than the rear.
For a “self” spear (one made of a single piece of wood), drag stabilization may be achieved by tapering the shaft towards the butt, or better still. selecting a length of wood that is already tapered.
Hawaiian All Wooden Spear
Captain Cook's expedition to Hawaii acquired a very nice example of such a spear (above), which must have been the product of many hours carving, particularly since the owner was unlikely to have had metal tools.
Throwing Spears
A simpler option is to fit a heavier head or a fit a weight just behind the head.
Most spears that have a separate head have a head that is denser than the shaft material.
Flint heads are well known, but one can also carve a blade from wood, maybe gumming flakes of flint or shell to it.
Fixing a knife as a spear point will do, but the blade length handy for a knife is often too short for a good spear and any cross guard will limit penetration. Traditional boar‑spears penetrated at least ten inches, and bear‑spears more than double this.
A point can be carved from wood, and fire hardened in some cases, but if for a throwing spear, ensure it has sufficient weight.
Fire hardening is a process that is often mentioned, but not described in detail in many survival manuals. Fire hardening is “lightly toasting” the sharpened point of a wooden weapon to drive out some of the moisture. The point is then sharpened further. Fire hardening may make a wooden tip harder, but also makes it more brittle. Sometimes grease, oil or fat is applied to the treated point afterwards.
Other useful construction materials include flint, obsidian, glass, shell, slate, bone, horn, antler or metal, either on their own or added to a wooden head.
Drag stabilization may also be increased by adding cloth streamers or long tufts of grass or hair behind the head.

Thrusting Spears

Sometimes your intended meal will have other ideas and will want to come up and inform you of its differing opinion. In such a situation, a thrusting spear is useful, no matter what other weapon you were using to hunt.
Forward balance is not such a problem for a thrusting spear but penetration still is. In this situation your concern is too much rather than too little.
Some beasties have been known to impale themselves further onto a spear or sword attempting to get the hunter within reach of their horns, tusks, claws or teeth!
The solution to this hazard is some form of arrest, usually a crossbar a foot or more down the shaft.
Examples of methods of creating barred spears
A number of examples are shown in the illustration above, taken from “Hunting Weapons” by Howard L. Blackmore.
The leftmost uses a boar tusk thrust through the bindings. Several others use plates of bone or horn attached by cordage. Blackmore, p.91: “To start with, in the fifteenth century, the bar was a piece of wood or horn held firmly in position by thonging. It was then realized that if the bar hung loose it was still effective and was not so liable to cause accidental injury to the bearer or his companions. The piece of horn forming the bar, often only roughly shaped, was fastened to the haft by a leather strap passing through a hole in the socket or woven into the binding which normally criss-crossed the head of the haft to provide a grip.”
In some weapons, the arrest is not so obvious, being incorporated into the design of the blade or socket. Examples of this include the partizan and the lugged or winged spears.
Having more than one point automatically limits penetration, as can be seen with the Chinese tiger fork.
Chinese Tiger Fork
Thrusting spears are also used for hunting, usually from ambush.
A thrusting spear should lack any barbs so that it can be easily withdrawn for a second thrust or to be used against another target.

Barbs and Multiple Points

A throwing spear may be barbed, and in a hunting situation this may be done for two reasons:
Firstly, it is done to keep a poisoned blade in the animal's body long enough for the poison to take effect. Often the head detaches so that the shaft (the production of which may have involved quite a lot of work) will not be lost or damaged as the animal escapes through the brush or tries to rub the head loose. Having a wound partially plugged by a shaft reduces the rate of blood loss, but the movement of the shaft will also inhibit clotting, prolonging bleeding time.
Heads are also barbed to prevent an animal escaping from the spear head when the shaft of the spear is held or the weight of the shaft will hinder escape.
The most familiar examples of this are fishing spears (which may be more effective thrust rather well as thrown).
Sometimes the head of a spear will be designed to detach but will be on a line so that the fish/seal/hippo(!) can be hauled in once exhausted.
The drag of the detached shaft through the water may further tire the animal and sometimes a bladder or buoy is added to the shaft increase this effect.
This technique is also used with arrows.
Fishing Arrow
An very nice example (above), taken from “The Art of Attack” by Henry Swainson Cowper. The drag of the arrow shaft being pulled sideways through the water tires the prey. The barbed arrowhead is made from bone and inserts into a socket in the end of the shaft.
Because fish are often hard to hit, many fishing spears (and arrows) have multiple points, and this strategy may also be used on small elusive furred and feathered game too. For ideas for such designs, I suggest browsing Cowper and Blackmore, paying particular attention to the multi‑pointed spear, harpoon and arrow heads made from non‑metallic materials such as antler, wood and bone.

Throwing Cords

A useful trick that can be applied to spears is to tie a loop of cordage to the shaft and slip the first two fingers through the loop when throwing. This increases energy transfer to the shaft and was known to the Greeks as the “ankulé” and to the Romans as the “amentum. Cowper describes this on p.230.
A variant of this is to tie the cord with a half hitch, either near the centre of gravity or the butt. Using this knot allows the cord to remain with the thrower after the spear is cast. Cowper describes this on p.231, using the term “ounep”.
Miners in West Riding, Yorkshire, used this method to throw 31 inch long drag stabilised arrows, and ranges commonly exceeded 200 yards. Cowper describes this on p.230, the source being “The Crossbow/The Book of the Crossbow” by Sir Ralph Payne-Gallwey.
Conventional arrows can be thrown by the same method and this maybe a useful hunting technique for a bow hunter should your bow be broken.

If suitable materials are available, and the above design principles are borne in mind, quite effective spears can be made.
Spears are also useful as walking and wading aids, as carrying poles, shelter supports etc.
Categories
Phillosoph

Throwing Sticks and Stones

Recently, my computer began to lag, so I ran a chkdsk on it. This took some time, so I decided to read in the more traditional manner.
My choice was a printed copy of Richard F. Burton’s “The Book of the Sword” (1884). I have dipped into this book on occasions, but never actually read it from cover to cover.
Bigfoot attack a cabin

Throwing Stones

In the introduction and preamble, Burton discusses humanity’s need for weapons, their disposition to violence and the forms and possible inspirations of early armaments.
I was particularly struck (pun intended!) by the discussion of hand‑throwing of stones.
Various apes, monkeys, kangaroo mice and some octopuses will throw a variety of objects to discourage intruders and predators.
Humans, however, are able to throw with sufficient accuracy to deliberately hit and injure an intended target. Indeed, there are indications that aptitude in this ability may have been an evolutionarily selected trait and have contributed to human sexual dimorphism.
In the Iliad, duelling heroes pick up great rocks and hurl them at each other.
Classical armies are believed to have included units of stone throwing warriors, known as “petrobóloi” or “lithobóloi”. Since these terms mean “stone-thrower”, some of these references may alternately refer to men armed with slings or catapult‑type war engines.
A little later in history, the Roman Vegetius states: [Legionary] Recruits are to be taught the art of throwing stones both with the hand and sling.” and “Formerly all soldiers were trained to the practice of throwing stones of a pound weight with the hand, as this was thought a readier method since it did not require a sling.”
It is worth bearing in mind that accurate use of a sling is very difficult and requires considerable time and training. Having legionaries lob stones at enemies was much more practical.
Homer's Iliad and Viking sagas also mention stones and rocks thrown during battles.
Japanese armies also had low-ranking warriors whose speciality was throwing stones (ishinage/ishiuchi/inji/sekisen/tōseki/isi arasoi/isi gassen), the stones known as tsubute. (“Classic Weaponry of Japan, p.156, Serge Mol)
Japanese stone throwing
Burton gives several examples of stones used in hunting or war (p.16): “Diodorus of Sicily (B.C. 44)…says that the Libyans [possibly a generic term for North Africans] ‘use neither Swords, spears, nor other weapons; but only three darts [javelins] and stones in certain leather budgets [bags/sacks], wherewith they fight in pursuing and retreating.’”
He also describes how raiding “Arab Bedawin”, rather than use their matchlocks, will pelt an enemy with rocks, causing him to uselessly expend his ammunition.
Burton also remarks: As a rule, the shepherd is everywhere a skilful stone-thrower.”
In “The Art of Attack” (1906), p.153, Henry Swainson Cowper notes: “Stone throwing as a method of attack would come natural to our earliest forefathers, like the use of the simplest club. Indeed such use might precede the last named, since no branch could be used without some trimming, while suitable stones lay ready almost everywhere.” and on p.159, footnote 2, “It seems natural for man, when irritable to " chuck " the nearest available object, whether a stone or a decanter, at the offender, whether that be a dog or a relative.”
As well as being a weapon system for hunting and war, stone‑throwing has been used for a number of other purposes.
Stones may be used to bring down fruit and nuts from trees. It is probable that thrown stones have been used to drive predators and scavengers away from a kill, and birds and other animals away from the crops and herds. Thrown stones have been used for duelling, as a means of execution, and as an exhibition of disapproval, discouragement, harassment and religious devotion. I even encountered suggestions that throwing stones could be used for stress relief (other than the obvious option of throwing them at whoever bothers you!).
One might also reflect at the various sports and fun‑fair or carnival games that involve throwing balls or other stone‑like objects.
While researching this topic, I came across this interesting scientific paper.
Stones deemed most effective as missiles were those of 0.5 to 0.75 kg (figure 6). The stones used naturally weathered into spheroids, and diameter of suitable missiles was approximately that of a tennis ball, which would be around 67 mm, incidentally very close to that of an M67 grenade (64 mm).
Another interesting feature of this study was that the simulated target was a 57 kg antelope at 25 metres.
In a genuine survival situation, a thrown stone may be useful for more than just squirrels, rabbits and birds!
Not all stones are created equal, and good throwing stones may not be as readily available in some environments as you may wish.
Cowper (p.150) notes that the natives of Tierra del Fuego carry a little store of stones for throwing in the corner of their mantles. Many other stone throwing peoples also carried stones on their person.
Undoubtedly, stones were often selected for suitable mass, and for regularity and consistency of shape. Shaping and polishing stones to create better missiles is not unknown.
“Ancient Chinese Hidden Weapons” by Douglas H. Y. Hsieh suggests carrying a bag a foot deep and seven inches across to hold suitable “locust” (sharp) stones encountered, or two bags each holding six pebbles. Readers can probably think of other practical uses for a bag of stones.
Hsieh's book also suggests “Anyone who intends to jump down from a height in poor visibility must use a stone to see if the ground is safe”.
Despite this long and broad history, the potential of hand‑thrown stones is often overlooked by survivalists.
In modern times, we associate stone‑throwing with rioters and hoodlums.
Survival manuals that describe field expedient weapons generally ignore the use of stones, other than as ammunition for slings and hand‑catapults/slingshots.
Rubber and elastic perish and break.
While a sling is easily constructed and has formidable power and range, learning to use it accurately enough to hunt with will probably involve weeks and months of practice.
As an aside, if you do have the cordage to make a sling, you may be better off making a bolas! The bolas is a clubbing weapon as well as an entangling one, so is related to the thrown stone.
Bolas are best used in open terrain. Bushes and trees give them problems.
Cords of more than a metre may be used for bolas, and heavier weights than those suggested in FM 3‑05.70 used. Blackmore (p.327) gives a range of 1 to 1.5 lbs for each weight.
Many people interested in survival or martial arts devote considerable time and money acquiring and learning how to throw knives, axes, shuriken, coins, darts or spikes. Stones are far more likely to be available in a defensive or hunting situation.
In his book Shuriken-Do, Shirakami suggest women carry several golf balls in their bags. Hold one in each hand and throw the pair in quick succession.
If you are serious about keeping yourself fed or defended, putting in some practice at throwing stones by hand would be prudent.
A practice range for stone throwing is easily constructed, even when out in the wilds. A tree, post, mound or object hanging from a tree may be used as a target.
Start learning at a range of about three metres. Increase distance and reduce target size as you improve. Cups or buckets on their sides make good targets,
Shuriken An Illustrated Guide” by Fujita Seiko in the section on stone throwing (Tsubute Jutsu, also known as Ishi Hajiki Jutsu) gives the useful advice: “You should always aim to hit above your actual target while your hand should drop down below your target as you throw. For example, if you want to strike an enemy in the face, your hand should drop down to his chin as you throw…To throw properly you need to understand how to aim, stand with your foot facing your target and throw as if you are trying to impale it”.
In the illustrations a right handed throw is shown with the left foot forward and the left hand pointed toward the target. Hold some reloads in your free hand.

Throwing Sticks

Throwing stones may be supplemented by throwing sticks.
Compared to a thrown stone, a throwing stick has a greater chance of hitting a target, and a greater range.
In their very simplest, a throwing stick is a piece of wood picked up off the ground or broken from a tree and thrown at a target. Such simple throwing sticks are useful for knocking fruit out of trees, or casting a bear‑line over a tree branch.
This video shows a very simple baton-style throwing stick made from a length of hardwood timber, as long as the arm and as thick as the wrist. Ideally this should be as free of knots and other non‑aerodynamic projections as possible.
Sharpening each end will increase its utility both as a weapon and as a digging tool. The other end may be cut into a wedge shape to aid in removal of loose soil.
More effective throwing sticks will take a little more fabrication.
Throwing sticks may be dived into those that have an aerodynamic cross‑section, and those that do not.
Throwing Clubs
The latter type (above) are often weighted towards one end, and may resemble a knobkerry or shillelagh.
The next illustration is taken from “Hunting Weapons” by Howard L. Blackmore, and shows hyrax being hunted.
Two hunters would work together, about 50 yards apart. Both would throw at the same time so that an animal dodging one club would be hit by the other. When hunting birds, one hunter cast his club above the bird, the other below.
Hunting with a throwing club
A knobkerry or shillelagh‑type club may be made from where a branch or root grows from a larger part.
The next illustration shows an alternated configuration of throwing club, cut from the junction of where a minor branch joins a major one.
Throwing club made from join of two branches
When it comes to aerodynamic throwing sticks, some mention must be made of the “boomerang”.
In modern usage, the term “boomerang” is generally used for returning throwing sticks. To return, a boomerang needs to be launched in a specific direction, relative to the wind. It also needs to be relatively light, making it impractical as a hunting weapon except against lightly-framed fowl.
Non-returning boomerangs intended for hunting and warfare may be up to a metre long, and may have a range of 150 yards (Cowper, p.166).
The term “boomerang” was originally a name only used in part of Australia, and according to many authors, was originally used for non-returning hunting and fighting weapons!
Burton notes (p.33): “The form of throwing-stick, which we have taught ourselves to call by an Australian name ‘boomerang,’ thereby unduly localising an almost universal weapon from Eskimo-land to Australia, was evidently a precursor of the wooden Sword. It was well known to the ancient Egyptians.”
Survival field manuals such as FM 3‑05.70 tell you to make a “rabbit stick” from “a stout stick as long as your arm, from fingertip to shoulder” (p.8‑26) and from “a blunt stick, naturally curved at about a 45-degree angle” (p.12‑8)
Some sources will tell you that a hunting throwing stick should be widest at the centre and thinner and tapered towards the tips. This is an effective form, but even if we restrict ourselves to looking at Australian designs, other forms may be encountered.
The illustration below shows a “beaked” war‑boomerang (3). Boomerangs
The image below shows an Australian weapon known as a “lil‑lil” besides a more familiar style of throwing stick.
Lil-lil and Boomerang
The lil-lil is classed as a club rather than a boomerang, but is also used as a throwing weapon. This design has inspired some weapons that do have an aerodynamic cross-section.
Both the beaked boomerang and lil-lil clearly concentrate mass towards one end rather than the centre.
Cowper shows a wide variety of curved throwing sticks, ranging from gentle S‑forms to sabre, hook and horn shapes.
In other words, you have considerable leeway in the shape of your throwing stick.
FM 3‑05.70 also tells the survivor to “Shave off two opposite sides so that the stick is flat like a boomerang.” which I think is a little misleading.
Aerodynamic throwing sticks often have a cross‑section that is described as “semi‑lenticular”. In other words, the lower surface flat‑ish and the upper convex. The edge formed concentrates the force of impact, hence Burton’s reference to wooden swords or edged clubs.
Cowper notes that some war‑boomerangs have one side flatter, which suggests this may not be as pronounced as seen on “comebacks”. He also mentions an Indian war-boomerang with both sides rounded. There is therefore some leeway in the cross‑section you give your throwing stick, depending on the tools and the time you have.
A practical bow and arrow, or even a good spear take considerable skill to produce in a survival scenario.
Manufacture of a throwing stick is easier and more forgiving. Your chances of bagging a meal with it are also much greater.
Like any other weapon system, you will still need to put in the time practicing!
There are plenty of websites and videos describing how to make and use throwing sticks, so I will not go into further detail here.
Depending on how it was constructed, a throwing stick may serve other purposes too.
Many types are suitable for use as digging sticks. Some knobkerry or shillelagh are long enough to serve as walking sticks, which is handy when traversing rough terrain. Throwing sticks may also serve as hand weapons, useful in dispatching caught fish or trapped animals.
It is a good idea to construct a pair of throwing sticks, providing you with the means to make a follow‑up attack, or defend yourself.
Categories
Phillosoph

Less Plate, Less Pot, Eat Less

One of the interesting things I have learnt during lock-down was that I could be happy with much smaller portions of food than I was accustomed to.
Before lock-down, I had already stopped including pasta, potatoes or rice in my meals.
Meals at home would be just meat and vegetables.
During lock-down, many meals became just a portion of meat or fish (battered fish bakes very nicely in a halogen oven!).
Other nights, dinner might just be a bowl of sweetcorn with a dash of Tabasco. The roast potatoes I had left after Christmas dinner formed a couple of nights' dinners on their own.
While individually, many of these meals were not balanced, things seemed to even out nutritionally over a week or more.
Generally, these relatively modest portions satisfied me.
If I felt peckish later on, I would eat some fruit. If a fancied some desert, this would often be fruit.
Some nights, when I did not feel hungry, dinner might just be fruit.
Typically I only ate twice a day.
Breakfast/brunch was usually a serving of porridge with a few sultanas.

Less Plate, More Satisfaction?

I am reminded of this since recently I heard someone comment “People eat too much because plates are too big! Use smaller plates and they will eat less.”
Often when eating my modestly sized meals, I have used the small 21cm diameter side plates rather than the full-sized dinner plates.
When food does not need cutting up, I usually use a 16cm/ 500ml bowl.
My small meals had satisfied me both physically and psychologically. Enough really is as good as a feast!
I did a little research, and the idea of using smaller plates has some support.
I also came across the suggestion that plate colour may also have an effect on satisfaction. My small plates and bowls are black, which is a good colour for contrast. Red is apparently even better.
There seems to be something to all this.
The “first bite is always with the eye”, so there seems to be some logic that the presentation of a meal has some effect on psychological satisfaction with portion size.
If you want to drop a little weight, a few red bowls and small plates may be a useful investment. I would advise getting those that can be used within a microwave oven.
After you eat, it is a good idea to drink a glass of tap-water and clean your teeth.

Smaller Pots

To the above, I have an additional suggestion.
If you cook your own meals, try using smaller cooking vessels.
It is all too easy to increase the quantity you are cooking if you use large capacity pots. And once the food is cooked, it would be sinful to let it go to waste! Instead it goes to waist.
I have put my large pans back in the cupboard and dug out a couple of small saucepans, each about one-litre capacity and around 17cm diameter.
For meals for a single person these should be quite adequate for anything you need a saucepan for.
I have an even smaller “milk pan”, but this is in daily use cooking my porridge. Also milk pans generally do not come with lids, and a lid is often needed for more efficient cooking.
A smaller pan may mean you have to cook on a smaller hob than you usually used.
I have also noticed I need a slightly lower flame setting to prevent flames wastefully lapping up the sides of the pot.
Thus, using a smaller pot is saving me some fuel and money. Smaller capacity saves both time and water.
And if further incentive were needed, mastering cooking with small pots is good training for when you may have to cook in just a canteen cup or mess tin.
Categories
Phillosoph

Lighter Kit and Stoveless Cooking

A friend sent me this video. Good timing, since I had just posted my article on ranger rolling and how it could be used to reduce the number and weight of stuff-sacks used.
I don't carry a lot of electronic gear nor do I idolize my phone, so I had not paid much attention to items such as power banks. With a suitable suite of compatible devices this may be a step towards solving the problem of the soldier's load.
One topic touched on is that of “stoveless cooking”. My friend sent me an additional video on this: 
Years ago I encountered a technique that might be called the “mobile haybox”.
The hiker would heat his food, or add boiling water, as appropriate. The food was then placed in an insulated container and stowed inside the rucksack.
Like a conventional haybox, the retained heat continued to cook the food over the next few hours. Ideally one used a “wide-mouthed thermos”, but those were not that easy to find in those days. More usually, you used a sandwich box or screw-topped container and wrapped your sleeping bag and other insulation around the outside. The wise hiker placed the container in a plastic bag in case of leaks!
The stoveless method is similar, in that you hydrate the food several hours in advance and give the water time to do its job.
The two methods can be combined. Providing it has a good seal, a sandwich box could be used.
Sandwich boxes, incidentally, make pretty good eating bowls for more conventional cooking. Remember that before you fork out a good chunk of cash on a specially designed backpacker's eating kit!
Have a look at the supermarket shelves for other suitable containers.
Buying them filled with food is often cheaper than attempting to buy an empty container.
I have seen plastic peanut-butter jars suggested for stoveless cooking and this is a way to utilize that peanut-butter stuck at the very bottom.
Categories
Phillosoph

A Decent Meal in Less Than Ten Minutes

Cooking for myself recently has been very efficient.
The other night my cooking proceeded thus:
I place a bowl of frozen sweetcorn in the microwave. This will cooked in under three minutes.
At the same time, I boiled a cupful of water in the electric kettle. This will be used to make instant gravy.
A good selection of ready-made sauces and instant stuff can really add variety to your diet.
A frying-pan heated up on the hob with a squirt of oil added. I keep the oil in a squirt bottle since it makes it easier to add less to a pan. Chopped fresh mushrooms went into the frying pan to brown for a few minutes.
While this was going on I heated up my new George Foreman grill.
I have seen some rubbish written on the internet about these grills drying food out. The George Foreman is basically a culinary trouser press. It cooks food from both sides at once, so it will take approximately half the time to cook something. Adjust you cooking plan accordingly!
On another hob, I boiled a pot of salted water. Following the previous blog post, I decided to experiment with pre-soaking dried pasta. It worked even better than I expected, so it was obvious I could now cook it like fresh pasta. A couple of minutes of cooking instead of twelve to twenty minutes.
Pork chop, mushrooms, sweetcorn and pasta in gravy, cooked in under ten minutes. Big saving on fuel, time and hassle.