The other day, I found myself thinking about the variety of weapons taught by many martial arts.
When these arts were created, most of these weapons were relatively common place.
The battlefield, and the street, have changed since those times.
You are unlikely to fight with a sword, a knife or machete being more probable.
The entrenching tool is more likely to be to hand than an axe or mace.
Your spear or staff will seldom have to deal with a horseman, and is much handier if its length is less than your height.
The stick remains a useful weapon, but nowadays will often be wielded with the intention of not seriously injuring a foe.
Those of you that wisely have invested in a copy of “Crash Combat” will recognize the above as the arsenal of modern weapons included in the course.
The above reflection melded with a question my subconscious had recently posed to me: “Does one need a combat knife?”
Some authors use the term “combat knife” or “tactical knife” to mean a variety of multi-purpose knife.
In this blog, I am talking about specialist designs that have the primary role of use against two-legged predators.
Certainly, it is prudent to have a knife that one can fight with, but what are the merits of spending good money on a knife that is primarily designed as a weapon?
And what form should such a knife take?
There is a baffling variety of supposed combat or fighting knives.
Context
To answer that last point, we must return to the theme noted in the first paragraph.
We cannot really consider a fighting knife without also considering context. The requirements of a fighting knife have changed as the nature of combat has changed.
In the Middle Ages, for example, it was desirable that a blade be stout enough to deal with body armour, yet narrow enough to slip between plates or through a visor.
Jump forward to the age of the rapier, and a dagger might be required to serve as a main gauche.
The Bowie knife provides us with another illustration. The Bowie blade shape is commonly used for survival knives, which tends to make us forget the original Bowie knives were primarily fighting weapons.
The Bowie came into fashion in an era when pistols were generally single-shot. The Bowie was a handy alternative to a sabre or smallsword.
The fighting Bowie was at least eight inches long, with examples longer than twelve inches by no means unusual. A blade might be a quarter of an inch thick and broad enough to look like a pointed cleaver, which essentially was what it was.
A Bowie might be used against other knives, or longer edged weapons.
The usefulness of the Bowie waned with the increasing availability of mass-produced revolvers. Apparently many volunteers in the War Between the States invested in impressive Bowies, only to discard them once the wisdom of a lighter marching load became apparent.
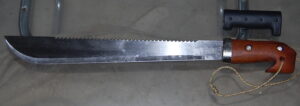
There seems little point nowadays in carrying a large fighting knife such as a Bowie or smatchet.
Many large utility knives, billhooks and machetes can defend our person equally well and prove far more useful for other, more likely tasks.
You probably also own entrenching tools, hatchets and tomahawks that would also be superior weapons.
The Modern Fighting Knife
Let us assume that you want a fighting/combat/tactical knife, on the basis that you may one day perhaps need it.
The fighting knife will be carried in addition to more general-purpose blades, so cannot be too large or heavy.
If a fighting knife has a place in our arsenal, then logically it must be because it can meet a requirement or scenario better than our large survival knives and other tools.
Large knives are not particularly concealable.
While it is possible to thrust effectively with a machete or kukri, it is not the ideal shape for use against thick clothing and a hypothetical “take out the sentry” application.
These criteria narrow down the form that a modern fighting/tactical knife should take, and what we should be looking for when making our selection.
This is best illustrated with some examples.
Fairbairn-Sykes Commando Knife
No discussion of modern fighting knives would be complete without mention of the Fairbairn-Sykes knife, aka “The Commando Knife” or F-S.
If fighting knives are mentioned, this is most likely the image that popped into your head.
At the start of his book “Combat Use of the Double Edged Fighting Knife”, Rex Applegate gives a nice summary of desirable features for a modern fighting knife:
“The heart of the fighting knife is its blade. It should be 5 to 7 inches in length, double-edged, and wide enough to be razor sharp on both sides all the way back to the cross guard. The point must be sharp enough to penetrate and thick and tough enough to withstand side pressure.
The blade should provide slashing, ripping, and thrusting capabilities. Stainless type steel, correctly tempered, with a dull finish is preferable. The blade should be tempered to hold an edge as well as being easily sharpened and, at the same time, not brittle.
The oval-shape handle should fit the palm of the hand and be designed so that the edges of the blade can be immediately, and automatically, located in dark or light conditions. A nonslip surface is another feature that should be incorporated. The handle should not turn in the hand (sweaty palms, etc.) when the blade strikes resistance. The knife should be handle heavy with relation to balance. Nothing in the design should limit its possibilities for use as a weapon from any position or either hand. The overall length should be approximately 10 to 11 inches; anything longer makes it too unwieldy and cumbersome to carry. The weight should be in the 1/2 to 3/4 pound range.”
Applegate’s earlier work, “Kill or Get Kill”, has a similar description, although includes the suggestion that the blade be no more than an inch across at the guard, and that the handle have its largest diameter at the centre and taper towards both the guard as well as the butt.
Contrary to what you may often see claimed, the F-S is not the “Ultimate Fighting Knife” [ignoring that this is not what “ultimate” actually means!].
Comparison to Applegate’s description quickly illustrates why.
The grip of the F-S is round in section, rather oval. Being of cast metal, the grip is difficult to modify or replace.
While the balance point is in the grip, the cast grip possibly contributes some unnecessary weight.
Oddly, my F-S seems heavier than my M3, but is actually half an ounce lighter.
If you own an F-S, you will know that it is very difficult to get a sharp edge on it.
Common advice on the net is to regard the F-S as a thrusting weapon only, and steel the edge at an angle of about 40 degrees. Personally, I think a sharp blade will create more of a wound if uses as described in my books. Steeling the F-S at 20 degrees seems better.
The “razor-sharp commando knife” is, however, a poetic licence of the novelist who has never owned one!
Some of these features seem to have been the result of wartime mass-production, which have persisted.
The F-S gets a lot right too! My step-son, on first holding an F-S declared:
“Woah! I feel like it wants me to do something, but I am not sure what!”
Fairbairn’s writings on how to use the F-S knife include illustrations of cuts and slashes directed to the forearm and inside of the elbow, although how practical this would have been against a woollen greatcoat or tunic is debatable.
Incidentally, the ancestors of the FS were the Shanghai Fighting Knives, which were made from obsolete double-edged Lee Metford 1888 bayonets. In Fairbairn's own words:
In choosing a knife there are two important factors to bear in mind: balance and keenness. The hilt should fit easily in your hand, and the blade should not be so heavy that it tends to drag the hilt from your fingers in a loose grip. It is essential that the blade have a sharp stabbing point and good cutting edges, because an artery torn through (as against a clean cut) tends to contract and stop the bleeding.

Boker Applegate-Fairbairn
Following World War Two, Applegate collaborated with Boker to produce a knife that met his requirements, called the Applegate-Fairbairn.
I have no personal experience of these, and they are likely to always be beyond my price range.

Gerber Mk II
The Gerber Mk II answers many of the complaints that can be made about the F-S.
While it is called the “Mk II Survival”, this is primarily a fighting knife.
Mine has taken a fairly respectable edge.
The bad news is that the Mk II tends to have a higher price tag than one might wish for a knife that will not be your primary survival tool.
It is rather baffling that copies or replicas of the Gerber Mk II are not commonplace!
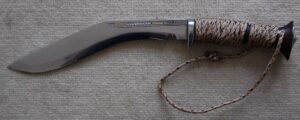
M3 Trench Knife
Shown with my F-S and Gerber is my M3 Trench Knife.
The M3 was also produced in Germany as the “NATO Combat Knife”. This blade configuration has also been used for a variety of bayonets.
The M3 was originally issued to soldiers not issued bayonets. Many riflemen acquired them too since they are handier than a sword bayonet.
Production of the original M3 stopped around 1944, with the M4 knife-bayonet being issued instead.
A nice design feature of the M3 is the asymmetrical guard, allowing the user to find the orientation of the main edge even in the dark.
While the M3 was designed as a utility knife, its configuration makes it a pretty good choice for a fighting knife. It compares very favourably to the Gerber Mk II in general size and features.
Personally, I do not mind that the M3 is not double-edged. The false edge comes already sharpened, and the balance of the knife is about an inch behind the guard, just where you would want it.
If you shop around, you can find reproduction M3s for a reasonable price.
Try websites that cater for WW2 re-enactors. Take a look at German trench knives while you are there.
In “Kill or Get Killed”, Applegate suggests “utility knives” can be reground into fighting knives, and shows a knife so converted. Presumably he means the M3, although he at one point claims that the utility knife has its weight too far forward in the blade.
The M3 as it comes is a pretty good fighting knife, with the option of serving in utility roles in an emergency.
Ideally, a fighting knife should only be used for its intended role, to keep it sharp.
Price of a reproduction M3 makes it a good basis for a custom project,
The derived M4 bayonet had a wooden or leather washer handle. Later models had a phenolic/bakerlite grip which is more practical. You are most likely to encounter the M7 model for the M16. The bayonet ring may be ground off if not desired.
Blade blanks for M3s or the related bayonet models, may also be found.
As Applegate suggests, the top edge can be extended, and if you have a belt-grinder adding a hollow grind is relatively simple. Tapering the blade may be more challenging. Personally, I would not consider this necessary.
Adding a fuller to the unsharpened section might be considered.
The grip of leather washers is probably simple to reshape or remove. Grip tape may prove useful here.
The large metal butt-plate may be more problematic for a customisation project, A narrow pommel of similar configuration to that of the F-S or Mk II might be preferred.
The V42
The V42 is another wartime design of fighting knife.
The skull-crusher pommel is a nice feature, although probably larger than needed.
The leather padding applied to the upper side of the quillon is a nice feature.
I have seen claims the pommel on the originals had a tendency to catch on and damage equipment. I suspect the versions on replicas such as mine have been made blunter.
My main complaint about this knife is the guard could be narrower and the blade somewhat broader.
Smaller Fighting Knives
As implied above, your fighting knife should be chosen so that it can be carried in situations you cannot carry a larger survival knife.
With this in mind, I will present two smaller examples of what can be considered fighting/tactical knives.
The larger knife is a Smith and Wesson 820.
The false edge is not sharpened, but the main edge has sharpened up to a very sharp edge.
This style resembles the M3. I prefer this configuration since it offers a little more utility, facilitating practices such as batoning.
Very impressive, and a very reasonably priced knife with most of the features you might wish for.
The smaller knife is a CRKT version of the AG Russell Sting (as favoured by a well-known literary figure!).
Small, but very solid and sharp.
Note that both knives have lanyard holes, a feature that would be welcome on the larger knives.
Adding wrist loops is on my to-do list.
Such knives are (hopefully) often carried and seldom used. Comfort and concealability are therefore priorities. A version of 820 with a flatter grip and reduced quillions, or a Sting with the option of a longer and possibly M3-style blade would be welcome.
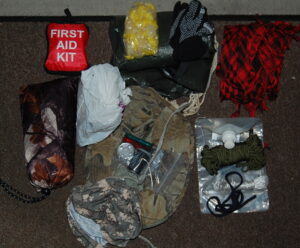
These are some of your off-the-shelf options, illustrated with examples I have to hand.
Later blogs will cover other options.