Escapes from wrist grabs are not a topic I have often covered in this blog. There are hundreds of books, blogs and videos showing such techniques. They range from simple to intricate, and from realistic to the not so much!
Here at survive.phillosoph.com, I try to offer content not found on other defence or survival pages. When I do consider a more common topic, I endeveor to look at it from a different angle, or provide fresh insight or novel information. I hope that I have achieved this, at least sometimes.
If some self-defence courses and books are to be believed, someone walking up to you and holding your wrist is a common problem. Maybe not for some of us. I am big and ugly and not that many people wish to hold my hand.
On the other hand, (pun intended!) wrist grabs are probably a more common feature of altercations between a man and a woman. And there are fighting styles that often feature controlling an arm to apply a lock, throw or to pull aside a defence for a strike.
Therefore, your repertoire of defensive techniques should include some responses to wrist grabs.
“Crash Combat” mainly concentrates on the method I have called the “under and up”, the “under and out” or even “under, out and up”. Use whichever name helps you remember how it works.
This technique works for same-side grabs (right hand to right wrist, left to left), or cross/mirror-stance grabs (left to right wrist, or right to left-wrist).
It works for whether the grabber's thumb is towards or away from the defender’s hand.
The same technique is used to respond to your knife wrist being grabbed, or someone grabbing your baton or rifle barrel.
Being a more extensive work, “Attack, Avoid, Survive” adds some additional techniques, ranging from the very simple jerking action against the thumb, to the kuk sool won-based throwing techniques.
Recently I started reading “Analysis of Shaolin Chin-na”. This included advice that I will paraphrase as: “if someone grabs you (by your wrist, fingers etc), poke them in the eyes or kick their shins. Attack, Avoid, Survive contains the same tactics, although not as catchily expressed as Jwing-Ming Yang put it, I will admit.
Techniques from Bagua
I was inspired to dig through my collection and find the DVD that included Erle Montaigue teaching eight methods of wrist escape. I found it on MTG15 “Dim-Mak and Combat Wrestling”, which is worth checking out, btw.
The clip below does not include the wrist grab section, but has some other techniques worth knowing, some of which may be used to prevent or follow-up a wrist grab.
The eight techniques Erle shows each use a hand form from bagua/pa-kur. Several of these are actually the under and up technique, but using a variety of hand configurations.
Today I would like to look at three of the other methods in the video. I personally think of these as the “Hidden Hand Wrist Grab” responses.
For ease of illustration, let us assume that it is the defender’s right wrist being held in the following descriptions.
First Method
In the first method, the wrist is grabbed, the grabber’s thumb away from the hand and his palm on the outside/back of the forearm.
In response, the fingers of the grabbed hand are splayed out. This action is also seen in the kuk sool won techniques in Attack, Avoid, Survive, so I presume the intention is to fortify the wrist.
The fingers are then thrust towards the grabber’s throat or face. This echoes the “poke ‘em in the eyes” advice, but uses the grabbed hand rather than your free hand.
The restrained hand is driven forward, not just by the arm, but by a rotation of the hips and waist and the forward movement of the whole body.
As the thrust is made, the hand is turned palm up so there is a corkscrew-type action, and considerable weight and force is applied to the space between the grabber’s thumb and fingers.
There is a supplementary technique to this move, which I will address a little later.
Second Method
The second technique is very similar, but in this case the grab is to the inner side of the wrist.
Again, splay your fingers and use your body motion to twist the arm and drive the fingers at the throat or face.
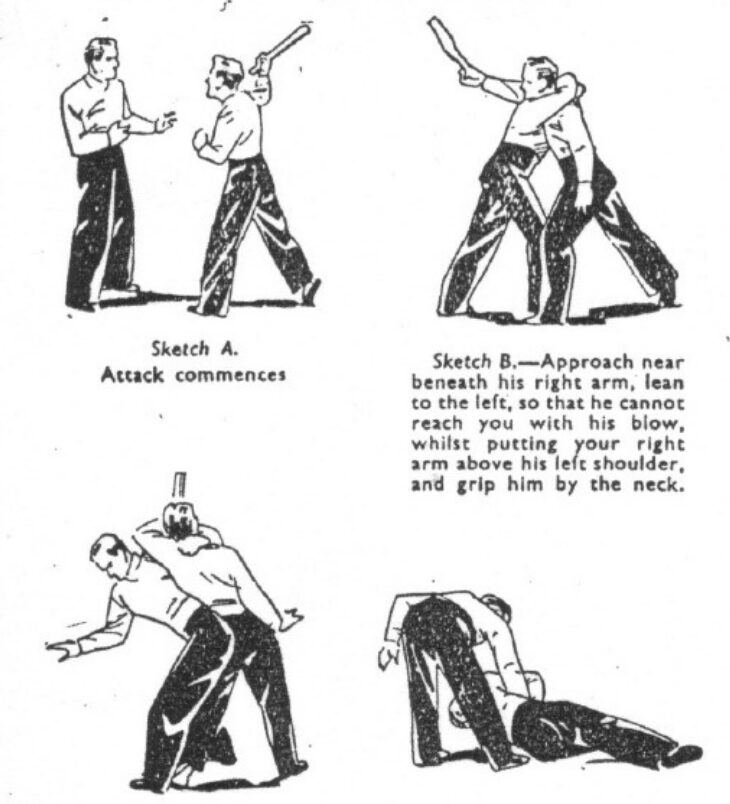
“Head Scratch” Method
The third and final technique we will look at is the fourth method on Erle’s video. To avoid confusion, I will call this the “head scratch” technique.
The wrist has been grabbed as in the first technique. The grabber holds the right wrist with his left hand.
Splay the fingers and raise your hand up so you look at your own palm. Without pausing, continue raising the hand as though you intend to scratch your head above the forehead. At the same time as you make this action, you utilize the body rotation and movement that powers it to turn to your left and move away from the grabber.
If the hold is not broken and the grabber does not let go, they will be pulled along behind the defender.
As the defender turns away, they may choose to throw their hand before them and thrust forward with their palm, applying additional force to break the hold or pull the grabber off balance.
This technique may also be used right hand against right wrist, or left against left, but you will need to change the direction you move away. Move to take yourself to the outside of the grabbing arm. This will take you out of reach of the grabber’s free hand.
Supplementary Technique
The supplementary technique for all three moves is essentially the same for all.
As your grabbed right hand begins to move, your free left hand moves toward your right elbow and then swings up toward your right hand. The left hand moves parallel to the underside of your held forearm. The grabber may not notice this motion, which is why I call these “hidden hand” escape techniques.
By grasping your wrist, the grabber has effectively immobilized their own, making it easy for you to grasp their wrist with your free hand. Use your thumb or fingers to attack nei gwan/neigwan/PC-6.
Rather than trying to grab the wrist outright, try placing your left palm on the forearm and allowing it to slip slightly down the forearm as it tightens the grip.
If the foe’s wrist grip on you is broken, use your own wrist hold to pull the foe off balance, or pull their arm out of the way while you strike with your freed arm, for example using a hammer-fist or elbow strike.
If the hold was not broken, twist your body to pull him forward, stepping across his front so that he is tripped.
Successfully exploiting a grab or lock may require disrupting the foe with some strikes. Similarly, a lock of grab may only be a prelude to a throwing technique.
For the head scratch technique, the action of turning away may be used to drive a hip or shoulder throw without waiting to see if the hold is broken.
If the hold is broken during the initial “head scratch” motion, the turn away may be replaced with a turn back to deliver a strike.
There are many other options, of course.
Your grab on his wrist may be used to pull his hand low and then up behind his back, for instance.
If moving to the outside of the grabbing arm the arm may be taken up to create a high bent arm lock to force the attack to overbalance backwards.
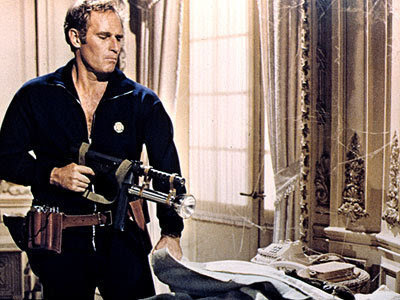
About 20 to 25 minutes into the movie “The Omega Man”, the protagonist (Dr. Neville aka Charlton Heston) is seen searching for the mutant nest.
He apparently combines this activity with his cardiovascular exercise, so we see him with both a tracksuit and a submachine gun.
This allows him to move fast and light, with significant firepower to draw on. I have seen much less practical loadouts for a reconnaissance mission!
Neville wears a belt carrying his iconic flashlight, additional magazines, and a tape-recorder (for exposition purposes). Also on his person he carries a map.
What else he carries on this belt is hard to make out in this sequence.
There may be a holstered handgun.
No sign of a water bottle, although this would be a logical thing to have for “reconnaissance jogging”, as would some binoculars/field glasses.
Watching the movie a few months ago, I fancied I caught a glimpse of a knife on the belt, possibly a Ka-Bar. Rewatching the scenes, I am not so sure. A knife would, however, be a logical thing to take with you on such a mission, and operating as Neville does, you would not want anything too heavy or two bulky.
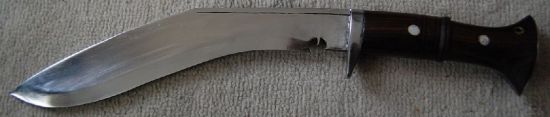
Bulk is always something to consider when selecting equipment. If I was planning to travel light, would I trade my kukri for a Ka-Bar or my Buck 119?
On the scales, the kukri is heavier. On the belt, the difference in length, bulk and mass seems less significant. It is the hilt you notice most, and that of all these examples is similar in size. And the ten inch kukri is a far better choice for, say, chopping through a door than a six or seven inch bowie blade.
This line of thought got me thinking about what I might carry if for some reason I was not carrying the Scrapboard Survivor. I realized that many of the “other” fixed blade knives I owned would also probably be too bulky for many such scenarios. In many cases, the limiting factor was the handle.
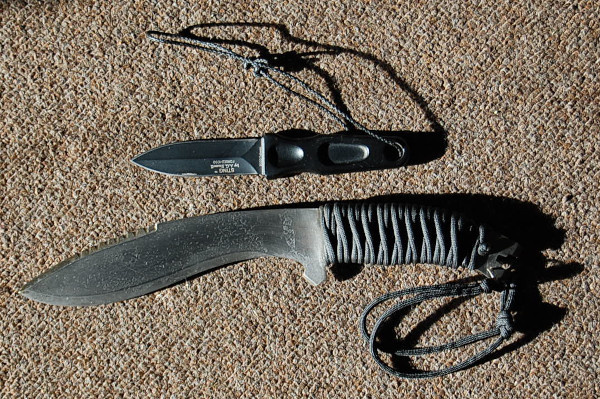
In contrast to most of these knives, I remembered that when I was visiting some friends on the West Coast, I had treated myself to a Hibben throwing knife.
Like most throwing knives, the grip section is of similar thickness to the blade so as not to offer too much aerodynamic resistance.
Unusually for a throwing knife, this model came with a nylon belt sheath and the grip section was wrapped in polyester thread.
It was quite possible (and not unknown) for me to take a nap and remain perfectly comfortable while still wearing that knife. Not a property that many of my other knives had!
So, I have been thinking about knives with low-bulk grips.
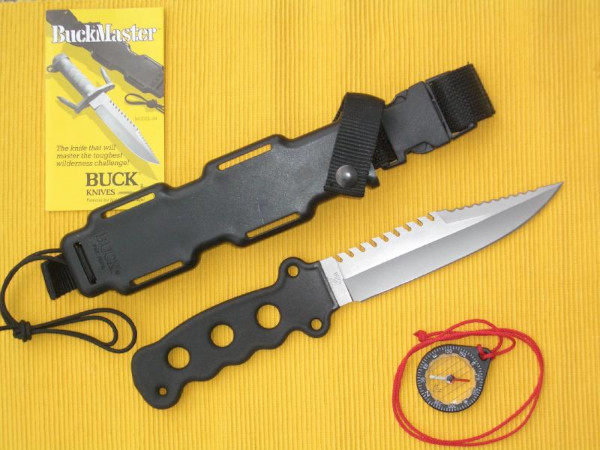
A notable example was the Buckmaster LT/Buck model 185. This was the Buckmaster blade fitted with a flatter grip rather than the then obligatory cylindrical hollow-handle of most survival designs.
I like that the LT used a plastic coating on the grip. I once (unintentionally!) sawed through a live electrical circuit and was very grateful the saw I was using was the only brand of Gigli saw with insulating plastic tubing over the end loops. Although that incident involved a saw, since that lucky escape, the conductivity of tool handles has been a consideration for me.
Bare metal handles are not much fun in sub-zero conditions either, particularly if you do not have time to put on your gloves when you need the tool in a hurry.
On the downside side, the shape of the Buckmaster LT grip and guard looked pretty dorky.
I am wary of pronounced finger grooves. They are as likely to not suit your hand as they are. A grip that may fit your hand perfectly may not if you put on gloves.
The Buckmaster LT is no longer in production, and I am not aware of anything similar on offer.
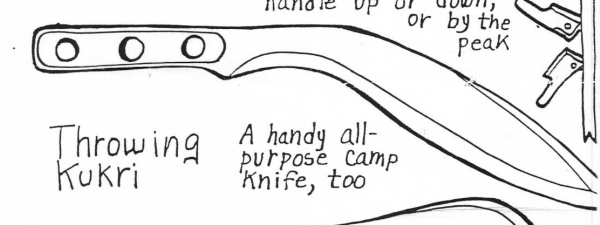
My friend Ed once sent me sketches of a “throwing kukri” which had a simple flat grip. He suggested it might actually be a fairly useful lightweight camp tool too.
Closest I have to this is a flat version of the Alphamega knife, a gift from a friend.
Alphamega were based on a knife I saw in a Macedonian museum, itself probably influenced by the Greek kopis, so this resembles a small kukri to many people, although the blade is actually straighter. This Alphamega is, however, a one of a kind. The Alphamega will be discussed further in a later blog.
It is debatable as to how much need there is for a seven to twelve inch blade with a flat, low profile grip. Such blades may be put to heavy uses, and such a grip configuration may be hard on the hands.
Boot Knives
A field where flatter grip designs would be more welcome would be for boot knives.
Flatter grips would make them more concealable, which is a priority for this category of knife.
There are some boot knife designs with skeletonized handles. Some of these look to be a little too narrow to give a good grip, or are fitted with deep finger grooves that may, or may not suit your fingers.
It would be nice to see some of the other models of boot knife offered with the option of covered but low-bulk grips. If a flatter grip needs to be wider to fill the hand better, so be it.
Comfort and concealability should be priorities.
Quillons should be no more than is needed to keep the fingers off the edge. .
A friend had asked me for some thoughts on boot knives:
Shape-wise, the hilt of the AG Russel Sting is hard to beat. Very comfortable and practical, yet only 0.36" in thickness. (figures from a website, I haven’t measured my own example).
The blade and hilt of the Sting is made from a single piece of steel. It is obviously possible that blade and tang be constructed from a thinner piece of steel and thin scales of some other material then added. This would allow for a greater variety, and improve thermal and electrical insulation.
Decades back, I sketched some designs for a range of boot knife type knives with ring pommels. I figured this feature might assist in drawing the knives from concealed positions.
I have cooled to that feature, thinking a more solid pommel may be more practical. I do regard a cord channel in the butt of a boot knife and essential, however.
A short loop of cord can assist in drawing the knife. Once drawn, the same loop may aid knife retention. About 40 cm tied into an 18 cm loop is good for my skinny hands. If you have big paws, start with a longer piece.
I would also like to see such boot knives offered in a choice of blade lengths and styles.
If I have one criticism of the Sting, it would be that there is not a commonly available variant with a longer blade available.
I rather like the one and a half edge/M3-style of my Smith & Wesson SW820 boot knife, and this configuration makes good business sense, allowing sales in backward places that consider double-edged blades to be “evil”.
Some users would probably prefer a clip-point or sabre-point utility-orientated blade instead. A low profile, Mora-style bladed boot knife sounds like a very useful option.
Mora and puukkot blades are available as unhilted “blanks”, although these sometimes cost more than a finished knife! Adding your own thinner grip to one is a feasible home project.
Other Knives
Boot knives are not the only knives that it would be desirable to see in flatter, low-bulk options. We have already touched on the subject of thinner field and utility knives.
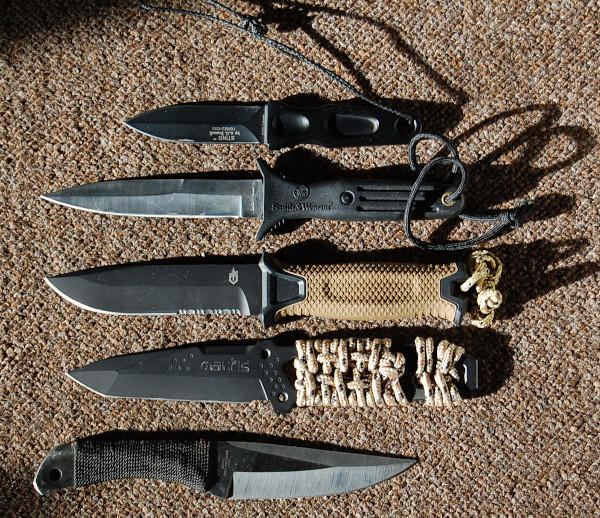
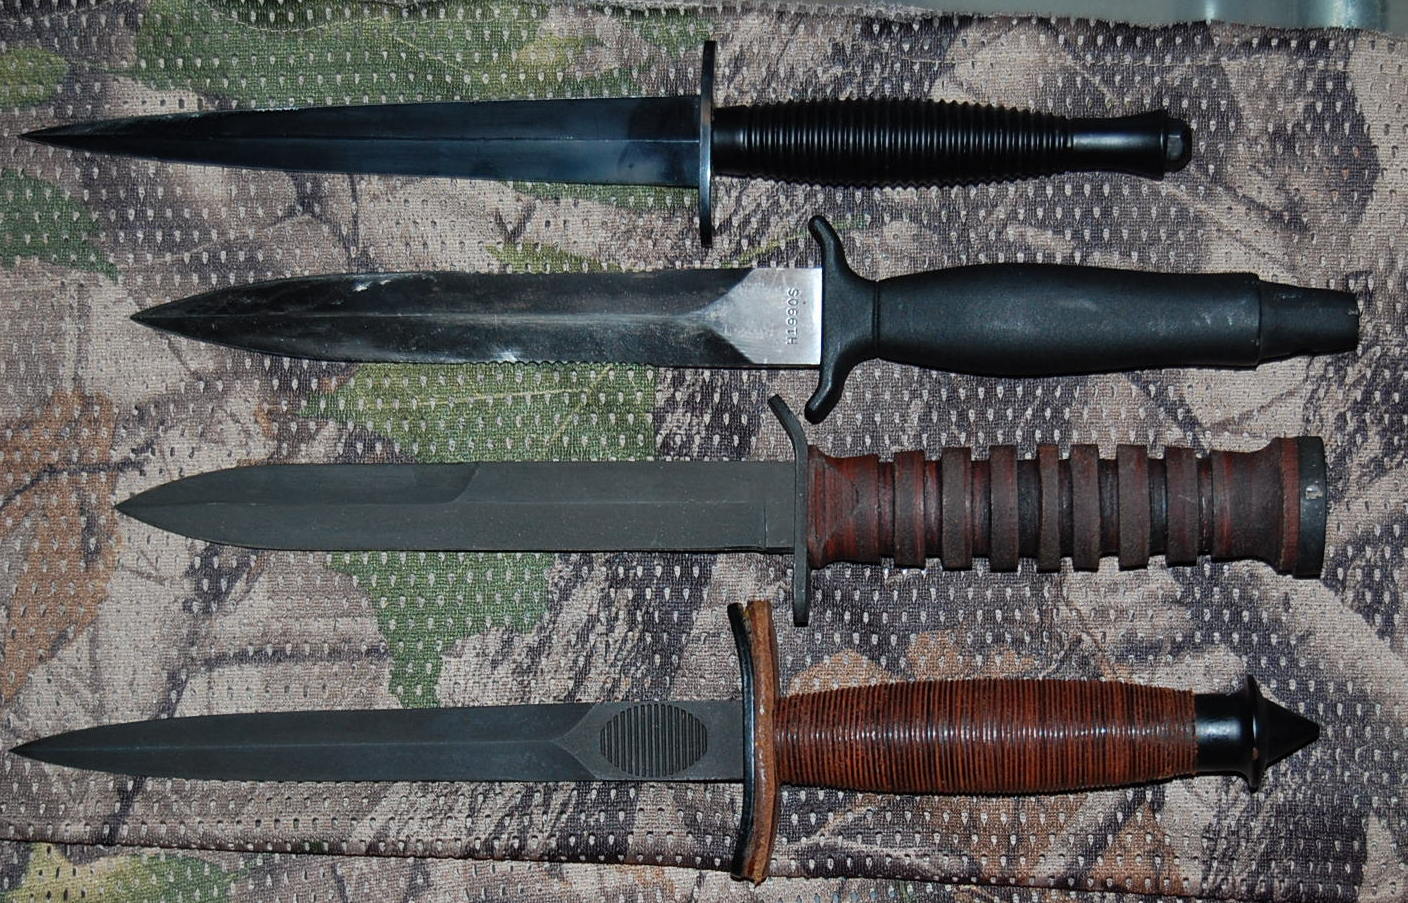
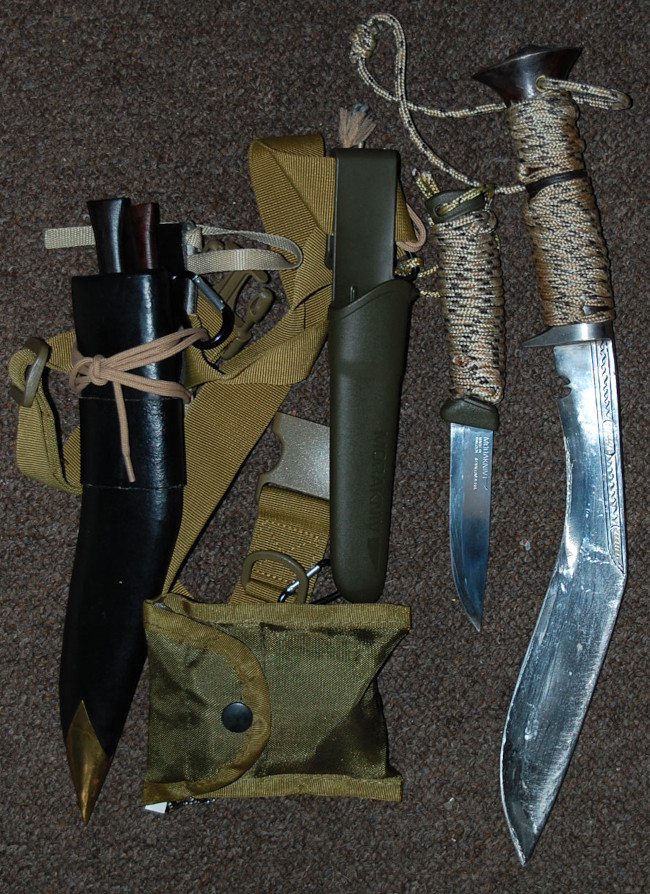
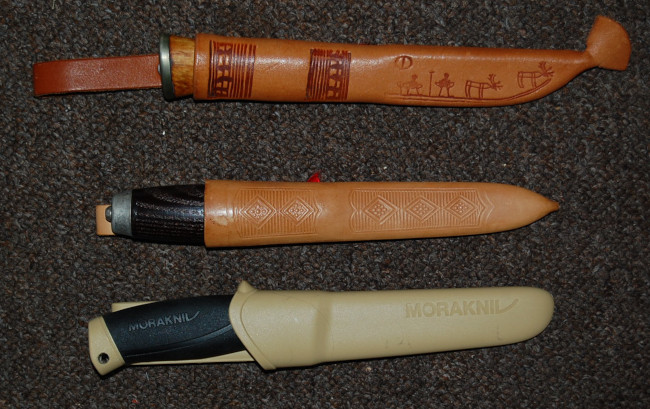
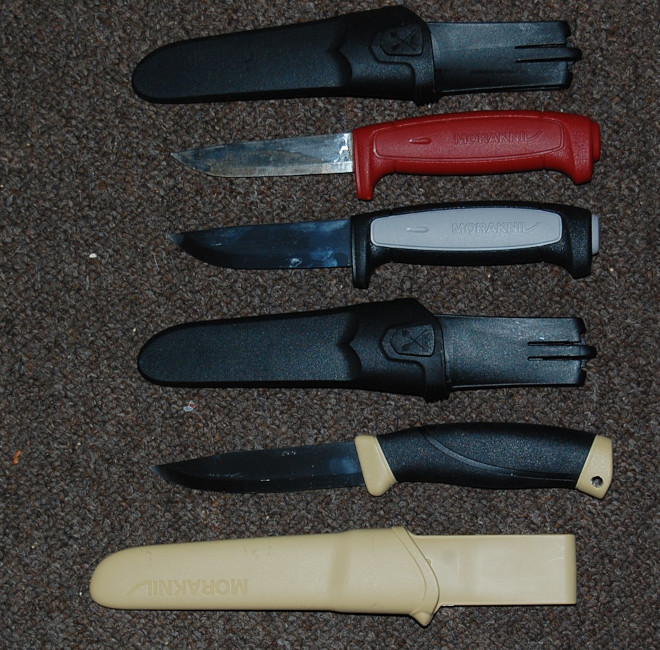
The picture above shows a pair of CRKT Stiff KISS knives, along with a neck knife and A.G. Russel Sting copy (for scale) by the same company.
The Stiff KISSes were a useful low-bulk fixed blade. Typically, they are no longer in production! The point of the drop-point (“MDP”) was a little too acute to my mind. A point with more belly would have been more versatile. Similarly, the tanto's point could have been less angular.
My main purpose for showing these Stiff KISSes is they illustrate two ways a bare tang design may be modified.
The tanto has a wrap of black kangaroo leather (given to me by whip-maker Joe Strain).
The MDP has scales of teakwood added (admittedly due for a clean and oil). The scales are deliberately different, the one on the private side being thinner and flatter than the public side scale.
I have seen it suggested that the narrow hilt of the bare model, with a finger notch rather than a guard, is not ideal for “serious” use, which is probably a fair comment.
The MDP or tanto easily fits in the thigh pocket of cargo trousers. This allowed me to have a useful fixed blade available while camping at a crowded “civilized” site.
Pec-Knives
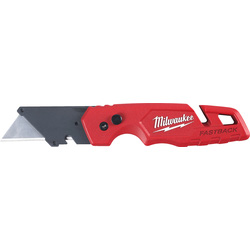
The Gerber Strongarm was not the first knife I brought as a pec-knife!
Those of you who have read “Survival Weapons” will know that my first pec-knife was a Mantis MF-1. Appropriately for its more general role, this is a thicker and larger knife than a typical boot knife. It is still a good choice.
The Gerber is good for overt wear. If concealment is more of an issue, I might be inclined to carry the flatter MF-1 instead.
Even without a cord-wrap, the grip is quite hand filling. The knife was “engineered for use with paracord wrap”. Without a wrap, the balance point is a bit more forward, although this has little practical effect.
As may be seen, my MF-1 has a wrap of paracord. If bulk was more of an issue, a wrap of tape could be used instead. Alternatively, a thin pair of wooden, plywood or plastic scales could be constructed and bolted together over the tang.
Photo above: CRKT/A.G.Russel Sting, SW820, Gerber Strongarm, Mantis MF-1, Gil HIbben throwing knife. Note how the Gerber and Mantis have much wider and thicker blades than the boot knives.
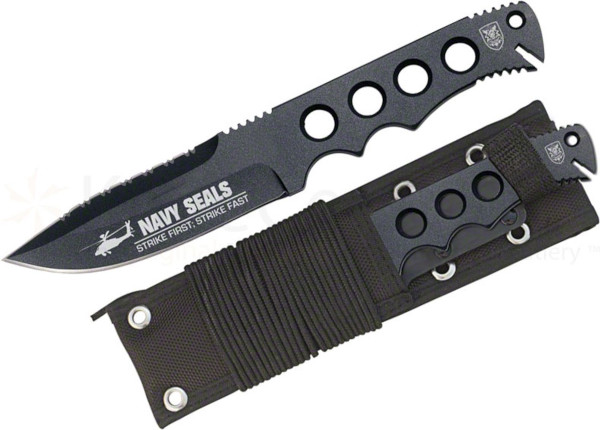
Another potential low bulk utility knife was the United Cutlery S.O.A. Navy SEAL knife. (If you can find one! All my searches today are giving “out of stock” and “discontinued” messages).
I am kicking myself that I never got around to getting one of these! When I first saw the design I assumed a ridiculously high price tag. Quite the opposite, in fact!
The “BlackField Integral pocket knife” appears to be a copy with an increased price tag. Steel is listed as “440” rather the AUS-6 of the UC version
Something like the Mantis MF-1 or UC SEAL might be the sort of low-bulk, lightweight, versatile knife suitable for the Omega Man’s jogging kit.
This page will record various tips, tricks and ideas that do not really warrant their own article.
You may want to bookmark this page, as new content will be added whenever it occurs to me.
The first part of this page will concentrate on combat related material. I have now add a section on survival and bushcraft further down the page.
These are in no particular order or precedence.
Version 1.0.3.5
Combat
• When fighting, assume there is a knife present. Just because you cannot see a knife, does not mean it is not there. Cunning knifemen ensure their knife is felt before it is seen.
Many unarmed defensive and offensive techniques become unworkable if the foe can bring a blade into play.
Handguns may also be difficult to spot, particularly in poor light.
• A parry should use the minimum of force needed to take an attack out of line of any targets. The attack should be deflected the minimum distance necessary.
A parry that uses unnecessary force or moves an attack more than is needed may slow the defender’s ability to counter‑attack. If you overparry you will be more vulnerable to feints and/or a sequence of attacks.
• Strike/kick the nearest target with your closest hand/foot.
• Close combat has been defined as knocking the other guy down and not letting him get up again.
Achieving this often involves several phases.
Some self-defence courses only teach reactions to attacks so students are uncertain about how to take the initiative and secure the advantage, or how to engage in defence of someone else.
Some striking styles seem to have no takedown techniques or have neglected these in favour of sport and competition sparring. Or the takedown and throwing techniques are a “secret technique” and not available to most of the students who may need them. An aggressor is presumably battered until one party is exhausted or knocked out.
You will need kicks, hand-strikes, locks and throws.
Many wrestling and grappling styles expect to prevail without acknowledging that a “blow before throw” is often necessary, and combat may not be one-to-one. Often they train with partners who do not know how to realistically attack.
A common assumption is that a foe will use a similar style, or will fight on equal terms and that the foe will not use a knife.
• Any time that a person is standing on two feet, there will be an angle at which the feet will be on the same line. If the body is tilted out of this vertical plane, that person will probably lose balance. Typically they will step back or forward to correct this. If you position your foot, leg or body so this step cannot be made, they may be made to fall. This is the principle behind many combat throws and takedown techniques.
•Breakfalls have useful applications other than just self-defence and martial arts. In everyday life they can save you from serious injury.
If your preferred training style does not include breakfalls, take the trouble to learn and practice them independently.
Ideally, everyone would be taught breakfalls as infants.
• You cannot make your hand or foot heavier, so if you want more power you must move it faster. Relaxed bodies move faster than tensed ones. Only tense a body part when really necessary.
This is the key not only to unarmed and armed combat, but also to many sports and other activities.
• There are ways to deal with someone catching your leg when you kick, but it is better to avoid this situation.
Do not kick at targets where there is a chance your leg might be grabbed. Kick targets away from the hands or wait for opportunities where the hands are otherwise occupied. Against a standing foe, kicks are best directed against the legs and hip. This will slow the enemy down and may cause them to fall,
The actions learnt from kicks may also be used to rapidly move your feet to manoeuvre or trip a foe.
• Bayonet attacks against high targets may be followed by a kick to a low target from either the front or rear leg. Defending against the high attack with the bayonet may expose targets beneath rib-cage level. Kick or knee the legs, hips, tailbone or testicles. A front thrust kick to just below the heart may be possible.
• The front stance of karate, and its equivalents in other styles, is not just for punching and parrying. It may also be used to move into grapples, takedowns or throws. Position the lead leg so it prevents the foe compensating as you unbalance them.
• When using a forward head butt, the upper part of the head rather than the forehead should be used to strike. This area is centred around the hairline, for those of you that are not yet balding.
If striking to the side with the head, impact using the area at hairline level above the temples.
When possible, the force from a headbutt comes not from neck movement, but from the motion of the entire body. “Back-heel” applies to headbutts just as much as it applies to linear punches.
• A butt with the back of the head may be used against someone who grabs you from behind. Striking area is the back of the skull, the face from the eyes down the preferred targets. In practice, hitting with a particular region of the skull and against a particular target is difficult in such conditions.
The back of the skull may be used when in front of an enemy. If in a clinch and your head is lower than your attacker’s hit upwards with your head, straightening your legs for more power.
Headbutts may be used on targets other than the face. When grabbing an enemy’s legs from behind, butt the small of the back or tailbone to encourage them to fall.
Butting into the stomach or chest is also possible, although the chances of a counter against the neck or face are higher.
If both hands are busy controlling an arm, the head may be butted just above or into the side of the elbow.
• A friend of mine used to advocate treading on someone’s foot before delivering a headbutt.
A variation is to place your weight on the foe’s foot and drive your knee into the front of his knee. The knee is unable to bend and may take damage or the foe may fall. Combine this with other techniques to unbalance the foe.
• a time to plant and a time to uproot, a time to weep and a time to laugh, a time to play with your precious bloody phone and a time to look where you are going and at what is around you. Amen!
• Never walk with your hands in your pockets. If your hands get cold, carry gloves. If you trip or are pushed, you will not be able to save yourself. Attacking someone with their hands in their pockets is a simple matter of hugging them and throwing them down hard.
• Never stop on public stairs. It is bad manners and inconsiderate if nothing else. Some people have bad legs or feet and need to be within reach of the handrail even if they do not need to constantly hold it.
• The palm heel, knife hand and hammer fist must become your primary weapons. The chances of injuring your hands when using these strikes is greatly reduced. Save closed fist punches for softer target areas of the body. Think of this as “hard against soft and soft against hard” if you wish, although being on the receiving end of a well thrown palm strike is unlikely to feel that soft.
• The eye jab/finger spear is one of the fastest of distraction and opening techniques. Some people are reluctant to use this technique and in many cases it may be considered excessive force.
Placing your open hand over the foe’s eyes (such as “Eagle’s Alien”) is an alternative. Variations of this may be used from the side or behind in situations where a finger spear could not. Speed is the key to this technique so you must learn to apply it with your hand and arm relaxed.
• Illustrations or photographs in martial arts books often exaggerate the distances between fighters for clarity. Occasionally you will encounter an illustrated technique that will not work at realistic ranges
• Techniques are sometimes taught as “long range”, “medium range” and “short range”. In reality, engagement may change from long range to short range in a fraction of a second. Relying mainly on long range techniques probably will not work outside an action movie.
• There will be times when it is necessary to attack rather than wait for an aggressor to make the first move. Some self-defence students and martial artists are at a loss how to proceed since they have mainly been taught defensive reactions. Psychologically they may have formed the impression that attacking may make them vulnerable, since most of their drills have been “attacker does this so you defeat him using…” Being able to attack effectively and realistically will also make their classmate’s training better.
Defensive techniques such as peng-hinge and long har ch’uan may also be used to knock aside an enemy’s guard to clear the way for the attacks.
• Once you commit to an attack, keep attacking as long as you can. Move in and keep on the pressure until it is safe to escape, you need to defend or evade, or the threat is neutralized.
• It has become a common trope in movies and on TV. A woman attempts to help someone else who is being attacked. She jumps into the back of the attacker, her feet leaving the ground.
Never attempt this in real life. It is ineffective and you may be thrown and land hard.
If the target presents itself, stomp the calf of his rearward leg. Read my books and learn the reverse punch against his kidneys, or the palm heel against his coccyx.
If he falls, jump or stomp on his legs before you run away.
• Even if an attacker is much larger than you, use what weight you have. If he tries to lift you, go limp to become deadweight and kick your legs around to hurt anything you can contact. If the rapist falls, use your body weight by jumping or stomping on him. Leave him unable to get up and run after you.
• The primary target areas on the centreline approximate the supposed positions of the chakras.
1. The genitals (front), coccyx (back). The CV1 point lies between the two on the perineum.
2. Sacral region/Tan tien (front): a little below the navel. Join of spine and pelvis top (back)
3. Solar plexus (front). First lumbar vertebrae (back): Where spine joins bottom of rib cage.
4. Heart/middle of sternum (front). Spine over heart (back)
5. Throat region (front) Spine at base of skull (back)
6. Forehead/Glabella (front). Back of skull.
7. Top of head/Bregma.
Note that attacking some of these targets forcefully may cripple, maim or kill your foe. Use only when there is a genuine threat to life.
• Strikes to the kidneys may be highly effective, so learn their position.
From the rear, strike the soft areas between the top of the pelvis and bottom of the rib cage, lateral to the spine. From the side, strike the same area at the level where the waist is narrowest (presuming the foe does not have a “spare tire”).
These strikes actually target the nerve complexes in the region of the kidney. If using a sharp weapon you must know the physical location of the kidneys. The actual kidneys sit above the waist, partially covered by the lower ribs. Stab upwards under the bottom ribs from the rear or rearward side.
• Is the threat you are being taught to defend against likely and realistic, or is it just there to show a clever counter. Are there simpler options?
A constant of older and lower quality self-defence manuals is techniques against someone who stands in front of you attempting to strangle you. I call this the “Frankenstein monster” attack. Recognise that this is highly unlikely. If you are strangled from the front, it is likely you are also being pushed up against a wall, or on your back with the attacker on top of you. Will the taught defence still work? What will?
An overhead knife or axe attack is more likely, but may not start with the attacker helpfully raising the weapon above their head while still several yards away. You may not have time for the recommended arm catch and throw technique.
• “A punch starts with the toes” (or the back-heel)
• To separate two individuals in a clinch: Place your hands together as though in prayer and insert them between the men’s faces.
Simultaneously covering each man’s eyes with a palm may cause them to flinch back.
If this fails, the edge of each hand may be placed to apply pressure against the throats or upward, under each nose. Be wary of bringing a hand into a position where it might be bitten when using the latter option.
If the above methods do not work, return your hands to the prayer position. Drop your weight down and bring your hands and arms down across theirs.
• Arms crossed over your chest has been suggested as a good “ready” stance, particularly when being “interviewed for a fight”. On the positive side, it places the arms in a good position to respond to attacks. On the downside, this body posture may project the impression of insecurity and nervousness, encouraging the potential aggressor.
The same criticism also applies to positions with one hand on your chin or near your mouth.
• Raising the forearm with an action like brushing back the hair over your ear is a useful defensive technique against circular punches at the end. Sometimes described as “attempting to smell your own armpit”.
Combine with ducking and appropriate body movement away from the attack. The other forearm may be brought up to shield the other side of the head.
If you move towards an attacker this basic arm motion may also be used to deliver an upward elbow strike to the chin or face.
The motion may also be used to break a wrist grab, although the “under and outside” method is preferred. Even if the grip is not broken, moving the hand up to your ear may pull the foe off-balance towards you. Use your other hand appropriately!
• The opportunity for using some elbow strikes can be brief as it takes very little time for a foe to move from “out of range” to clinching and grappling range.
Use an open palm as a rangefinder as an enemy closes distance. When the palm makes contact with his upper chest immediately bend the elbow and move forward to deliver an upward elbow strike to the chin.
• Cloth can be surprisingly effective at resisting knife cuts. Small knives (i.e. those that are not kukris or machetes) should always attack with the point first against clothed areas. This should be practised against bare flesh targets too, since a penetrating attack is likely to do more effective damage than a slash.
• To cut a throat, stab into the side of the throat first then cut outward. Pulling back the head moves the major blood vessels back so would need a deep cut or slash to reach them. Better to stab in and cut outward.
If you cannot access the throat area, stab up under the ear, down from the suprasternal notch, down behind the clavicle or upwards just under the sternum or into a kidney.
• Knives for anti-personnel use should be selected on the basis of their point and suitability for thrusting attacks. For more general field and survival uses, the ability to chop, slice, carve and cut is a higher priority.
• If you can slip to a foe’s outside gate, try a headslap.
Swing your relaxed outermost arm upwards, parallel to the foe’s back. As you reach shoulder height convert the motion to an inward horizontal slap impacting the back or side of the head. The more relaxed you keep your body, the more velocity and power this attack will have.
• Many fracas involve pushing and shoving. Most fighting styles fail to fully utilize pushing as an attack. Tai chi uses “push” (arn/an) like a double palm heel strike. It can often be utilized when in very close proximity to a foe. It may also be used using a hand and a forearm, or both forearms.
Step forward with one foot, utilizing body motion and back heel to generate power.
Push is often used against the foe’s ribs, with force delivered at a slight upward angle. This exploits the elasticity of the foe’s ribs to help bounce them away.
• Tai chi often has the hands held in a configuration as though holding an invisible ball. This has a number of applications. One is used to seize the foe’s head. Power and movement from the hips and waist may then be used to twist the neck or unbalance and throw the foe. This is a useful technique if you are taller than your foe.
If your hands are in “hold the ball” and you bring the palms together this action may be used to clamp an arm between them. Slide the hands apart laterally to transition into an arm lock.
Hold the ball may also be used to bring the palms together to use the tai chi technique of press/squeeze. This may be used to strike and push in confined positions when push would not be practical.
A similar technique has both palms towards the foe, one on top of the other.
• When you manoeuvre to the outside gate, hook your palms over the foe’s shoulders and pull downwards and back by making your elbows heavy. This is an adaptation of the opening move of the tai chi form. Your target is actually the GB 21 point.
Position your legs so the foe cannot step back to regain balance, or kick at his legs to further unbalance him. Alternately, knee him in the spine.
• Many techniques suggested for dealing with a knife attack or other threats involve catching the attacker’s arm in a wrist grab. Grabbing accurately and firmly may be difficult to achieve in practice.
Hooking your palm over a limb is easier to apply and gives you some measure of temporary control. The forearm may be used in the same manner. Counterpressure from the other hand or forearm may be used to increase control.
• If a foe raises their right arm high to use a club, a possible move is to duck in and headbutt to the underarm region. At the same time, attack to hit their solar plexus or sub‑sternal region with a hook punch, palm strike or hammerfist.
You will be in a position where it is difficult to strike you with the club, and most blows will have little power.
Immediately after the attempted torso strike, slip your head behind him and hug him around the chest or over his left shoulder and against his neck.
From this position, use a hip/cross buttock throw.
Variations: Hit under the arm with the shoulder rather than your head. Duck under the arm before moving closer to the body. Use your inner arm to push his chin upward or hook around his left arm to to clamp it to his side.
• When studying a technique proposed for use against a knife or club, always be aware of what the foe’s other hand may do.
There is little point controlling their weapon arm if it puts you in a position where the other hand can strike your kidney.
It may be possible for the foe to easily transfer the weapon to their free arm.
• Many techniques you may encounter are too complicated. Remember KISS! Will as simpler set of actions be as or more effective?
• Real fights often end up with both parties on the ground. Being practised in groundwork techniques is prudent, although some are derived from combat sports and may not work if knives are present.
In most situations, it is foolish to willingly go to ground. Even if you think a confrontation is one-to-one, your foe may have friends nearby. They will happily kick you when you are down if you have given them the opportunity.
• Tai chi techniques such as peng/p’eng utilize the forearm and back of the hand. In addition to being used for parrying, this is a useful close-range technique that may be used to strike, push a foe away or off balance.
The forearm may also be used as a striking weapon, either against the body, the throat or an attacking limb.
A strike with the back of the hand may be converted into one with the knife-edge of the hand or hammer-fist when possible.
• When grappling, do not interlace your fingers. This may result in injury if a hold is forced open. Hook your hands together by the fingers, or use one of the palm across palm techniques used in various wrestling styles. Or grab one of your wrists or forearm with the other hand.
• When doing press-ups or performing “the Plank”, use closed fists. This is better for your wrists and helps condition your hands for punching.
Concentrate the weight on the first two knuckles if the fists are horizontal, the lower two if vertical.
• Point-blank is the distance at which a target of a certain size may be hit without significant holdover or hold-under. Point-blank range to hit a tank is much greater than that for a squirrel!
Point-blank does not mean “close-range” or “short-range”. Most people getting something wrong does not make it right.
Many weapon-ammunition-target systems have point-blank ranges in the hundreds of metres.
• Concealment prevents you being seen, Cover stops bullets.
An unarmoured vehicle such as a police cruiser offers concealment but very little cover.
Only the engine block is likely to provide any useful cover against gunfire.
Shooting from behind a car door looks cool, but…
• If the enemy is shooting, your priority must be finding cover rather than shooting back. If nothing is within sprint range, go prone and exploit any microterrain. Even a street kerb may provide some cover.
Always shoot from cover if possible. If in a door, use the door jamb.
Seek any cover if you have to reload or deal with a weapon malfunction.
• There are times to use the sights and a perfect stance, and times to snap-shoot. You need both skills and the wisdom to know when to use which. “Shooting to Live” (Fairbairn & Sykes), the hand gun chapters of “Kill or Get Killed” (Rex Applegate) and “Shooting to Kill” (G.A Elliot) should be essential reading.
• There is little point in having a fast-draw if you cannot accurately snap-shoot. If you have time to line up sights and take a stance, you have time to draw normally and avoid the risk of a fumble.
• Movies and TV shows often show a character about to enter a room with their gun held muzzle up. This makes for a nice tight dramatic shot.
In real life, keep your muzzle down. If a foe is immediately inside the room they may grapple you to prevent you bringing your firearm to bear. If your muzzle is down you may still fire at their legs, which can be distracting.
• The “Lethal T” is a target usually described as a line drawn between the temples and down the centre of the torso.
The vertical of the T actually represents the spine, so is actually down the centre of the back rather than the front or the central axis of the torso. The crossbar may be visualized as a circlet around the brow.
Shooting “centre of mass” (as most people interpret this) is likely to miss the Lethal T unless directly before or behind the foe.
To the visualization of the Lethal T one should also imagine the “vital ball”. This is a 15 to 20 cm sphere within the torso at armpit height.
Shots fired at armpit level of a foe are most likely to hit a vital area. From certain angles such shots will pass through the arm openings of body armour.
Targeting the Lethal T and vital ball is for relatively short ranges where there is sufficient time to aim available.
• In combat, range is often uncertain and targets are fleeting. Engagements are often within less than 200 to 300 metres distance.
Shooting high in combat is due to a number of common factors, including shooter and target being at different elevations.
In such conditions, aim at where the foe’s belt buckle would be. This automatically leads a target if they are moving across your field of view or at an angle. If only the head is visible, shoot below chin-level.
At longer ranges, point-of-aim should be shoulder-height or towards the top of the head.
• Zero iron sights on the bottom of a target. Scopes and reflex sights should be zeroed on the centre of target.
• If you have any choice in the matter, zero your combat rifle to 200 metres. This will be more accurate at the ranges you are most likely to engage targets.
• Zero a combat pistol to hit two inches high at 25 yards. At 100 yards the round will have dropped less than twelve inches from point of aim.
• Handguns can be used accurately at longer ranges than many users realize. Put in the practice, and they may be used as emergency medium-range hunting or defensive weapons. While a .357 or 10mm shoots flatter than a .45, the difference is only a few inches and generally not significant at useful ranges.
• When zeroing an unfamiliar weapon or one new to you, start at a few metres to ensure it actually puts rounds on the paper.
• Take the stairs whenever you can. Be thankful you still have the health to do so.
• For most of us, the finger jab only has sufficient power as a distraction technique. Learn to throw it with a relaxed arm and body to make it as fast as possible.
This action is worth learning since it has other applications such as making a parry or setting up a throw or takedown. A finger spear “shot” between a foe’s arm and torso might be used to apply an armlock, for example.
• In the morning, before you shower, perform “the Plank” on your fists. Immediately after, stand and stretch your hands high above your head. Still stretching, twist your waist to face right and left.
Take several deep breaths to clear your airways.
• Variation of the DURA throw (see “Crash Combat”): After ducking under the arm and placing your other hand in contact with the foe’s leg, do not attempt to lift the foe.
Instead, move forward, tilting the foe to move his weight and balance to his left.
Your hand against his calf or shin will prevent him stepping to compensate and he will fall to the side.
• A straight limb can only be bent. A partially bent limb may be straightened or bent further, as needed.
• Very close? Your shoulder, chest, back, hips, thighs and knees may all be used to bump, strike or knock the foe off balance.
• A soft-point or hollow-point load should meet three criteria:
1. The round should be capable of reliably feeding through the mechanism of the weapon using it.
For a revolver or derringer, this may simply be a requirement for the round to fit in the chamber and stay there until fired. Recoil should not case the casing to ride back and foul the gun’s mechanism, for example.
For a round that must feed from a magazine and through a self-loading or other mechanism, the requirements may be more stringent. The bullet must not be deformed or misshapen by loading or firing.
2. The round must have a high chance of reliably expanding at the velocities it is being used at by the gun/ammunition system.
If the round is unlikely to expand, you may be better off shooting solid rounds such as FMJ or semi-wadcutter.
3. Both expansion and penetration is required.
If a round does expand, it should still have sufficient penetration to reach vital organs.
If your hollow-point or soft-point loads give inadequate penetration, you should consider other loads, and be open to the idea that you may need to use non-expanding ammunition.
• Think of a pistol as a two‑handed weapon that can be used single‑handed. Whenever possible, use both hands, and if practical, a rest.
• A snooker ball hitting a cushion will bounce off at an angle close to that at which it impacted. Bullets and shot fired against hard surfaces behave differently!
Bullets or shot hitting a hard surface will be deformed, and follow a trajectory close to the surface. This will be between 2 and 20 centimetres for a distance of about 25 metres.
This behaviour may be used to send rounds along walls or under vehicles.
Do not move too close to walls.
• Master reloading by touch alone. It will be dark. You will need to watch what the bad guy is doing!
Survival and Bushcraft
• Placing a net or camouflage cloth cover on your headgear does not make it camouflaged. You need to add things to it.
• Wearing an outfit of the latest fashionable camouflage pattern does not make you camouflaged.
A few token streaks of camo paint on your face does not make you camouflaged.
• “Uniform” is the antithesis of “camouflaged”.
•Chest rigs and other load-bearing gear intended for field use should have textilage attached to break up its shape. Provision to add natural materials such as foliage should also be included.
• For a general purpose survival/hunting .22LR rifle, zero to 35 yards/33 metres. This will give you a point-blank shot against the smallest of game at most practical hunting ranges. Targets far enough away to require hold-over will probably not be visible under usual field conditions.
• You would not parachute without a reserve chute. Always have backups, be it the files on your computer, a means of self-defence or a resource for survival.
• Having survival items tightly packed or integrated into objects like bracelets makes it more difficult to access them when you really need them. Always assume you will be tired, cold and wet.
• Using paracord as boot laces is often suggested. Most miss out the vital detail that if you do use such laces as a source of cordage, you must gut the cord into outer and inner and use one of these to keep your boots on.
• Stock up on survival/space blankets, disposable lighters and waterproof ziplock bags. Buy in bulk, you will find many uses for them. A 100m reel of paracord is also a good investment.
• In any outdoor coat, have a survival blanket and disposable lighter, at the minimum. A hank of cotton string can serve as cordage or tinder.
A spare pair of gloves and spare hat in a pocket are also prudent.
• A hiking/trekking pole or walking staff have too many useful applications to list here.
Spears may also be used for many of these tasks. Equipping yourself with one should be a high priority in rural terrain.
A pole or staff will be more comfortable to use if it is long enough that your elbow may be bent at 90 degrees when using it.
A walking staff should be under six feet to allow it to easily navigate doorways. Five foot/1.5 metres is good. Some say as high as your eyebrow, your chin, breastbone etc.
To a pole or staff add a couple of metres of cordage and wrap it LOOSLY around the shaft. This cordage will be readily accessible when needed and may be used as a carrying sling to carry the pole when it cannot carry you.
Near the top end of the shaft, add a small screw-hook, with the open end down. Useful for retrieving items from ponds or pulling down branches.
• Many a good movie and novel has been made about survivors trekking to safety.
In most situations, you are better staying with the vehicle or wreckage if possible. Locate resources and construct signals.
Your chances are better if more than one person knows your travel plan and ETA.
• If you judge a knife by how well it cuts rope, you will end up with a knife that is a great rope cutter! A survival knife needs to be able to work wood and prepare game and fish.
• Only two types of people are injured by their own tools. Those who are unfamiliar with them, and those who are too familiar with them.
Treat all tools with caution and respect.
• Despite what you may see on youtube, never cut towards a body-part!
• A hunting sling is easily constructed or improvised. Realistically, it will take weeks and probably months of practice before you are accurate enough to be able to hunt small game with a sling.
It is probably more practical to hone your skill at throwing stones by hand.
• One of the first survival hunting weapons to construct is a throwing baton. Carve or abrase one end to a point, the other to a wedge. It may then also be used as a digging stick or also serves as a club to dispatch fish or for batonning a knife.
• After a throwing baton and a spear, the construction of bolas and Apache/rabbit-stars should be considered.
Apache stars should be big enough to prevent a hit rabbit entering its burrow. Construct from two sticks of about half a metre/18 inches/one cubit length. If possible, use the woodsaw of a penknife to cut a square- or X-notch in the centre of each before binding them together. Pine resin/pitch or similar may be added as an adhesive in addition to the lashing.
• Bolas are of little use in wooded terrain.
• Do not reach your hand anywhere you cannot see. There may be thorns or things that bite and sting. Use your throwing baton, digging stick or staff instead.
• The darts offered for commercially produced blowguns are not suitable for hunting, even those designated as “broadheads”.
A survivor is unlikely to have suitable poisons available so must use more effective projectiles. Darts from sewing needles and paperclips are not going to work!
Darts need to be long to achieve sufficient penetration. Hunting darts used by some indigenous peoples may be nine inches and resemble half-sized arrows.
Darts more effective than the shop-bought junk have been constructed from 3 mm to 5 mm diameter bamboo “satay” skewers or dowels, 10 to 18" long. Coat hanger wire has also been used effectively. Darts made from three inch nails have been used effectively on very small game. Something similar may be made from local natural materials or wreckage.
The tail is just a paper cone (or birch bark) or a blob of cotton wool (sheep's wool, bird or thistle down etc). This design is pretty easy to make in the field.
Blowguns may also be used to project pellets against small game.
If improvising a blowgun, an internal bore diameter of about half an inch is desirable, and a length of more than a metre.
If you do not have a pipe, a semi-circular section channel may be cut in two pieces of material and the halves bound together. Use a taunt string to ensure both channels are cut straight.
• Snow on the ground? Footing unstable? Use a stick! So many injuries each winter could be avoided if everyone owned a decent pair of boots, knew how to walk on ice, and used a stick or hiking pole when it was needed.
• My girlfriend was about to embark on a long journey by plane, train and bus.
She called for me to produce my stock of ziplock bags. Into one bag went several handfuls of “wet‑wipes”.
Washrooms are likely to be few and far between, and often occupied. With a modest supply of wet‑wipes she can freshen‑up when she wants.
• When batoning, use the section of the edge nearest the hilt, unless this part is serrated or scalloped. Also not a good technique to use on double-edged knives.
When batoning, hit the back of the blade with a wooden object, not one of metal or stone. Use a hatchet handle rather than the back of the head.
•Black is not a good camouflage colour. Calling it “SWAT-black”, “chaos-black”, “ninja-black”, “tactical-black” or such does not make it so.
• A bath is relaxing, but not the best way to get clean. You effectively end up soaking in your own dirt!
At the end of a bath, finish by having a shower if possible. A shower is a more efficient time to wash your hair.
• When using a seatbelt‑cutter/hook‑knife, cut away from you at an oblique angle. This creates some tension, helping the edge cut. If possible, pull on the strap(s) with the other hand to create tension.
A seatbelt‑cutter/hook‑knife or similar may be used to cut open clothing with less chance of injuring a casualty. They should be included with any larger medical kit, and attached to the outside of the bag with cord.
• A cheap butane lighter lights more fires, more easily, than the equivalent weight in matches.
Get the type with a striking wheel. Once the gas has run out it will still produce sparks.
Invest in a number of these before you spend your money on more exotic fire-lighting gadgets.
• Your primary survival/emergency items should be carried on your person. You are more likely to remove a jacket or coat than your trousers. Your trouser belt and trouser pockets should carry a useful assortment of items.
• Tobacco tins or mint tins are not the best means to carry your emergency items. Often they are such masterpieces of packing that items pop out when opened and are lost in the grass.
There is a danger of thinking their contents are all that is needed.
They carry too few of some useful items, and cannot carry some very useful gear.
Tins are bulky and unpleasant if you sit or fall on them. They are not well suited to being carried in trouser pockets. Carrying them in a belt pouch or jacket pocket is contrary to their intended function.
The only merit of a tin is that it can hold and heat a very small amount of water, possibly to attempt to sterilize a needle or scalpel blade. There are other ways to do this, and it is unlikely the tin will hold enough water to boil the item for an adequate time.
• When in doubt, step out! Feeling flustered, or uncertain? Don't be proud or stubborn! Let someone else take over and take a break.
If on your own, sit and think about the problem calmly and logically. Or don’t think about it, practice tying some knots or brew-up, and the answer may come to you.
• Carry a metre of clear plastic tubing with your primary water bottle or bladder. The bladder may have a drinking tube, but you do not want to take this to bits if you can avoid it.
A length of tube may be used to reach sources of water that are difficult to reach.
If using a solar still or transpiration trap, a tube may be used to drink collected water without disrupting the apparatus.
Carry additional tubing if planning to travel in desert or arid areas.
• A solar still may be most effective in non-desert conditions. In desert soil it may produce only half a litre or so of water per day. This may not justify the effort and water lost digging it.
You will probably need multiple solar stills.
Yield may be increased by urinating in the hole or adding salt water, vehicle radiator water, greywater, blood (not your own!) or most other water not safe to drink.
• In a vehicle, carry a length of tubing suitable for syphoning fuel. Better still, equip your vehicle with the sort of plastic hand pump that is primed with a squeeze bulb. Save yourself a mouthful of fuel.
• When a chimpanzee cannot drink directly from a source of water, such as in the fork of a tree, it makes a ball of leaves or grass. It dunks the ball in the water, then squeezes out the water into its mouth. Learn from the chimp.
• Some tribes of chimps signal each other by banging on the trunks or the buttresses of trees. This sound will carry further than your voice or whistle.
Bang on aircraft fuselages, vehicle bodies, boat hulls, bridge railings, refuse, debris etc.
• During the siege of a fortress during World War One, French defenders had to resort to licking condensation off the walls.
A small piece of clean sponge added to your water bottle carrier takes up little room and is of negligible weight. It may be used to mop up condensation or morning dew. Keep this separate from the sponge you use to wash your mess kit, unless you like the taste of detergent!
• Walking in the woods, or just down the park? Take along a field guide, preferably the sort that lists if a plant or tree is edible or has medicinal or other uses. It is easier to learn to identify specific plants if you have a memory to put them in context.
• Illustrations of natural shelters often show the “rafters” as a lattice of horizontal and vertical sticks.
Experiment with laying the “rafters” obliquely. Most will only need to be lashed at the top, and the bottom end may be driven into the dirt.
• When constructing a natural shelter, do not underestimate the weight the main supports and ridgepole must take. Several inches of wet insulation or a foot or so of snowfall is not light!
A ridgepole should be of sound (not rotten) wood and about four inches/ten centimetres diameter. Ridgepole and primary supports should be able to take your bodyweight, at least.
• Conveniently Y-shaped forked branches are not as common as many wilderness manuals make out. A join between a branch and side branch will often serve instead.
• Attach tent pegs to your shelter using a lark’s head knot. Easy to make, even when fingers are cold and numb. With a lark’s head knot the pegs remain attached when you pull them up. Useful if you need to vacate an area quickly.
• Keep a stout, medium-sized slot screwdriver with your tent pegs. This may be used to poke holes for pegs when you do not want to attract attention by hammering. Also used as a crossbar handle to pull-up stubborn pegs. Can itself be used as a tent peg. Paint or tape over the handle if a more natural colour is needed.
• Put on a fleece under your coat. Put a hat, scarf and gloves in the lower pockets. You may have trouble closing it up!
Buy outdoor coats and casual jackets at least a size bigger than you need. Room for insulation when it is cold. In warmer weather, room for air to circulate.
• Zig zag when ascending steep slopes.
Naismith’s rule is that you average 5 km/h (1.4 m/s) plus an additional minute for each 10 metres ascended.
If you ascend a 45° slope making a zig zag of 45° across the direction of travel, you have to walk 40% further, but it is the equivalent of walking that distance on a slope of only 30°.
This is equivalent to ascending a slope only 57% as high!
It is also a lot easier on the ankles!
• If you set a ridgeline for a poncho, basha or tarp, rainwater will run down it to drip from the lowest part. This will usually be inside your shelter.
Just inside the sheet edge, tie to the ridgeline a “drip-wick”, a length of cord with one end hanging down. Do this at each end of the sheet.
You may use simple string for this, or pieces of grass or leaves. You may use a simple overhand, clove hitch or lark's head knot
Water running down the ridgeline will be diverted and run down the hanging cord or plant stalk.
This trick is sometimes seen performed with a piece of stick pushed through the ridgecord. This leaves a section of exposed line between the stick and the sheet edge that may still allow water into the shelter.
• Consume from the outside, inwards.
Use the water, food and resources in your pack before that in your webbing. Use items in your webbing before those in your coat pockets. You coat contents before the items in your trousers. Likewise, use supplies in your vehicle before your pack. Your base camp supplies or stuff in the local area before your vehicle stores.
If you use any “inner” items, such as ammunition, fully replenish from “outer” stocks as soon as possible.
• If you must use matches, find a watertight, large mouthed container for them. Do not forget to include the striker strip(s). Cotton wool stops them rattling and may be used as tinder.
• Strike a wooden match by pushing it along the striker strip rather than pulling. Less chance of the matchstick breaking. Fingertip may be placed just behind matchhead for support. Best method for wooden matches, may not work with paper/books of matches.
If windy, face into wind. Hand holding matchbox forms wind-shield for striker and matchstick in palm. Help flame catch by tilting matchhead down into palm so flame catches stick.
• Strike a match, light a candle! To save wasting matches/lighter fuel, use the candle to get your tinder burning. Hold a small candle handy between two fingers when striking a match. A pack of birthday cake candles may be distributed between your various fire kits, EDC etc.
• I once saw the advice “to learn camouflage, read a good photography book and break all the rules for taking a good photo!”
Camouflage is often taught as being a product of shape, shine, shadow, silhouette, movement, noise and smell.
If you maximise rather than minimise these properties, you have the essence of effective emergency signalling!
• In very cold conditions, store water bottles cap down. Ice will form in the uppermost (bottom) part. Water near the cap will remain liquid.
• Melting snow for water can be problematic.
The snow at the bottom of the container will melt but the water will be absorbed by the snow above. The resultant airspace cause the pot to burn.
Snow is mainly air. Squeeze as much air as possible out of the snow and gradually add very small amounts to the warming pan, ensuring liquid water is never fully soaked up.
Better still, make “snow kebabs”! Squeeze balls of snow on to the length of a rod or stick. Position angled sticks before a heat source so the melted snow drips into a collection vessel.
• A pot of water allowed to freeze overnight warms the shelter by its heat loss. Ice takes less fuel to melt than snow, so reheat the pot when you need water. Much easier than trying to remove ice frozen within a water bottle.
• You can light a fire with batteries and steel wool. If you happen to have these items, by all means make use of them. Foil or wire may also be used.
This does NOT mean you should be carrying batteries and steel wool just for fire lighting!
Rusted steel wool will not burn so well. If you (bizarrely) carry steel wool and a battery in a survival tin, you need to consider galvanic corrosion.
• That condoms may be used to carry water is commonly reported. Very few sources actually mention the filled condoms are much easier to handle and transport if placed inside a sock first!
You will need some means to pour water into the condom. Very little water enters if you submerge it.
The condom may alternately be used to keep matches or tinder dry.
• A Zip-lock bag may be used to carry water instead of a condom. Reinforce the bottom with duct tape. The side seams may also be taped.
Until needed to carry water the bag serves to keep some of your emergency items dry. My EDC pocket pouch easily fits in mine.
• A “V” shape is the ground-to-air code for “Require Assistance”.
This may be an easier shape to create on the ground than “SOS”. Straight lines are rare in nature so this may be more distinct.
Note that many survival books that show ground-to-air signals do not include this one.
Each arm should be at least a metre wide and at least six metres long.
• Replace the metal rings of a wire saw with loops of cord. Add fishing swivels between the wire and loops if it does not already have these.
Some things you want to be easily seen so you do not lose them. Loops can be made from trainer/shoe/boot laces. These may be found in colours such as red, orange, bright blue, neon green and yellow.
Wire saws work best if the wire is kept relatively straight when sawing, rather than looped around something.
A branch may be bent to convert a wire saw into a bow-saw.
• Dark objects absorb heat better than light ones. If attempting to ignite scrap paper with a magnifying glass, create a dark spot with your EDC Sharpie. Charcoal or dirt may be used instead.
Cotton wool/tampon or other materials you are attempting to light by sparks etc, may also be darkened first.
• Ed’s Wisdom:
1. A tool left in camp is no tool at all. Trying to save a few ounces is a mug’s game.
2. Jerky is serious trail food, especially at the turnaround point. The more highly flavored the better. Having a bag to pass around makes you popular.
3. Every hike is longer than you think.
No. 3 is the really important one, in particular above 9500 feet. No, goddammit, I am NOT getting old!
• Around the opening of your sleeping bag liner sew material that is distinctive to both sight and touch.
This lets you locate the opening of your liner by touch.
It also prevents the maid at a hostel mistaking your liner for hostel bedding.
• Many are familiar with the bow‑drill method of creating fire. Fewer realise that by adding a piece of metal or stone the basic mechanism becomes a useful hand‑drill.
• Swiss Army Knives (and some other tools) include a small split ring. This ring may be used to hold the SAK tweezers closed.
This serves as a small vice suitable to hold, for example, a fishing hook while material is added to create a fly or lure.
Lay the tweezers and ring crossways across the back of your penknife and clamp them down under the head of the multipurpose hook.
• Add a safety pin to the split ring or lanyard of your penknife or multi‑pliers.
A safety pin serves as either a pin or a clip to attach your tool to a D-ring or clothing. This secures the tool when you need your hands free.
The safety pin may also be used for other purposes such as draining a blister, when necessary.
• Hung from a cord, a Swiss Army Knife or similar object may be used as a plumb‑line.
• If you own a hot-glue gun, consider adding a stick or part stick of the adhesive to your repair kit.
The piece of adhesive on the tip of a safety pin may be gently heated over a lighter flame until clear, and then used as a seal or to stick items together.
• Never sharpen a tool that does not belong to you without the permission and knowledge of the owner.
A sharp tool expected to be dull is an accident waiting to happen.
• Any polished or semi‑polished item may be used as a signalling mirror. Some larger objects may be more effective than the expensive purpose‑designed item you purchased!
Remember that glass or similar may also be used as a heliograph.
• Paracord stretches! This makes it good for its intended purpose, not so appropriate for uses such as shelter construction.
Make use less elastic cordage such as bankline when appropriate.
For temporary constructions, use natural materials that will bio‑degrade.
• “Stone Rimmed Fire Places. A common, though unnecessary practice, is to ring open fires with stones. This practice is based on the claim that the stones confine a fire and make it safer, yet many forest fires are in fact traced to such fireplaces. There are, however, justifiable uses of stones in a fire: to store warmth in a closed shelter: to support pots when no other means arc available: and to produce steam for a steam bath or a steam cooking pit. Rocks used without good reason arc needlessly defaced and, unless they are scattered after use. leave a permanent marker of the campfire. A stone fireplace also requires more effort to cool, and the stones that are not moved aside can harbour hot spots that may start a forest fire.”.
• “The Tepee Fire: This method is probably the most common one used all over the world. Simple to light, providing there are plenty of dry materials available. However, no matter how simple or practical it may be, this method will not work on snow or very wet ground. All fires, no matter which type, should always be built on some form of a platform. [My emphasis] Because this method has no controlled fire surrounds it quickly consumes the fuels. More forest fires are started by this method than any other. Often the lazy campers just kick the fire out and move out leaving the fire to smoulder and relight.”.
• To use a ferro‑rod: Place the “steel” down on the tinder or just between the tinder and yourself. If it is windy use the steel to hold the tinder down.
Keep the steel stationary and pull the ferro‑rod back towards yourself.
• Before attempting to light a fire, gather all materials that you expect to need first. Gather tinder, kindling and a good supply of fuel. Build a platform under your tinder and stack fuel as a windbreak/reflector
Only when this is all gathered should you attempt ignition.
Gather more than you expect to need. That which is not used for this fire may be used later.
• Shift through the remains of a fire to ensure everything is extinguished and cold.
While you do this, save any pieces of charcoal you find.
◦ A couple of tablespoon‑sized lumps of charcoal should be eaten if you have diarrhoea.
◦ Charcoal may be used like chalk to mark a trial or leave a message. It can be used to draw a map on a sheet of flexible bark.
◦ Charcoal may be used as tinder/kinder to help start your next fire.
◦ If attempting to light a fire with a magnifying glass, charcoal may be used to “blacken” tinder to increase its heat absorption.
◦ Charcoal may be used in the construction of a water filter.
◦ Ground charcoal and a little water may be used as improvised toothpaste. Don't expect a pearly white smile.
◦ Charcoal may be used to camouflage exposed areas of skin.
◦ Charcoal smeared under the eyes reduces the effects of sun-glare from sand, snow or water.
• Metal at sub‑zero temperatures will freeze on to bare flesh.
If you have a metal whistle, tape around the mouthpiece with insulating tape. On some designs of whistle, heat‑shrink tubing may be used.
Make sure the whistle you carry in your cold weather coats and gear is non‑metallic
• Loose matches will rattle in a partially filled container. Pad the space with materials such as dry grass. Ensure whatever you use is completely dry!
It is easier and more practical to carry a lighter instead of matches.
• Learnt on the Russian Front in the Second World War: Cold Weather clothing should be either warm, or white, never both.
A warm garment will be worn whenever it is cold, so will not stay white for long.
Once dirty, a white item has little camouflage value.
Warm items tend to be thick and slow to dry, so having to wash them frequently to keep them white can be problematic in the field.
• When using stairs, make less noise by allowing the banister to take some of your weight.
Note that buttons or poppers on your cuffs may hit a banister and make noise that will reveal you.
Cuffs can also get caught on the ends of banisters, causing you to stumble or make unnecessary noise.
If trying to move quietly, roll your jacket cuffs up. The exposed forearms may act as an additional tactile surface. Open cuffs may be covered by knitted tubes or devices similar to ninja bracers/tekkou.
• In cold weather, take a blanket or similar, and fold it twice lengthwise to create four layers.
Wrap around your torso just under the armpits. Secure with a belt or cordage. Wear beneath your coat or jacket.
• Acid removes rust. Cover the rust with vinegar, rub it with a slice of lemon etc. Also good for water-scale in your bathroom.
This does not need to be cider vinegar. Unless you are following a recipe, anything that tells you you need cider vinegar is usually BS.
For a gentler action, submerge the item is something such as pineapple juice. For a knife, use a container with a good depth to volume ratio. A tall glass, vase, measuring cylinder.
Heat each end of the straw and crimp together to create an airtight and water-tight seal.
• Swiss Army knife tweezers are compact and useful, even if you do not own a Swiss Army knife (yet).
Place in a short length of plastic straw or tube. Add brightly coloured tape if wanted.
Carry tweezers in your wallet, pocket pouch, medical kit etc.
• Four Ws: Water, Wood, Wind, Widowmakers.
When choosing a campsite, consider the four Ws.
A source of water is good. Camping too close to the water may cause problems with insects. You should have shelter against rainfall.
A nearby source of wood for fuel will be useful.
Your site should be out of strong winds. A gentle breeze may remove smoke from your fire and keep some insects away.
Widowmakers are potential dangers: Dead branches that may drop on you. Rock overhangs that may crack in the heat of your fire and fall. Dry river courses that may be flooded by rainfall elsewhere.
• Five (Seven) Cs: Cover, Combustion, Container, Cordage, Cutting (Consumables and Compass)
When considering equipment needs, utilize the five Cs:
Cover: Suitable clothing, bedding and means of shelter. Rain poncho, poncho‑liner, space blanket(s), survival/large plastic bag(s), hats, gloves etc.
Combustion: Have the means to make fire easily. Lighters and tinder. Perhaps a ferro-rod as backup.
Container: Have the means to carry water with you. Have the means to boil water.
Cordage: Have a variety, from fishing line and cotton string to paracord and bank line.
Cutting: Carry useful tools. Invest in a Swiss Army knife and a Mora and carry the penknife with you at all times. Different environments need different larger tools.
With the above, also consider Consumables and Compass. Water, food, ammunition, medication, soap, batteries, water treatment tablets. How much will you need and where can you resupply?
• Your emergency items in your vehicle should include:
Blanket, poncho‑liner and/or winter sleeping bag: An immobilised vehicle is a metal box. It will get cold inside.
Bottles of drinking water and “European” mess tin: Mess tin can be used to melt snow, treat water or as a bucket to fetch water for an overheated radiator. A stove will be needed.
Lightsticks, Warning Triangle: Means to make an immobilised vehicle visible on a dark road.
Flashlight/headlamp: Means to inspect vehicle in dark. Ideally a wind-up model since the batteries will be flat when you most need it.
Candles: long duration candles, nightlights. Provide a source of heat in an immobile vehicle. Open a window a little for ventilation.
Spade and other tools: Can be used to dig out a stuck vehicle. Your vehicle probably has room for a robust, full-sized garden spade rather than a more expensive, smaller folding camping tool. Placing floor mats under tires can help free a stuck vehicle.
• A survival bag or large plastic bag retains heat and keeps out wind better than a foil space blanket. It is easier to manage when stationary.
Few gizmos or gadgets are as useful as a roll of trash bags in your pack or vehicle
Such bags are generally bulkier than space blankets, many requiring a large pocket or needing to be carried in your daysac. A space blanket will easily fit in most pockets, your EDC pocket pouch etc.
It is not an “either/or” choice. Use the bag if available, with the space blankets if necessary.
If you cannot reach the backpack or coat the survival bag was in, you still have the space blankets.
• STOP
In an emergency:
Sit: (stop, stay) Once clear of immediate danger, find a safe location. Take a deep breath and accept you are in a survival situation. Nothing can be done about how you got there. Generally it is better to say close to your vehicle, the crash site etc than wander off in a long cross‑country trek.
Think: (Take stock) Don’t Panic. Think through what you can do. Take Inventory. Go through your pockets and bag to remind yourself what you have available that may be useful. Don’t just do something, sit there!
Observe: Look around. What resources in the area or from the wreckage may be used? Which of your fellow survivors have useful skills. Which will need extra help. Assess the situation and location.
Plan: Make a plan. Prioritise your needs (Medical, Shelter and Fire, Signalling, Sustenance). If you need to change location, where will you go and how will you notify searchers?
• A pair of zip-lock bags may be joined together to make a larger bag by turning one bag inside out so the collar sections engage.
• A rucksack is an extra layer of insulation. Empty the rucksack and place the foot of your sleeping bag/survival bag inside. Pull the draw-cord snug if it has one.
• Many of the survival applications advocated for zip/cable ties are better if string or plant stems are used instead.
Some claimed applications, such as using zip ties as tinder for fire‑lighting, are just wrong.
Two or three 20 cm or longer zip ties may prove useful as part of your repair kit.
There are various ways the lock of a zip tie can be opened. The pin or tweezers of your Swiss Army knife, the needles in your sewing kit and the safety pins in your medical kit or the tip of a fine screwdriver, may all be used for this.
After being trimmed, the tail end of a zip tie may be melted into a blob with a flame to prevent a zip tie being undone.
If you cannot unlock a zip tie, cut it close to the lock where it enters the lock. The shortened tie may still be of use.
If using them to restrain a bad guy, do not leave the prisoner unattended.
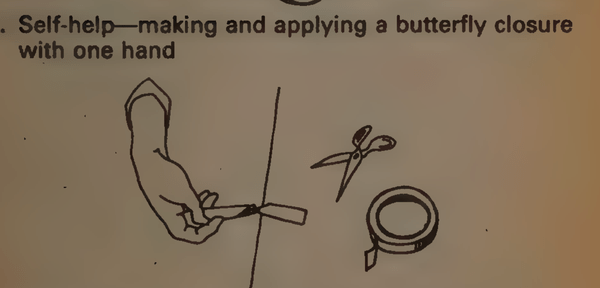
• Butterfly closures may be improvised from narrow lengths of adhesive tape.
Twist the centre one complete turn to form the section that crosses the wound.
My medical pouches have some elasticated tape that is good for minor finger cuts. Twisting this into butterfly closures for larger wounds is more practical than trying to cut plasters into the butterfly shapes.
• No Combustion without Ventilation.
Do not light so much as a single candle unless you can ensure there is an adequate supply of oxygen.
More than a decade and a half ago, I discovered Khukuri House Thamel (KHT). Genuine kukris, straight from Nepal!
As if this wasn’t enough, KHT were very agreeable when it came to suggestions for modifications and customizations.
I commissioned a number of kukris that added a half-guard to the traditional grip form.
I knew from previous experience that the traditional grip form was just about ideal for a blade of this shape. Adding the half-guard really did make it even better.
Not only does the half-guard add some protection for the hand, it also makes the grip even more comfortable and more secure.
These experiments led to my commissioning the kukri that I call the “Scrapboard Survivor”: A ten inch sirupate blade combined with a half-guard and a traditional grip. To my mind, this is pretty much as ideal a survival knife as you can get. Read my blog “Why a Kukri?” For more information.
I had rather hoped KHT might add the Scrapboard Survivor to their range, so that others might enjoy this most excellent of tools. Sadly, as far as I am aware, there are no plans to make the Scrapboard Survivor a standard option at the moment.
KHT did, however, take a liking to one of my earlier commissions. Before I opted for the sirupate blade, I had brought a 10" standard bladed kukri with a half-guard added.
KHI have added this option to their catalogue as the “Junky Jungle (JJ) Plus Guardwala”. The example shown in their photo is the actual knife and sheath that I own.
My love of the Scrapboard Survivor has rather made me overlook just what a fantastic knife the JJ Plus Guardwala is.
A friend of mine prefers this kukri to the Scrapboard Survivor. Anything you can do with the Scrapboard Survivor, you can do with the JJ Plus Guardwala. The JJ Plus Guardwala is a little heavier, but at 650-750 grams, it is hardly a burden. The added “heft” was one of the things my friend preferred.
The JJ Plus Guardwala is a very good option if you do not want to commission your own Scrapboard Survivor. What is more, it is currently listed at under $60!
Do not let the good looks fool you. These are high quality, practical, working tools.
The JJ Plus Guardwala is not available from other Kukri stockists.
If you are ordering a JJ Plus Guardwala, a Scrapboard Survivor or any other kukri, please mention this blog.
There is no defence without awareness. You must pay active attention to your surroundings.
You are not aware if you are gawping at your phone. Do not walk with a phone in your hand. Keep your phone in a pocket or pouch and only use it when stationary and safe.
Do not walk with your hands in your pockets!
Look where you are going and at the world around you.
Awareness is not just about spotting potential threats. You should be noting possible escape routes, resources or means of defence.
Awareness is more than just sight. Sounds and even scents may provide useful information. Pay more attention to these senses when visibility is restricted.
If you feel someone or something seems “off”, do not ignore this feeling. You may subconsciously be registering body language or other cues that you may be in danger.
Get Out: Defend Before Draw
If attacked, you must evade or redirect the attack before attempting to ready a weapon. Neutralise the attack, then draw and use your weapon.
If an enemy is within three body-lengths distance, you must prioritise defence and evasion over counter-attacking..
If you neglect this, your enemy may have time to wound or kill you, even if you have fatally wounded them. An attacker need not be armed. They may bury their thumbs in your eyes, knock you down and fatally stomp you, or use your own weapons against you. Treat any attack as though there may be a knife, even if you cannot see it.
If you have a weapon ready, combine your attack with an evasion.
If fired on from a distance, do not stand and return fire. Get out of sight, preferably behind hard-cover, before returning fire.
If fired on, get out of sight. Move location, crawling if necessary. Assess the situation and locate the enemy. Return fire, or escape, or manoeuvre, as you judge best.
Strike Out: Hit the Nearest Body Part
Several martial arts advocate “defanging the snake”: attacking the hand or arm holding a weapon.
An extension of this idea is to attack the nearest/most accessible body part.
While this seems obvious when using a weapon, this tactic may also be utilised when unarmed. Hit whatever you can.
Be aware that in addition to your hands, you have your elbows, knees, shoulders, feet and head to attack with. The nearest target may be a foot, leg, hip, shoulder, coccyx, or kidneys.
Lower targets are more easily and rapidly attacked with your feet and knees. Higher targets are better attacked with your upper body weapons. Use what is closest and fastest.
If there is a choice of targets, hit one. Hesitating while you decide which is the better target may result in your missing the opportunity to hit anything. Any attack that lands will have more effect than a more effective strike that misses.
When I wrote “Survival Weapons”, the concept was to optimize what firearms one spent their hard-earned money on.
There were also several knife related chapters in the book, but I did not apply the same approach to these. Instead I gave a description of the pros and cons of various types of knife for the reader to consider.
I admit, I have too many knives. I find myself sometimes wondering, if I had to restart, what should I have brought and what should I have not brought.
Essentially, the question is what knives do I really need?
After decades of buying and using knives, and way more money spent that I want to think about, my answer to this question may have some value for the reader.
This article will be in several parts. The first part will concentrate on the knives that are primarily for home use.
The knives you use in the home are those that you are likely to get the most use from, in some cases using then daily. It makes sense to get your home selection in order before spending the price of a new car on a custom survival knife!
Part two will cover outdoor and general purpose knives.
Home Utility Knives
A Stanley knife is a useful addition to your home tool kit.
“Stanley” is actually a brand name, but in many parts of the world the term “Stanley knife” has become generic for certain designs of utility knife with a replaceable trapezoid-shaped blade.
Prices range from very reasonable to very high, which is odd, given that, as far as I am aware, they all use the same blades!
The short blade gives very good control, while reducing the chances of cutting too deep and damaging something it was not intended to cut. Some variants of blade have a rounded tip to further reduce the chance of damage or accidental injury.
A retractable blade may be handy for limiting cut depth or safety, while a fixed blade may be better for prolonged tasks such as carving.
The type of blade most commonly encountered is a straight‑edged trapezoid-shape. A concave edged variant is favoured for some tasks.
Blunt blades may be replaced with new ones, although it is possible to resharpen dull blades.
Some handles have a small cut-out for wire stripping. The value of features such as strap-cutters will depend on the work environment you carry a Stanley knife in. Some handles can be fitted with purpose-designed metal‑ or wood‑saw blades.
I seldom use my Stanley knife. It is usually at the bottom of a tool box or back of the cupboard somewhere.
If I need a cutting edge, there is generally another knife more readily in reach. Of course, not everyone has a bookcase decorated with knives and a kukri by the bed!
This, incidentally, is a theme we will see again in this article: Knives for use in the home should be placed so they can be easily found and accessed when needed.
My Stanley knife now hangs‑up on the inside of the tool cupboard door, like my flashlight, spirit‑level and tape‑measure.
A smaller utility knife is useful for finer jobs.
If you are not familiar with them, I would recommend against using scalpels. Scalpel blades are designed to be removed from handles by snapping them in two. They have weakened fracture lines designed into them.
If you have a tendency to use more force than finesse, the scalpel blade may snap when you least expect it and this can cause injuries as you lose control of the tool.
For similar reason, I recommend a tool such as a Stanley knife for general use in preference to the box-cutters that use snap-off blades.
You should also be aware that different scalpel blades need different handles. The no.11 blades take a number 3 handle, while blades such as the no.22 need a number 4 handle.
Many scalpel blades are now manufactured with plastic handles already attached. These handles are designed to be disposable and are not very durable. They will snap if you use too much force.
The flattened end of a metal scalpel blade may be put to various uses. It may be used as a spatula to flatten hot plastic or the heated ends of paracord. They are also handy for levering open the lids of paint tins, although a slot screwdriver is probably a better option.
The no.11 scalpel blade is possibly the most useful for general usage. The hooked no.12 may be useful to jobs such as unpicking stitches. Curve-edged blades like the no.22 may be better for cutting some materials.
Rather than a scalpel, you may be better off using a small craft knife, such as an X-acto. These come with a range of blade shapes, although most are just variations of a straight‑edged triangular blade. The configurations resembling a chisel may have some applications.
Most X-actos and their copies have a rod-shaped handle. This may roll out of reach on some surfaces. If you websearch on ideas to on “how to stop pencils rolling” you may find suitable solutions.
As an aside, I very rarely use a modelling knife when modelling. A set of needle-files and a pin-vise with small drill-bits is better for most jobs.
My more common problem with an X-acto is sometimes not being able to easily see if the blade is cutting-edge up or down. I sometimes use the knife under poor lighting conditions, such as the inside of a garment when cutting stitches.
Like Stanley blades, blades for smaller utility knives may be resharpened or touched‑up during extended use.
Adding some tape to the handle and positioning the tag in relation to the cutting edge may solve two potential problems at once!
Add a “stitch ripper” to your home sewing kit, but some jobs still need a very small pointed blade to get started.
It is not the worst idea in the world to also have a general‑purpose Mora knife as a home utility blade too.
Kitchen Knives
I have written about kitchen knives before, so will refer you to those pages for more detail.
A professional chef visited me a few years ago. His first request was to see the Chinese cleaver I had told him about.
Very cautiously, he placed his fingertip across the edge. A nod of approval and a knowing grin. As he had expected, it was very sharp.
Most of my cutting is done with my Chinese cleaver, also known as a vegetable cleaver and not to be confused with the heavyweight Western items. Mine has been in use for more than thirty years.
For cutting acidic fruits and vegetables, I have a serrated bread-knife, which, not surprisingly, is also used to cut bread!
Between them, these two knives handle more than 90% of my cutting tasks in the kitchen.
If such a combination is a little too unconventional for you, and you are just starting out equipping your kitchen, I suggest buying one of the basic wooden blocks of knives sold by many stores.
I got my block of knives to stop my sister-in-law mucking up my cleaver. Since the block sits there on the counter, she was unlikely to look for my cleaver in a cupboard or drawer.
The countertop block is so handy I ended up using its knives a lot myself.
The block has six knives, including a chef's knife, carving knife and bread-knife.
The chef's knife can do many of the tasks I would have used the cleaver for.
The smaller knives are a straight-edged knife, a small serrated knife and a hook-bladed paring knife.
The small serrated knife is used for acidic fruit and veg, and supplements this use of the bread-knives.
The knife that sees the most frequent use is possibly the paring knife. The claw-like blade is very useful for opening packaging. Sitting in the knife block, it is readily to hand whenever it is needed.
What other knives you use in the kitchen depend on your cooking style. I have a very nice boning knife, but seldom use it since I generally don't de-bone meat.
My lady is a big seafood fan, so I expect I may have to buy a filleting knife or two soon.
A butcher's steel keeps most of my kitchen knives sharp. I also have a diamond stone and some ceramic sharpening rods in a cupboard in the kitchen, should they be needed.
Letter Openers
In one of the unnecessary Rambo sequels, Rambo enthuses to his daughter about the letter opener he is making for her.
“No one writes letters any more” she comments.
But most of us shop via the internet, which means most of us probably receive more parcels than we might have in previous decades.
Such parcels are much harder to open than a simple envelope. I often find myself reaching for a knife or other sharp edge to open my mail.
Food packaging these days also seems to be harder to get into than in the past. If anything, I am stronger now than I used to be. Exerting enough strength to pull a packet open often results in the contents fountaining all over the room. Again, I find it easier to have a sharp edge within reach.
“Traditional” designs of letter‑opener are designed to open envelopes and may be blunt‑edged tools made from plastic, ivory, brass, pewter or wood. Parcel tape and other modern packagings my require something more capable.
Many of the knives described elsewhere in this series of articles are up to this task. The paring knife is often used for parcels that get opened in the kitchen.
For a blade you will probably have in sight in your living space or office area, you may desire something more decorative and less aggressive‑or utilitarian‑looking than the blades with your camping gear or toolbox.
My current “parcel opener” is a miniature tanto/aikuchi with shirasaya‑type sheath and grip, but in a dark wood. Edge is sharp enough to deal with modern packaging, and the point acute enough to get beneath envelope flaps.
If I did not have the aikuchi, I might use a sufficiently attractive puukkot instead. Various other designs of fixed blade or folding knife are possible alternatives. Some “neck knives” have hooked blades.
I would recommend a stainless steel blade for a parcel opener.
Such a knife is of no use unless it is readily within reach. Mine does not look out of place sitting on the carved wooden box I brought in Hong Kong. This box is on a table beside where I usually sit.
Home Penknives and Multi-Tools
I will talk about penknives for everyday carry (EDC) in part two.
It is worth having an extra penknife or two at home, and readily to hand.
I have a couple hanging on a hook inside the kitchen drawer.
The larger of these penknives is an eleven-bladed model that is too bulky and heavy to carry on my person. This includes a set of pliers and various screwdrivers, which have proved handy tightening up the handles of various cooking pots. The reamer has also proven useful for various jobs, including fitting the screw-hooks inside the drawer the penknives hang from.
These particular penknives were donated by the lost property box.
It is quite possible that you have penknives or other multi-tools that you have purchased or have been given that you have decided are no longer your first choice as EDC or field tools.
Some such items may be repurposed as home tools. The trick is to keep them somewhere that they may easily be located when needed. Mine are in the kitchen drawer. Hanging them inside the door of your tool cabinet is a good option too.
In with my box of gimlets (q.v.), I have a Swiss Army Tinker. This is mainly there for its reamer, but three kinds of screwdriver are handy too.
Gimlet
The gimlet is not by any stretch of the imagination a knife. I have included it in this discussion since its use complements that of the reamer on a penknife. Also, it is a tool that is often overlooked and I suspect there are many tool boxes out there that do not include this very useful implement.
Many home-improvement jobs involve the instillation of screws, nails or hooks. Such tasks are often easier, more accurate and neater if a pilot hole is created first. The reamer on your penknife is a good way to start such a pilot hole, and in some instances may be all that you need.
When this is not the case, a screw gimlet comes in very handy.
A typical screw gimlet resembles a corkscrew, with a handle set at a right angle to the shank.
The shank of mine begins in a screw thread and becomes a spiral cutting groove like a drill bit.
Mine has a shank diameter of 4.5 mm, which has proved to be a good size for general use at home.
My gimlet recently proved to be the ideal tool for cutting a lanyard hole in the handle of a Mora knife.
It is probably prudent to keep a gimlet with your DIY drill(s). Most jobs you may need the drill for may be started with a gimlet. Often you may find the gimlet was all that was actually needed.
Another useful feature of a screw gimlet is that it can be used in locations where there is insufficient space or awkward to use a power drill or hand drill.
Gimlets are very reasonably priced. Old gimlets are sometimes sold mislabelled as “corkscrews”!
Looking on-line, there are gimlet sets of several sizes that often include an awl and/or bradawl.
My original gimlet has proved so useful I invested in a set of gimlets, going down as small as 2 mm. All my gimlets live in a small ice cream tub, so are easy to find. An awl and bradawl and Tinker SAK are stored with them.
Some holes are better made using a small gimlet and then enlarging the hole with one or more bigger gimlets.
If you drill close to the edge of a piece of wood there is a chance of splitting the grain. In such a situation, start the hole for your gimlet using an awl, reamer and/or bradawl. Create a hole large enough to accommodate the screw-threaded section of the gimlet.
Unlike my power drill, a gimlet never needs recharging whenever I need it! Thinking back, I suspect many of the jobs in the past I used a drill for might have been done easier and more quickly with the gimlet!
Gimlets are also a relatively safe tool compared to many of the alternatives. If you are introducing your child to carpentry or similar crafts, I would suggest thoroughly familiarising them with the gimlet before they start using potentially more dangerous tools such as drills.
Sometimes, when out in the wilds, there is a need to bore a neat hole or two in wood, bone or hide. The reamer or corkscrew on your penknife is often up to the job. You may need a deeper, more regular hole. In “Survival Weapons” I describe a more capable tool I call a “brog”.
A gimlet is a possible alternative, and takes up very little room in your pack. Cover the point with a length of tube, section of stick or a cork.
Stay Sharp
I have had to work with a lot of stupid people. Reflexively, I cautioned my girlfriend: “Careful, that is sharp!”
She gave me an eloquent stare that both said “I am NOT an idiot!”, but also “Of course it is sharp! You will have sharpened it!”
Blunt knives are dangerous. They encourage the user to apply more force than is needed and increase the chances of mistakes or injuries.
You should have items for resharpening you knives and other tools in your home. These should be easily accessible from where you might need them, to encourage you to use them when necessary.
As already noted, I keep some sharpening items in my kitchen. Others are in or with a flannel bag in my tool cupboard. There are also items with my outdoor gear. On my person I carry a small diamond impregnated sharpening card. An old brass key on my keyring may be used to “steel” an edge for a quick touch up.
For home use, a set of ceramic rods that fit into a base are very good. I have a set in the tool cabinet and a more basic set in a kitchen cupboard. A set of rods like helped me learn sharpening.
Since I am a “pull‑sharpener” by preference, I like to have a small stone or triangular rod I can easily hold in my hand and move across an edge. For the latter, I generally either use a small fine Arkansas stone I inherited, or a triangular Lansky rod with plastic ends.
There are many alternate options. Most suitably sized triangular sharpening rods will be suitable providing they are not too course.
The trick to avoid sharpening becoming a tedious chore is to never let an edge get really dull. Sharpen lightly and often, as needed.
While tools should be sharp and accessible, they must also be stored responsibly so they cannot cause injury to family, other residents or visitors.
On a number of occasions, I have talked about my favourite kukri (I own a few!). This is a ten inch sirupate with a half‑guard and a lengthened grip. This is the tool I will grab when SHTF.
What I have not so far discussed is that my kukri is just one half of a double act. It has a Companion!
With the kukri, I carry a small, fixed blade knife. Both are fitted to the same belt, along with a small pouch containing a fire kit, survival blanket and a sharpening stone. Note wrist loops that may be attached to the snap-links to further prevent the chance of loss.
I always have my Swiss Army Knife and mini-Leatherman on me, of course. A small fixed blade is handier, and easier to get clean after a messy task like gutting a fish.
The rationale behind having a pair of fixed blade knives is thus:
Most cutting tasks do not need a large knife. Most such cutting tasks are easier and safer with a small knife. This helps save the edge of the large knife for uses that it is really needed for.
A shorter blade and lighter knife often provides a greater level of control and precision.
A large knife can perform many of the duties of a small knife, but a small knife cannot entirely substitute for a larger blade.
Since the small blade will spend more time out of its sheath than the larger, in theory I am less likely to lose my larger blade. I can manage without the small knife better than I would manage without the larger.
Puukko
When it comes comes to useful small blades, one of the examples that comes to mind is the Finnish puukkot (singular is “puukko”).
Puukkot are about as common as snow in Finland.
Puukkot come in a variety of sizes, but the most commonly encountered are blades of 75 to 100 mm length.
Large production runs and informed buyers means puukkot are produced with good quality blades at reasonable prices. Reasonable in Scandinavia, at least. Crossing the water bumps the price up, but they are still very good knives for the money.
“Fica” knives were apparently once popular with some Russian criminal elements. This is claimed to have inspired the Soviet NR-40 knife. (With its clip point and inverted main edge, the NR-40 has some resemblance to British knuckle-duster knives used in World War One and the Second World War BC41 knife.)
Many puukkot are works of art. Some have handles carved from “curly birch”. Another grip construction utilizes stacks of washers made from reindeer skin or birch bark.
Unmounted puukkot blades are available from some suppliers. If you fancy making your own sheath and grip, I recommend Bo Bergman’s book “Knifemaking”. Not only highly informative, but beautifully photographed and recommended for knife-lovers and other hoplophiles.
I have not yet been to Finland.
I picked up this pair of knives on my last days in Denmark.
The upper example is Finnish, I believe. The grip is curly birch, with a touch of linseed oil to bring out the grain. Note the button hole in the hanger.
For ease of access, puukkot are often carried suspended from the button of a breast pocket on a shirt or jacket.
This knife is also a good size to fit in a cargo trousers’ thigh pocket. Useful if camping in areas where simpletons will freak out if you wear a belt knife openly.
Note also that these knives usually use a deep sheath that covers most of the grip. Such a sheath is very secure, but does limit the provision of a guard.
Mora Knives
I didn’t know it at the time, but the second knife is Swedish, and made by Mora.
Mora (aka Morakniv) are a Swedish knife manufacturer, and their main products are puukko-type knives.
Whether a knife can be a puukko if it is made in Sweden, I will leave for others with more time on their hands to discuss.
Mass production means good quality at very reasonable prices, so Moras are the first choice for many when it comes to choosing a small, fixed blade knife.
Moras are probably at least equal to many knives that are more than five times the price.
The most obvious difference between most Moras and puukkot is that most Moras have handles and sheaths made using plastic rather than wood and leather.
My kukri is complemented by a Mora Companion (model number 860).
I gave another Companion to my girlfriend to complement her kukri. The Mora proved useful when she was foraging in Sardinia. She also utilised it when gathering seafood when snorkelling. She particularly praised how securely the knife stays in its sheath.
The Companion has a ten centimetre stainless steel blade of a useful and proven configuration.
The plastic sheath is well designed and very secure.The knife positively locks in position and stays in the sheath until you want it. You can quite confidently wear the knife handle down.
A slight bump at the top of the sheath mouth is provided for the thumb to push against if drawing the blade single-handed. You can also push down on the top of the belt-hanger.
The belt hanger is provided with a cut-out for hanging from a button, and the sheath is provided with a drain hole. The hanger itself is a clip, so the sheath may be worn with clip slipped over the top of a pocket or over a jacket edge.
Companions are offered in a wide range of handle and sheath colours. Mine are in a drab green or sand‑colour. Brighter colours are available for those prone to misplacing items.
The Companion, and several other models are available with either stainless steel or carbon steel blades. My preference is for stainless steel, particularly if the knife is going to be stored in a kit and not inspected for some time. Stainless steel is also recommended for fishing knives or any other use that takes you close to salt water.
Carbon steel is better for throwing sparks from ferrite, but is more prone to rusting and discolouration if neglected.
I have various other objects that can throw a spark. My kukri has chakmak and karda. Spark striking is realistically a low priority or me since my EDC includes a butane lighter and there are two in the fire kit on the knife belt. I can even use the striker wheels of the lighters to strike sparks from ferrite rods.
The only modification the Companion really needs is to drill a hole for a wrist loop or lanyard. Since the blade has a rat-tail tang, adding such a channel is a quick and simple task.
I recently brought a Companion for my step-son. Turned out that the most straightforward way to add a lanyard hole was with a 4.5mm screw gimlet. Edges of the hole may be neatened-up by holding it over the flame of a lighter and gently heating.
A screw gimlet is a very prudent addition to your home toolbox.
A criticism sometimes levelled at puukkot is the transition between blade and grip. The forefinger could slip forward and be cut by the edge at the base of the blade. For most uses this is unlikely, but if in a hurry, forgetful or your hands are wet, is a possibility.
The plastic handled Mora’s include a finger guard, and their plastic sheaths are designed to accommodate this feature.
Some of you reading will be discouraged by the reasonable price of a Mora Companion. It cannot be that good a quality at such a low price!
Given how low the price is, I challenge those readers who think this to take a risk and buy yourself one. Then send me a cash donation as penance for doubting my word, shame on you!
Chances are you will probably invest in a couple more Moras. At these prices, you can stash a spare in your car, your tackle box and so on.
Mora Pro Robust
When I heard about the Mora Robust/Pro Robust, I was eager to get one.
It might be a good option for situations when I can only carry a single fixed blade knife.
I was expecting a heavier bladed version of the Mora Companion. In fact, the Robust is closer to being a heavier bladed version of my Mora 511 (above, top). The grip is the same shape, and both have 9 cm carbon steel blades. The Pro Robust is described as having a 3.2 mm thick blade while the 511 is listed as 2 mm.
The Pro Robust has a beautifully polished blade. I had elected my 511 as the “kitchen Mora” and used it for something without realising it was a carbon steel blade. Leaving it for a short period without cleaning and drying it has discoloured the finish. Won’t make the same mistake with the Pro Robust.
The Robust and 511 have a more pronounced half-guard than the Companion, and consequently the sheath is a little different. Different in details, but not in features and functionality.
Like the Companion, the Robust (and the 511) lock securely into their sheaths. I have been unable to shake it hard enough to persuade the knife to drop out. I will probably pop a joint before I shake it loose.
Rather than a bulge for the thumb to push against, the top of the sheath mouth has a ridged section for the thumb. The design of the button hanging feature is also different. The most obvious difference is the knob/mushroom structure on the front. A similar feature is seen on some bayonet scabbards and is used to secure the sheath in a frog. It is a convenient structure for the fingertip to push on when drawing the knife single-handed.
There is a thicker bladed version of the Companion available, but I have yet to acquire one. This has a 3.2 mm rather than a 2 or 2.5 mm thick blade.
Scandi Edge
All of the Mora knives I have owned have arrived already sharp with a good edge. Eventually you will need to resharpen, however.
Traditionally, Scandinavian knives were sharpened with what has become known as a “Scandi edge” or “zero grind”.
What this means is that the primary edge and the bevel are the same. To sharpen, you lay the knife’s bevel flat on the sharpening stone and move the blade back (or forward), depending on your preferred sharpening style.
This is very easy to do, but involves removing a lot of steel with each sharpening. The scandi edge is claimed to produce a very strong edge, useful for some applications.
Modern blade steels tend to be harder and better quality than was available to previous generations, so there is reasonable doubt as to whether a scandi edge is the best choice for modern Mora and puukkot, especially those with laminate or stainless steel blades.
There are plenty of forums and videos on the pros and cons of the scandi edge, so decide for yourself what is best for you. Personally, I sharpen my Mora the same way as I sharpen my other blades.
Bergman’s book suggests sharpening blades with an angle of 10 to 30 degrees, depending on intended application.
For a general purpose knife I would suggest an angle of 22.5 degrees. If you lack a protractor or have trouble visualizing this, fold the corner of a piece of paper in half, then fold it in half again. A quarter of 90 degrees is 22.5.
The “kitchen Mora” responds well to the butcher’s steel I use on my other kitchen blades.
If you are looking for a special present for a knife-lover or outdoorsperson, a traditional puukko is worth considering. Something both beautiful and practical.
Morakniv, aka Frosts, make a wide range of other knives, for the kitchen, the outdoors and for the workshop.
I was watching an episode of MacGyver where they break into a museum to steal a jade dragon. No gloves, and they go in through a ventilation duct. All high security buildings have spotlessly clean air ducts large enough to accommodate fully grown men, naturally.
In such a situation, I think to myself, drab-colour coveralls would probably a very good idea.
After the heist, the coveralls may be discarded to eliminate forensic evidence and change appearance. Anyone who looks like they have been crawling through dirty air ducts is going to draw attention.
Also, dressed in drab-coloured “boiler suits”, anyone that does see you may assume they are seeing maintenance or cleaners. You are probably less likely to be challenged than someone in wandering around in civies or a black polo neck.
The approach or departure to the target building may involve moving though rural terrain or parkland. A drab-coloured coverall provides a measure of camouflage in such conditions.
As an aside, I know of an airgunner who used to hunt wearing a pilot's flight suit. It was a single colour, but the loose cut created folds and patches of shade that tended to break up his shape. Fooled the bunnies, anyhow!
Around the same day as I was watching that Macgyver episode, I had been reading one of James White's “Sector General” books.
Implied in the book was that Monitor Corps personnel spend a lot of time wearing coveralls. Since most of the Monitor Corps in the books are spaceship crews or perform maintenance on the hospital station, and changing into environmental suits is fairly common, this makes good sense.
If I was designing a military-style organization from scratch, a range of coveralls for general and working wear seems a good start. Like the Spanish nearly a century ago, it may be found they are useful for field wear too.
That night, a Ghostbusters movie comes on. Dark tan coveralls are their uniform.
Before was an episode of Knight Rider, and it looks like the henchmen are wearing dark blue coveralls with a beret and police belt.
I also watched the Indian movie “Fighter”, where everyone is wearing flight suits, even if they are just cadets marching around the academy grounds.
At least two or three Bond films have the henchman spear-carriers in coveralls.
Synchronicity, or is the universe telling me to write about coveralls?
Coveralls, Overalls, Boiler Suits and Jump Suits
In British English, coverall and overall are essentially interchangeable. Americans reserve “overall” for the bib-and-brace type garment that paradoxically leaves the arms and shoulders uncovered. Brits usually call the latter “dungarees”, not to be confused with the USMC garments of the same name! Mia Goth demonstrates American overalls don't cover all below:
“Boiler suit” is another term for a coverall, unless aircrew are wearing them, when they become flight suits. Jumpsuits tend to be a snugger cut, particularly if used for free-fall jumps.
Honourable mention goes to the siren suits that helped many Brits through the Blitz.
Raider Wear
Another episode of MacGyver features Treasury men raiding a nightclub. This provides the bizarre spectacle of men in suits and ties lugging around a battering ram.
You would think that a “non-uniform” law enforcement organization would have a few “riot coveralls” or “squad suits” for such occasions.
As well as the obvious protective benefits, having a few people in such garb would at least provide some uniformed presence and prevent an operation being mistaken for a mafia outing.
An old Shomer‑Tec catalogue I have describes the Topps Squad Suit as “a rugged, low‑cost, professional‑looking garment that can be worn over, or in place of, a uniform during demanding operations.” and suggests keeping one in a patrol vehicle.
The coverall would need some form of distinction. “Law Enforcement” on a back panel would encompass the needs of most potential users. Velcro patches on sleeves and breast for more specific identification.
Elsewhere I have discussed the influence of police uniform colour on both the wearers and those they interact with. The Topps Squad Suit and many similar items come in black or very dark blue. This would be very uncomfortable in sunny locations, and looks very fascist, which may be counter productive. Dark colours also really show up any dirt.
In many parts of the world many civilians dress dark, so there is a potential for misidentification.
A coverall in police blue-green would be useful, and be an economical way to introduce and experiment with the concept.
Possibly the best single choice is “wolf grey”, as is used already by some police tactical units. As a neutral colour, it offers some concealment in many rural or urban environments and low‑light conditions for when this is needed.
Monos
During the Spanish Civil War, many of the militias were formed from factory workers. Many fought in their work overalls and coveralls, known as “monos”. Monos were found in greys, browns and khakis, but many of those of industrial origin were dark blue. One anti-fascist publication even called itself “El Mono Azul”.
The Soviet Union, Nazi Germany and Italy (among others) supplied the combatants with tanks, aircraft and advisors. Included in the military aid supplied were coveralls for tank crews, air crews and maintenance staff.
Monos became popular, not just for crewmen and technicians, but for front-line use, and not just with the ex-factory workers.
Many Spanish police formations had elaborate duty uniforms that were not suited to hard wear and combat. Police units that traditionally wore blue often selected dark blue monos.
Browns or khaki monos were more common with more conventional military units.
While the fashion of using monos as combat wear probably began with the Republican (left-wing) factory workers, troops on both sides used them.
“Osprey Men-At-Arms 074: The Spanish Civil War 1936‑39” has a number of photos and images of Nationalist (right-wing) troops wearing monos. “Osprey Men-At-Arms 498: The Spanish Civil War 1936‑39 (2) Republican Forces” notes that monos were appreciated for their pocket capacity. An International Brigade veteran recalled his comrades buying new ones before the battle of the Ebro in 1938 (MAA 498 p.44).
The Spanish CIvil War had a number of influences on military fashion, but oddly, the mono was not one.
The US Army did experiment with a one-piece jungle-fighting outfit during World War Two. Dysentery was quite common in such campaigns, so the one-piece was found to be “less than ideal” in such situations!
The Bottom Line
That brings me to a “fundamental” issue when selecting a coverall. Does it have a “bomb‑chute” or not? A number of outdoorsmen who have experimented with one‑piece outfits have failed to consider this feature!
Another common error seems to be attempting to use the pocket capacity for dense items such as water bottles and ammunition. Since coveralls are loose in cut, this often proves uncomfortable.
It occurred to me that a coverall or two might be a useful thing for an individual outdoorsman to have available, too.
Coveralls seem warm for their mass and bulk. This may be because you are trapping a single body of air that can freely circulate, rather than separate masses for the lower and upper body. Clothing riding up on your lower back is less of a problem. Coveralls can also be combined with other warm clothing, either over or under.
I suggest that for general use you buy uninsulated coveralls. It is easier to add more insulation under or over than sweat it out in milder conditions. There should be enough room to wear your coveralls over other garments.
With just a shirt and shorts beneath, a coverall should be comfortable in warmer weather.
Bug‑Out Outfits
In previous posts we have talked about the need to have a bug‑out outfit as well as a bug‑out bag. Something that you can don quickly and easily that will provide some protection from the elements and possibly help conceal you from hostile observation.
Many coveralls meet these criteria and will fit over whatever you might happen to be wearing at the time.
A good coverall usually costs less than a combat jacket. Some police riot coveralls include Goretex as well as being fire‑resistant.
If a coverall is a full‑time addition to your bug‑out kit, you can pack the pockets with useful low density gear: hats, gloves, fire kit, cordage, space blanket, compass, plastic mirror, whistle, earplugs, sun glasses and so forth.
If you are going hiking or hunting, a coverall can ride rolled up in your pack until the terrain gets rough or you are away from civilization.
Coveralls that lack a bomb‑hatch tend to be very reasonable in price, being mass produced by the thousands for painters and mechanics.
The main challenge may be finding a set in a suitable tactical colour. Army surplus outlets often have a selection, some of them being intended for tank, AFV and aircraft crewmen. Most examples are single colour, camouflage patterns in such garments being rarer.
Choice of coveralls “with bomb‑hatch” is narrower. Most of the examples I have seen have been tank- or AFV-coveralls.
My First Coverall
I am not a great fan of MTP, since it tends to blob‑out to a khaki‑drab monotone shape. On the other hand, at closer distances the pattern may make dirt or stains less obvious. I was also a little concerned the sand/beige‑coloured monotone AFV‑coveralls might be a little light for general use. I don't intend this garment as my primary camouflage, but khaki‑drab is probably the ideal monotone for British countryside.
What swung it was the MTP coveralls I was offered were cheaper than most alternatives, and were in flame-retardment material!
When the coverall arrived, I was pleasantly surprised that it was lighter in mass than I expected. I am used to military gear being on the heavy side! The cloth was actually quite soft and comfortable. I would swear it was a good quality poly/cotton, but the label says it is all aramids and other flame‑resistant stuff.
What did puzzle me was the lack of pockets. This example had only two pockets, located on the upper thighs. The examples I had been looking at definitely had chest pockets, among others.
From what I can make out, the British Army currently uses two types of AFV‑coverall.
One type (NSN 8415-99-226-0794) is currently for training only, made from poly/cotton, and of the same design as earlier monotone AFV-coveralls (NSN 8415-99-212-5330), with about a dozen pockets. The exact NATO stock number (NSN) will vary with garment size
The other type, COMBAT FR, MTP for CR2 (NSN: 8415-99-313-5415) is for combat use, made of flame‑retardant materials and of a newer design that has only two pockets!
Because of the camouflage pattern, seeing pocket details can be difficult in on-line photos. The combat coverall has no flaps on the thigh pockets. The training version does, and additional pockets on the chest, hips and lower leg. The older design has a waist drawcord (missing on my example), while the newer uses Velcro waist adjustment.
Pocket detail of the older design is easier to see on photos of the sand/beige‑coloured version.
Adding More Pockets
Now, I would rather have pockets and not need them than need them and not have them.
Luckily, I came across a reasonably priced damaged MTP training coverall. The coverall is too small for me, but was designed for someone of my height, so the pockets were be of the right size. Chest size was too small to fit me, but I could salvage the pockets and fit them to my flameproof coverall.
This makes my coverall slightly less flameproof, but I don't drive a tank or an F1 car, and will make an effort to avoid catching fire.
And so I spent a couple of weekends unpicking stitches and sewing pockets onto the newer coverall.
Buy the older pattern poly/cotton “training”coveralls and you can save yourself some sewing.
My coverall now has 15 pockets!
• I added a small internal pocket inside one hip pocket to hold my debit card. Also inside this pocket is a D‑ring I can hang my keys from. (The keys are mounted on a carabineer)
• Added to the left breast pocket is a loop of webbing a snap‑link can be mounted on. This folds away beneath the pen pocket flap when not needed.
The damaged and now pocketless training coverall provides me with a lot of cloth and a couple of zips and Velcro patches for other projects. I may use some of this cloth to reinforce the elbows and knee areas of my coverall. I plan to use some to add some sleeve pockets when the 12 cm zips I have ordered arrive. Armpit vent zips are another option I am considering.
Admittedly, I have not yet put the coverall to particularly challenging uses yet. I jump into it if I want to fetch something from the local shop, hence the debit card pocket and key‑hanger. I don't even need to take my dressing gown off!
It has been quite cold recently but the coverall has been comfortable with just a light hoodie thrown on over it.
Inevitably, when I get back from the shops I often lounge about in the coveralls, and have been quite comfortable without needing the heating on.
Pockets Galore
The modified coverall now has the following pocket arrangement, in addition to those already mentioned:
• Two large chest pockets, with “napoleon” zip-fastened access. Mounted on the outside of each of these is a Velcro-flapped pocket designed to hold four pen or pencil‑like objects.
• Two roomy patch hip pockets, with slanted zip-closure. Zipped pocket closures are a feature many expensive combat and outdoor trousers often lack!
• Two Velcro‑flapped thigh cargo pockets. On the outside of each is a pocket designed to hold and allow the use of a notepad when seated. These are rather like those found on flight suits, but have a sideways opening panel to hide the notepad when not in use. The notepad inserts from one side.
I sewed the thigh pockets to the upper surface of the existing thigh-top pockets the coverall had. These latter pockets are roomy, bellowed and have a side‑zip, allowing them to be accessed when seated.
• There are also two roomy calf‑level cargo pockets. These are probably best used for low density items such as cordage, emergency toilet paper in a ziplock, and a space‑blanket. If I have to use bowyangs with my coverall, I may experiment with passing them under the flap of the calf pockets. Calf pockets are a logical place to store bowyangs.
Adding pockets to a coverall proved to be a relatively simple task. Despite the different material, mine were a near perfect match. It doesn't really matter if the cloth you are using is not an exact match. Variations in hue and shade will add to the disruptive effect.
Zips and Handles
The main zip of the coverall is two-way, opening at each end. This zips up all the way to the points of the collar, rather like a Norwegian Army shirt. The left side is thoughtfully provided with a flap of material that prevents the zip teeth contacting your neck or cheek when the collar is worn open. The older version lacks this flap, but it is easily added.
Decades past, I read a book or comedy skit where a character claims fly zippers were mounted the wrong way, and should pull up to open. The coverall zipper does pull up to open, and that character is actually right! It is much easier to operate such a zipper one‑handed!
And a few days ago I came across some rain pants I brought in British Columbia (where they know about rain!). The zips on the side pockets pull up to open! Something to think about if modifying gear.
A two‑way zip is handy for situations other than a call of nature. You can open the lower end more to access garments and pouches worn under the coveralls.
If you keep your trousers up with a rigger's belt, opening the zip from the bottom allows you to use this, combined with your carabineer keyring.
On the subject of calls of nature, both the training and the combat coverall have a J‑shaped zip at the rear, covered by a Velcro flap.
What appear to be shoulder straps are in fact grab handles. On the newer coverall, these are held down with Velcro so they are less likely to catch on projections within a vehicle or out in the field. A one‑piece garment and such handles allow a wounded or stunned man to be pulled up out of a damaged vehicle.
These handles could be used like shoulder straps to display rank, but would need a wrap‑around rank insignia rather than a slip‑over. Poppers are probably the best way to achieve this, although buttons, Velcro or hook and eye fastening are other options.
Both MTP coveralls have side vents that allow you to access the hip pockets of garments worn underneath. On both coveralls, the left is secured by Velcro and the right by a zipper. I have no idea why!
The right vent could be used to increase air circulation to the coverall interior. I suppose the rear zip could be used in this way too.
I have heard it claimed coveralls are often long in the body or short in the leg, but this example is actually a very good fit for me, and I am long‑legged.
Many old soldiers seem obsessed by the topic of blousing trouser legs. Doesn't matter that young soldiers have inadequate camouflage practice and their vehicles have no armour, rant about those trouser bottoms!
Many coveralls have elasticated ankles, so “problem” solved! If blousing is so essential, why don't combat trousers have the same? (Not really an issue with me, and I am an advocate of gaiters when available).
Many coveralls also have calf zips that allow you to put them on or remove them without removing boots. It also lets you roll up the legs, should there be a need.
Cons
Other than less than the expected number of pockets, my major complaint about the coverall is that the fly (flap of fabric over the main zip) and the baffle (draft excluder flap behind the zip) seem to be made the minimum width necessary. Someone doubtless worked out this would save so much cloth and so many pence per hundred coveralls made.
It would have been nice if the fly had been wide enough to allow popper fastening as an alternative in hot weather to using the main zip. I could always open the lower end of the zip, I suppose, provided there are no objections to me having my flies open!
The main zip and that of the right side vent have a tendency to catch on the fly or the baffle if you are not careful when zipping up. This may be due to the zips themselves, which have quite small teeth. The zips on the training coverall seem better in this respect, although the main zip on mine was the major incidence of damage.
The Velcro on many of the pockets is a potential source of noise, which means you may not wish to access those pockets in certain situations.
The Velcro pile on the sleeve cuff sometimes catches on a square of hook Velcro on the chest pocket, resulting in unintentional noise. Admittedly, this mainly occurs if the cuff has not been fully closed, so is more likely in hot weather. The square of hook holds the pen pocket flap open, so could be removed or covered by various means. Or construct a tape‑like strip of cloth that covers the exposed section of pile on the cuff.
Update
Zips arrived. I based the sleeve pockets on those often seen on many bomber jackets, with a vertical side zip. A five inch zip is a little small for this, even with my small hands, so I would suggest using six-inch.
The armpit zips have an opening less than five inches, but using a smaller zip might have been too fiddly. It is easier to shorten a longer zip.
Reasonably happy on how the sleeve pockets and armpit vent zips have turned out.
The grey zips are much less obvious than the flash photography makes them appear.
Coveralls are easily modified or customized. Some of the features described on this page may provide you with inspiration. If anyone is interested, I can provide details and measurements of the pockets I used.
Does a coverall have a place in your outdoor wardrobe? If you are not sure, it is within most of our means to experiment with one of the lower priced examples. It will probably prove useful for something, even if it is just doing the gardening or clearing out the garage.
Recently, I have been watching the “Rurouni Kenshin” series of movies. “Origins” was a little slow and melodramatic, but the main ones are great entertainment.
The lead character's gimmick is they use a sword with a sharpened back‑edge and a blunt main edge. He clubs enemies down with the main edge in an attempt to not take any more lives.
This reminded me of a passage in Don Cunningham's book “Taiho‑Jutsu”:
“For such situations, the machi-kata dōshin [samurai police official] carried a special long jutte, usually with a tapered six- or eight-sided shaft, as their primary weapon and arresting tool. They also only wore one short sword in their obi. The dōshin either grinded the ha (sharpened edge) off their wakizashi or carried special wakizashi forged with extra-thick dull blades. The short blunted wakizashi were considered more suitable for making arrests, especially within confined spaces. A resisting suspect could easily be stunned and immobilized with a strike from such a blade without risking a potentially lethal injury as with a sharpened sword.”
I will admit to being sceptical as to whether anyone ever ground the edge off a perfectly good and valuable wakizashi for such purposes. It seems easier and more effective to fit a suitable strip or billet of iron with sword furnishings.
That such blunted weapons were carried seems possible, since the feudal police seemed to have taken considerable lengths to take their suspect alive.
Why did the police officer have a blunted sword when he already had a jutte? Possibly to show that he had samurai rank. Why did he carry a wakizashi rather than a daishō? The following passages should shed some light on that.
Most readers will know that the samurai wore two swords, known as a “daishō”. It would become enshirned in law that a samurai on official business was required to wear two swords.
Daishō means “big and little” and reflects that the two swords were of differing lengths.
In earlier periods, the daishō might be a tachi and a long tanto. By the Edo period, both weapons were katana, which were worn edge up.
In modern usage “katana” is a term usually used to distinguish the long sword. Historically, the term could be used for either of the daishō, and to distinguish them the terms “uchi‑katana/uchigatana” were used for the longer sword (“daitō”) and “chisa‑katana/chisagatana”, ko‑dachi, kogusoku, ko‑katana, wakizashi or shotō for the shorter.
To avoid confusion, I will reserve the term katana for the longer sword, as is common modern practice.
Why Did The Samurai Carry Two Swords?
Part of the reason was probably symbolic. Two swords was the symbol of a samurai and if you were a samurai, you therefore wore two swords.
Practical explanations for the practice are less satisfying. The short sword was a backup for it the long sword was lost in battle. The short sword was for removing the heads of slain opponents. The short sword was for seppuku.
Other than length, the short and long swords are effectively the same in design. Why a short sword would be better at cutting heads from corpses than a longer variant flies in the face of basic physics. Taking heads was also a task attributed to the kubikiri/kubigiri, which is of a very different form to either of the daishō.
Was the wakizashi carried for seppuku? Most samurai movies seem to use the katana with a cloth or paper wrapped around the blade for grip.
George Cameron Stone's book, “A Glossary of the Construction, Decoration, and Use of Arms and Armor in All Countries and in All Times: Together with Some Closely Related Subjects” (p.658) claims the wakizashi was used for seppuku, but its use had declined in favour of a dagger in more recent periods.
Some samurai fought with a blade in each hand, and utilized their wakizashi in their left. This seems to have been an uncommon practice, however.
Some writers have dismissed the wakizashi as redundant and superfluous. And yet, the wakizashi or weapons like it were widely carried for at least six hundred years!
Safety in the Home
The samurai did not always wear both swords. Etiquette required the long sword not be worn indoors when visiting a superior or another samurai. Wearing the long sword in such a situation was disrespectful, if not outright suspicious and threatening.
In his own home, the long sword might be stored in a rack, or entrusted to a servant for cleaning and sharpening.
When indoors, the samurai only wore his wakizashi, or possibly just a tanto. If the wakizashi was not worn thrust through his sash, it would be within easy reach, such as beside him as he knelt on the floor.
If a samurai was attacked in his home, the wakizashi or tanto would be the weapon most likely to be available.
The wakizash/tanto were the weapons the samurai would have to rely on when he was in most need of a defensive weapon. Not surprisingly, there was a considerable body of training on how to use a wakizashi.
Indoor combat might be at close ranges, so the use of the wakizashi and other weapons was studied in conjunction with grappling techniques. Techniques that could be used while kneeling or seated were also studied. Some techniques involved hindering an attacker drawing their weapon, or taking their weapon and/or using it against them.
For example, as a kneeling attacker attempts to draw a wakizashi, a hand on his wrist may prevent him completing the action. The wrist hold and the other hand are used to unbalance and throw the attacker forward, possibly falling on the exposed edge of his own blade.
If he could afford it, a samurai would see that both swords of a daishō would have matching fittings and decoration. Ideally both were made by the same craftsmen. Stone suggests that the wakizashi would often be the more ornately decorated, since this is the sword that would be worn during indoor social occasions.
The wakizashi was also the one of the pair likely to mount accessories and implements such as the kogai and kozuka. This made these items available when the long sword was not being worn. This approach may have also prevented the possibility of the kogai and kozuka interfering with the draw of the long sword. Kogai and kozuka were sometimes used as expedient bo-shuriken, so having them with the wakizashi might have given the wearer another option if attacked indoors.
Something for the Ladies
Samurai women were expected to fight in defence of their homes and persons. The naginata was the usual weapon of choice, but instruction was given in the use of the wakizashi and dagger and include the kusarigama.
The naginata and kusarigama are relatively long‑ranged weapons. If an enemy got too close, or combat was indoors, the wakizashi or dagger were a useful alternative.
For Lord and Commoner
Only the samurai were permitted to wear the daishō. In addition, commoners (non‑samurai) were not allowed to have long swords.
What is not so commonly know is that commoners were permitted to have short swords.
Cunningham notes (p.22):
“While katana (long swords) were prohibited, chōnin [townspeople] and nōmin [farmers] were still allowed to carry tanto (daggers) as well as short swords known as wakizashi. For many years after the end of the Japanese civil wars, though, commoners did not always abide by the laws prohibiting swords. One reason was that the actual measurements used to define katana, wakizashi, and tanto were confusing and often inconsistently applied in many of these laws. Thus during the early part of the Edo period (early1600s), some chōnin, and especially yakuza, or criminal gang members, openly carried long wakizashi that were virtually equivalent to prohibited katana.”
It was not until 1645 that a law defined the maximum blade length of katana as 2 shaku 8 or 9 sun (33.5 to 34.5‑inches/85.5 to 87.5 cm) and wakizashi as 1 shaku 8 or 9 sun (21.5 to 22.5‑inches/55.5 to 57.5 cm). [figures and conversions from Cunningham]
In 1668, chōnin were restricted to carrying ko‑wakizashi of blade no longer than 1 shaku 5 sun (approximately 17.5 inches or 45.5 cm) without official permission. There was no restriction on a commoner wearing a ko‑wakizashi, but it was unlikely for the weapon to be worn when on day‑to‑day business.
Later amendments permitted the carrying of “full‑sized” wakizashi under certain circumstances, such as travel and fire.
A travelling commoner was allowed to carry a wakizashi as a defence against robbers.
Fires were common in feudal Japanese towns. Commoners forced from their homes by the threat of fire were permitted to carry wakizashi to protect what other possessions they had managed to carry with them.
Serge Moll, in “Classical Weaponry of Japan” (p.19) notes an alternate name for a short sword was “dochuzashi”: “Dochu literally means “while on the street” or “while on a journey,” so one could describe a dochuzashi as a short sword inserted in the sash while one was traveling.”
The characters commonly used to spell wakizashi may be read as meaning “insert at the side”. The practice of wearing the daishō was termed “nihonzashi” (“insert two (swords)”)
Moll also gives a definition of ko‑wakizashi as between 30 and 40 cm, and that longer ones (up to 60 centimetres) were called Owakizashi (“big wakizashi”)
Doubtless, a commoner would avail themselves of their wakizashi or ko‑wakizashi in the event of a burglary or home invasion.
The short swords owned by commoners were probably more utilitarian and lower priced than that owned by a prosperous samurai. For every famed Japanese swordsmith, there were probably scores of blacksmiths turning out commoners' blades.
What is in a Name?
Time I addressed the topic of terminology.
Some Wikipedia articles and other websites use very narrow definitions of some of the terms that have been used in this article. A wakazashi is this! A kodachi is a quite different thing and is this! And so on. There is little credible precedent for these narrow and exact definitions, and they may prove counterproductive to your actual understanding.
We are talking a considerable period of history, large geographical area, varying levels of education and often no centralized system of standardization.
The distinction between tantos, kodachi, wakizashi, shotō etc are in practice less distinct and more fuzzy than is represented by some modern writers. Often these terms were used interchangeably or with a degree of overlap.
Moll: “The meaning of the terms “long sword” and “short sword” changed over the centuries. Nowadays, all swords that are shorter than two shaku (approximately 60 centimeters)! but longer than one shaku (approximately 30 centimeters) are called shotō, or “short swords.””
This definition nicely encompasses all wakizashi, but also includes some tantos and other Japanese knives. Moll also notes some ryu define their kogusoku/kodachi techniques as being for tanto and short swords of “up to 36 cm length”. Other ryu consider kogusoku/kodachijutsu to be methods for tanto/knife and/or short sword and it is quite probable in some cases the latter refers to wakizashi.
Some of you will know the “‑to” part of the term tanto actually designates that the hilt has a sword‑type guard. You will see some sources refer to tanto as “short swords” or “swords”. Other identical forms and sizes of Japanese blade, fitted to different varieties of hilt, are never called a sword. This is confusing to a reader not aware of the word's origin, when the weapon is clearly a knife or dagger in form and function.
“Dagger” itself is a problematic term, since it has been misappropriated and misused by the legal systems of certain American states, creating the false impression that the term only applies to double‑edged weapons.
Cameron Stone observes the term seems to be applied to any variety of knife, save a clasp knife. (p.198)
Wakizashi in Combat
We have seen the wakizashi/shotō was used by samurai and commoner, and by both men and women. How effective a weapon is it?
If you have ever handled a real, full‑length sword, be it Japanese or otherwise, you may have been surprised. Length and mass add up to considerable inertia. Keeping such a sword under control needs strength, conditioning and considerable practise.
Fencing swords are a possible exception to the above statement, although it is debatable if those used as sporting equipment should be considered real swords.
A shorter blade, such as a wakizashi or machete, is another thing entirely. They are light and agile.
Moll (p.21) comments that the greater speed of a wakizashi made to more effective than a longer sword against fast attacks by longer weapons such as spear thrusts.
Long weapons such as spears and naginata, tend to have an optimum range within which they are most effective. If one can close within this distance, the advantage of the longer weapon is often lost and the user may be at a considerable disadvantage.
The speed of a wakizashi improved the chances of parrying an initial attack so that distance could be closed. The wakizashi's greater manoeuvrability was an advantage when distance was reduced, since it was easier to apply either the edge or point than with a longer and heavier sword.
If using a long weapon and an enemy attempted to close distance, the wakizashi was also a good choice for a backup weapon to deal with close range threats.
One character in Rurouni Kenshin, Aoshi, only uses a kodachi for its superior defensive abilities.
The combination of a long weapon and a shorter one may be seen in some other cultures. The German landsknecht, with his pike, halberd or zweihander wore a short sword called a katzbalger (“cabbage cutter”). The huntsman with a boar spear often wore a long wood knife or hanger.
The wakizashi is short enough to be used for the close‑range fighting techniques of kogusoku/kodachijutsu but long enough to use the daitō techniques taught in kenjutsu.
The lighter weight and reduced inertia made a wakizashi more responsive and effective than a longer sword if used in one hand. Its ability to be used one‑handed and shorter length allowed use of the wakizashi to be combined with strikes and grappling attacks from the other hand. The use of a wakizashi could be combined with weapons wielded in the other hand, such as a jutte, tessen (fan), tanto or manrikigusari.
The wakizashi was also a more practical weapon to use in one's weaker hand. Nitoken was often practiced with the wakizashi in the left hand and a katana in the right (all Japanese swordsmen were taught to fight with their right hand as primary). Figure 1-8 of Moll's book shows nitoken using a kodachi in each hand, an interesting variation with considerable potential, particularly if used with the principles of long har chuan.
Being shorter and lighter, a wakizashi may be drawn in less time than a longer sword. I suspect the wakizashi will often taste blood while the katana is still leaving the station. I have come across references to Japanese bodyguards wearing short blades in full‑length sheaths as a deception.
As we have seen, the wakizashi might be used for combat indoors, and seems well suited for the purpose. Using a katana indoors may not have been as practical and elegant as the movies make it seem. A traditional Japanese ceiling was only 220 to 240 cm high, which must have hindered some of the classic kenjutsu moves. How many samurai embedded their katana in a rafter and fell victim to a wakizashi, one wonders. Not all the walls were paper, so narrow corridors may also have hindered a swordsman too.
One begins to appreciate why the ninja favoured short blades for their ninjato.
This is doubtless the reason why the machi-kata dōshin described above carried a blunted wakizashi and not a katana. There was a good chance he might have to fight indoors, and a wakizashi‑length weapon was superior to a katana in such locations.
This more in‑depth look at the wakizashi has made me think about other warriors that used short weapons, such as the Egyptian with his kopesh, and the Roman with his gladius. The shorter gladius was obviously handier during the close press of massed combat. Did it also over an advantage parrying against spears and longer weapons? Shaka invented the short ilkwa, giving the Zulus a significant advantage over most of their enemies.
I have liked wakizashis from the first time I handled one. The above research and analysis shows my initial gut reaction was not off target.
I have also learnt they have a much broader and significant history than is generally known. It was an important weapon for commoner and noble alike.
The wakizashi is overshadowed by the katana. Short swords don't look as good up on the screen as long ones. The wakizashi is probably a much more practical choice, particularly those of use who do not have the necessary time needed to master the inertia of longer weapons.
I have a replica wakizashi that is of particular interest. It has a 20 inch blade and an eight and a half inch grip.
Not particularly long‑bladed for a wakizashi, but long enough for most tasks I might ask of it. It is longer than many machetes, for example. It only looks short if you put it alongside a full‑length katana. The shorter weapon handles much better.
The eight and a half inch handle is a nice feature. This is longer than is found on some wakizashi, and gives a shade more leverage when using two‑handed techniques.
The Japanese blade shape is widely recognized as an efficient design. There is good reason it changed little for hundreds of years. Slightly curved for a more effective cutting action, straight enough to allow the point to easily be brought into action.
I have a modernized “ninjato” of similar dimensions. Grip a shade longer, blade a little shorter. People who have handled this sword react very positively to it, often surprising themselves. It just feels right!
I have a better quality wakizashi, longer blade and shorter grip. The oval section of the handle is less sharp and more comfortable, but it is the 20+8 that feels right.
A typical single doorway is 28 inches wide. Unless, for some bizarre reason I hold my wakizashi sideways and horizontal, a doorway is little obstruction to me when holding a wakizashi.
If, by some freak of chance that I ever have enough money to have a sword custom made for me, I think I might actually opt for a 20 inch wakizashi with an eight and a half inch grip. It is probably a far more practical and versatile option than a longer weapon.
Many years ago, this blog looked at Marc MacYoung’s suggestion on using a sword for home defence. To the comments already made there, I will add that you pay special attention to length and inertia. The reasons for my saying so should be obvious by now.
In some parts of the world, pointless local laws may prevent you owning a katana unless you are rich enough to buy antiques. Some of these laws permit a blade of 50 cm or less, which ironically may result in you getting a more effective weapon!
Many years ago, I read an article where the author noted that if you did want to own a genuine antique Japanese blade, buying a wakizashi might be the better option, since prices were often more bearable.
Wakizashis are not your only choice, of course. Many of the benefits already described also apply to machetes,barongs, kindjal, goloks, hangers, falchion and kukris, to name just a few.
To finish, a rather nice video:
There are several things to note here.
Note how the wakizashi attacks and defences come from a low position. This will be familiar to some of you from the baton, entrenching tool and machete techniques in “Crash Combat”. This is much more useful than waving a weapon around over your head.
Note the wooden wakizashi is gripped a short distance below the guard, protecting the hand from any forceful blows the guard may take.
Also, note how the wakizashi allows one hand to shield the eyes against the sun while the polished surface of the blade would be used to reflect sunlight back at the attacker's eyes.
Recently I was recently reading a science fiction novel. The crew of a spaceship are without power, and have to warn another ship to keep its distance. They can be seen at a window. They resort of pantomiming “pushing‑away” actions. Using Morse code does not seem to occur to them.
How do you use Morse code without electricity? There are ways to do this, and they are possibly not so well known as some other methods.
Manual Morse
The first method is taken from this useful website. It has a passing resemblance to semaphore, but uses standard Morse code, which is far more likely to be known by the sender or viewer.
I call this system “Manual Morse”.
You do not need to have flags to use this system. You can use the motions if your hands are empty. Holding a scarf, bandana or branch in each hand may be used to make your motions more visible. Coloured stuffsacks may be stretched over a flexible stick bent into a racket-shape.
Depending on the background, taking off dark‑coloured gloves or wearing lighter gloves may aid empty‑handed signalling.
Flag Morse
Back when I was blogging about American Civil War outfits, I read the book “Hardtack and Coffee”. A fascinating book, which finished with a chapter on the pre‑Morse signalling system used during the war.
This system, called “Wigwag” in some other sources, used a single flag (or disc).
A modern version of a signal disc showing contrasting alternate sides.
While less compact, a disc was easier to handle and could be painted with different colours on each side. The side offering best contrast with the background would be used.
This system may also be used with Morse code, and may be found still being referred to as “wigwag” or “wig‑wag”.
I prefer to call it “Flag Morse”.
The convention here is a little different to that used with two‑flags. Flag up is “ready” or “word begins” rather than “dot”.
“Dot” (Two) is starboard: to the right of the signaller, to the left of the observer. Easily remembered because we read from left to right in English.
“Dash” (One) is port, as in “a dash of port”.
No flag? You can use the single pole/Flag Morse method with a rifle, a hiking pole or a branch. Add a scarf to the end or anything else that makes your signal more visible.
You can also clasp your hands together as though you are about to dive and point your straightened arms up, down, left and right. Point them straight ahead between dots and dashes.
That said, my personal feeling is that the two-flag/Manual Morse method is better for empty handed signalling. The shapes made are more distinct and wider or taller.
In these days of electronic warfare and eavesdropping, such simple visual methods of signalling still have a place.
Establish a shorthand of one, two and three letter signals.
Non‑Electric Morse at Night
If you want to signal at night, you may flash a light. If your light cannot easily be turned on or off, you may be able to cover it with your hand, hat, map or similar.
This is not so easy if you are using a light source such as a burning brand. When viewed at a distance at night, a single light source can appear to move about even when it is not moving. “Hardtack and Coffee” tells us:
“The services of the Signal Corps were just as needful and valuable by night as in daylight; but, as the flags could not then talk understandingly, Talking Torches were substituted for them. As a “point of reference” was needful, by which to interpret the torch signals made, the flagman lighted a “foot torch,” at which he stood firmly while he signalled with the “flying torch.” This latter was attached to a staff of the same length as the flagstaff, in fact, usually the flagstaff itself. These torches were of copper, and filled with turpentine. At the end of a message the flying torch was extinguished.”
Our spacemen in the book could have used a non‑electric method of Morse signalling. Perhaps a piece of material with a different symbol and/or colour drawn on each side.
Later in the book the natives of a planet signal using a pivoted disc painted white on one side, black on the other. It is commented that this is the local equivalent to Morse.
Morse by Sound
Morse signalling with sound was not an option for the spacers.
Often in movies, someone will bang on pipes and a character will identify it as “Morse code”. Morse needs two distinct signals, so most Morse letters cannot be transmitted with a single note such as a tap on a pipe. The code you need for this is POW tap code.
One of the few messages you can transmit with a single note is SOS (…—…). With a signal whistle, you make three short blasts, three longer blasts, then three more short, no pauses between the letters.
If you are drumming against a tree trunk or piece of wreckage, you cannot do this. Instead you vary the interval between the notes: three quick notes, three notes with a longer pause after each, then three more quick.
I have recently updated my blog on learning Morse with some new reference and some new tricks to help you remember certain letters.