Roll back to the start of this century, and you would have found me practising cookery in a mountain hut in the middle of Iceland.
I had found myself part of an impromptu group hiking over the mountains.
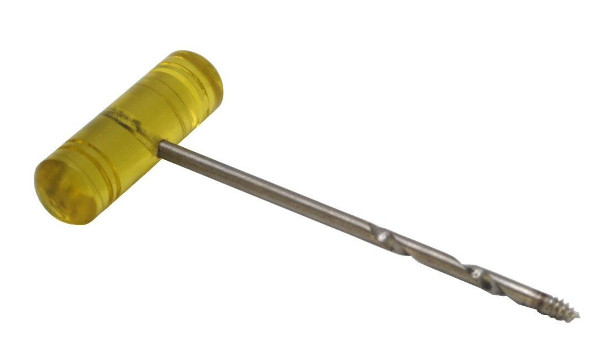
While most of my companions tucked into their freeze‑dried rations, I busied myself cooking my dinner in my Kephart‑inspired cook kit.
I do not remember exactly what I was cooking, but it was based around some rice. Among the foodstuffs I carried was included rice, flour and “Alpen” (a brand of muesli).
Cooking a meal from base ingredients was considered to be somewhat eccentric by my fellow hikers. It was, however, admitted that my meal looked far more appetising than theirs! I was probably carrying less weight of food too.
The following day, a beautiful German girl scrutinized by every move with great interest as I improvised an Alpen bannock, cooked in my home‑made folding handled frying pan.
Carrying flour and knowing how to make use of it on the trail I can attribute directly to my acquisition of “Jack‑Knife Cookery” by James Austin Wilder.
Not to be confused with an inferior book of similar title by the “Woodsman’s Thong” (!)
The real Jack‑Knife Cookery book was first published in 1929, but has undergone several reprints. My copy dates from the twelfth printing from 1965.
Written for boy scouts, this book begins by proposing a scenario where you have only flour, raw meat and a jack-knife. How would you go about feeding yourself?
The reader is then introduced on how to cook “twister” and “kabobs”, both of which may be cooked on green sticks over a “plug‑hat hole” fire.
From here, Wilder introduces the reader to cooking dampers and other foods, cooking on or in coals, “Imu” cooking, how to cook vegetables without a pot, mixing without a bowl, how to cook in a billy, making stews and many other useful subjects.
All of this is illustrated with Wilder’s own drawings and anecdotes/“yarns”, so is clear and highly readable.
Having fed the inner (young) man and grabbed the attention of the reader, Wilder moves on to discuss camping and related topics.
This is 1920s’ style, of course, so of interest to anyone who understands that they may have to survive outdoors without Goretex, GPS and freeze‑dried rations.
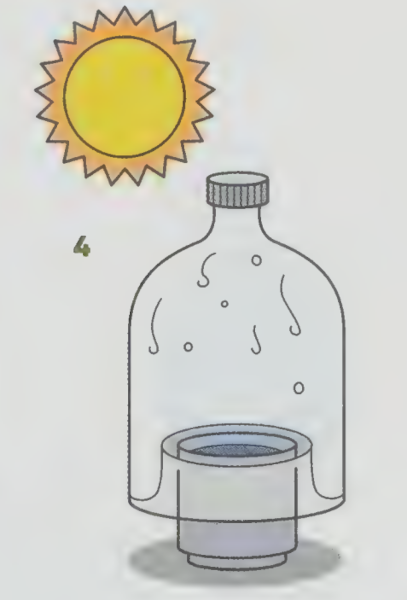
The third part of the book logically drifts into survival and emergency advice, peppering it with additional recipes and cooking techniques, including fun stuff such as boiling water in a glass bottle.
The section on friction methods for starting fires is entertaining, if not as technical as that in “Northern Bushcraft”. This section includes a story about using a fire‑plow/fire‑plough, a technique many survival manuals do not bother to include. There is also a “sawing” friction method using sections of bamboo which I do not recall often seeing in other works.
This book has been a great influence on many young outdoorsmen, myself included.
To this day, I may sometimes be found in the kitchen mixing flour and sultanas together when I feel peckish.
Jack‑Knife Cookery is a great book. I treasure my copy, which sits in pride of place on my shelves next to “Camping and Woodcraft”. I thoroughly recommend adding a copy to your survival library.
Now the bad news. I have been unable to locate an on‑line or Kindle copy of this book. The only search engine hits I get are dodgy sites with bad English that want your credit card details first, so steer well clear of those.
Printed copies may be found, although on‑line prices tend to be high. I have seen copies offered for as little as $30, so shop around before you part with hard‑earned cash.
If ever a book should be preserved on Internet Archive, it should be this one! If anyone reading can make that happen, make it so.
Trivia: I share my birthday with John Wayne. Some years, a TV channel will schedule a day of his films. Good, unpretentious entertainment! That is me sorted for the day!
I once watched something where a character declares “I try not to have high expectations. I am, therefore, seldom disappointed. Occasionally, however, I am pleasantly surprised!”
That is not a bad philosophy, and I was reminded of this when I began to read “The Official John Wayne Handy Book of Bushcraft”.
This could be really bad, have hidden pearls, or just be a bit of a giggle.
Firstly, I will answer a question I usually save until the end of these reviews. This book should NOT be used as a primary survival guide. Some fields are omitted, others lack adequate detail.
Some of the content was useful. There is a section on dealing with a riptide, which is not a topic I have seen in many manuals,
Each section is only a few pages long, so I expect much of this content was originally an article in “The Official John Wayne Collector's Edition” magazine.
Many of the sections only deal with a single topic or subject, such as a single type of knot or a particular type of campfire. That works well for certain topics and is a presentation style I may experiment with.
In other places, the treatment of the topic is rather brief, and in a few places additional illustrations would have been useful. The latter is odd, since in general the book is quite well illustrated, both with drawings supporting the text and photos from Wayne’s films.
Tools
The book starts with a section on how to make a variety of tools using primitive means. No mention is made of the risk of silicosis from stone knapping. Improvise a nose and mouth covering when making stone tools. Eye protection, if you have it, is also prudent unless you are a big Rooster Cogburn fan.
Several places in the text you are told to hit the back of an axe or knife blade with a stick or stone. Do not use a stone! The technique is called “batoning” for a good reason.
If you made yourself a stone knife as suggested at the start of the book, hitting it with another stone will waste hours of your careful work!
The section on making a whistle was disappointing. Acorn cups may be quite hard to find in certain seasons and regions.
The section on making a bow shows the first finger hooked over the top of the arrow, which must result in considerable friction.
Correctly, the book advises that hunting with a sling requires a vast quantity of practice. Incorrectly, it says the weapon is also called a “slingshot”. [Wikipedia also gets this wrong!] Sling and slingshot are quite different weapons using quite different principles.
Knots
The chapter on knots deals with one knot per section.
In some of these sections more information on the application of such knots might have been useful.
For example, the Alpine Butterfly knot is covered, but no mention of the quick and handy way this may be tied.
The section on the half hitch actually shows two half hitches in the illustration.
Food and Water
The chapter on food and water mentions water tapping from trees, which some survival manuals neglect.
The edibility test is described in detail, but no mention is made of prioritising the test for foods that are most abundant in the area.
There are sections on line and rod fishing and fish trapping, but no mention of night/trot lines. The latter section could have used some illustrations of various fish traps.
There is a section on “knife hunting” with a caution on how dangerous it will be and the high likelihood of injury.
Use the knife to cut a stick and make a spear. If in terrain where there are no sticks, you are unlikely to get close enough to use a knife, anyway.
Fire
The chapter on fire I thought was quite good. Some fire‑lighting techniques not often covered, with some useful illustrations.
Some discussion of various types of campfire. Uses for charcoal, and emphasis on properly extinguishing your fire.
Wet rocks in a fire may explode into fragments, not “shrapnel”, which is a different thing.
There is a section on using a Mylar space blanket as a reflector for your fire. This is a legitimate application, but perhaps some mention should have been made that a higher priority use for such an item is waterproofing your shelter roof or wrapping yourself.
Shelter
The chapter on shelters was much less satisfactory. It starts with a description on how to cut down a tree because it may be where you want to make a camp! Camp somewhere else, yahoo!
You are told to hang a hammock using a figure eight knot, but no real explanation nor illustration.
Building a raised bed suggests using logs for the short side. Two long logs with shorter sticks between them seems far more practical.
There is a description on how to make a five foot diameter teepee. Not sure what for. I could not lay down in such a space, let alone someone John Wayne’s height!
One of the illustrations incorporates ideas such as using natural windbreaks such as rocks, but seems to show the bed laid perpendicular to the fire.
There is a lot about this chapter I feel could be improved.
One error that really has me scratching my head is that in several sections the authors describe shelters made with “poncho liners” when they clearly mean ponchos.
You would think a retired Green Beret and a SERE course graduate would know the difference.
You would think that the editorial staff of the magazine might have picked this error up.
You would think some of the readers of the magazine might have written in about this obvious error the first time it appeared.
To confuse a liner with a more external layer is itself a really bizarre mistake for native English speakers to make!
“Make a map” could have mentioned that birch bark or similar and charcoal could be used to make a portable map.
Another objectionable section is the recommendation to shoot any snakes on sight!
You should not kill anything unless you have a legitimate reason. This saves ammunition, if nothing else.
As a later section notes, most snakes will not bother you if you leave them alone. If there is a danger of stepping on a snake, carry and use a walking staff.
At the end of the book is an advert for a survival training school where both authors work. The various points raised above do not really form a recommendation.
After finishing this book, I started browsing “The Official John Wayne Handy Book for Men”. This begins with some bushcraft information. I found this description of making a bow and arrows better written. Some of the other articles on the same topics are also superior.
It mucks up the illustration of how to identify the North Star, however.
The other day, I went looking for an old survival book.
The search engine provided me with hundreds of titles just within the bushcraft/wilderness field alone.
Back in the 1980s, the choice seemed much more limited. Of course, with my memory I may be forgetting quite a few titles from then!
The main work in the field was what was then FM21-76 and related publications.
There were a few books from other official sources, such as the Air Ministry pamphlets: “Arctic Survival”, “Desert Survival”, “Jungle Survival” and “Sea Survival”. Those are still well worth a read, incidentally.
“Combat Survival and Evasion” was apparently compiled from the course notes of some gentlemen in Hereford. It is an interesting, if a little eccentric, read which I may discuss in a later blog.
I owned copies of “Can You Survive” by Robert DePugh, “Jack Knife Cookery” by James Austin Wilder and “The Art of Survival” by Cord Christian Troebst. Not strictly survival manuals, but all interesting and all containing some useful information.
“The SAS Survival Handbook” by John “Lofty” Wiseman was the new kid on the block, and had already established itself as one of the go-to books on the subject.
The “Survival Handbook”/“The Book of Survival” by Anthony Greenback was a little older, but did not seem to get as much attention as some other works. A shame, since it remains an excellent book.
Admittedly, my memory often fails me these days, but the only other manual I can recall from that time is “No Need to Die” by Eddie McGee. This was actually the book I had been searching for, although naturally I could not recall the author nor title until I found it.
Back in those days, this had been one of the few survival books my local library had.
Personally, I tend to think of this book as more of a discourse than a guide. Some topics are covered in great detail, while other fields, less so.
For example, there is some discussion of direction finding using plants and other means, but very little instruction in navigation as a broader topic.
On the other hand, there are large sections on tracking, trapping and fishing. These are very good, and it will be a very rare reader that does not learn something new.
There is a certain, very British eccentricity to the book. It is written in an informal, chatty style. There are numerous cartoons and sketches by the author, some of which detail ideas only touched on in the main text.
Reading it once again after several decades, one of the sections I now find interesting me is that on the use of fishing skiffs and fishing with gourds/balloons/condoms/plastic bags.
Pine bark as insect repellent is worth knowing too. (Some other tree barks, such as birch and cedar may also be suitable, as might other parts of the pine tree)
“The Tepee Fire: This method is probably the most common one used all over the world. Simple to light, providing there are plenty of dry materials available. However, no matter how simple or practical it may be, this method will not work on snow or very wet ground. All fires, no matter which type, should always be built on some form of a platform. [My emphasis] Because this method has no controlled fire surrounds it quickly consumes the fuels. More forest fires are started by this method than any other. Often the lazy campers just kick the fire out and move out leaving the fire to smoulder and relight.”
I would not suggest “No Need to Die” as a sole or first book someone should read on survival. See Survival Library Chapter One for my recommendations in this regard.
“No Need to Die” is certainly a book worth reading once you have a grounding in the basics. You are bound to learn a few things.
McGee was later to write “Eddie McGee's Complete Book Of Survival”. I hope to find time to read and review this in the near future.
One story from “No Need to Die” sticks with me (p.178):
“I remember once on a long desert walk in the Oman, while serving with the Sultan’s forces, making my way across to a known water well. I knew that the arabs guarded their water hole tenaciously but when I arrived at the well I did not expect to find that each arab, in fact, carried his own water collection skin, so having found the water well and removed the stone covering I was dumbfounded to find the water over twenty feet down and the hole about two feet in diameter. I had no bucket, only my water bottle and no means of lowering it down by rope and it was certainly too dangerous for me to climb down, so I sat a little and thought. I removed my survival bag from my belt, took off my vest, fastened my fishing line to it and lowered this to the water. In a couple of minutes I had not only filled my container, I’d also stepped back and had a good strip wash and removed some of the grime and salt from my body. Later I made a cup of tea, went to sleep, had a good rest and moved off the next morning feeling on top of the world and re-supplied with water.”
As luck would have it, the same day I read the above passage, I came across a forum where some members were glibly challenging if anyone’s life had ever been saved by a survival fishing kit?
Right here was an example of how a component of a fishing kit (and a vest!) had potentially saved someone’s life, even though they were in a desert and probably miles from the nearest stream.
With my current situation, lifestyle and location, the chances of myself needing to fish or trap to feed myself are remote. Thus, I had been tardy getting around adding any fishing or trapping components to my skin-level EDC.
Reading the above story, I vowed to add some fishing line to my EDC pouch. A couple of packets of hooks on nylon couldn’t hurt either. Better to have them and never use them…
One of the reasons for this is that I have been concentrating on the fourth (and final) edition of Crash Combat. This has progressed quite nicely and is available now in both print and epub format. With lots of new techniques and concepts added, the fourth edition is 50% larger than the original edition.
The business world abounds will all sorts of management strategies, methods and philosophies. Some seem to be well meaning, while others have a whiff of snake oil or butt-smoke about them.
Such systems seem popular with certain companies. Sometimes they are a way to avoid addressing genuine problems, and if things go wrong, “blame the consultant”.
Many of us have managers, or manage other people. A survival situation, whether it is an emergency or long-term, may involve organizing individuals to work together. If nothing else, this book will be useful in that it allows you to “know your enemy”
Unlike most management schemes, “First, Break All The Rules.” is based on actual empirical evidence. The well-known company Gallup interviewed over a million employees and 80 thousand managers, good, bad and mediocre.
Among other things, the book nicely explains why so many management strategies don’t actually work. They are based on false premises.
For example, a person’s abilities are based on their skills, knowledge and talents. Skills and knowledge may be improved, and may contribute to the use of a talent. Talents, however, are inherent. They may be hidden, may be discovered, may be developed, but they cannot be created!
If someone does not have a talent in a particular area, no amount of training, threats, bribes, diversity awareness, personal development reviews or bullying can change this.
Thus, a good manager will allow for this and organize to best utilize abilities and compensate for lacks thereof. They utilize an individual's strengths and talents and compensate for weaknesses and nontalents.
“People don’t change that much.
Don't waste time trying to put in what was left out.
Try to draw out what was left in.
That is hard enough.”
For example:
“Jim K., a full bird colonel in the army—an organization that might be forgiven for emphasizing flexibility and camaraderie over individual excellence—gives this description of team building:
'When I first assemble the platoon I ask each person to tell me what activities he is mostly drawn to. One will say sharpshooting. One will say radio. One will say explosives. And so on. I'll go around the whole group, taking notes. Then, when I build each squad, I try to assign each person to the role he said he was drawn to. Obviously you won't get a perfect match. And obviously every soldier will be required to learn every role on the platoon—we might lose a man in battle, and every soldier must be able to step in. But you've got to start by assigning the right duties to the right soldier. If you get that wrong, your platoon will falter in combat.'
Whereas conventional wisdom views individual specialization as the antithesis of teamwork, great managers see it as the founding principle.”
In a short blog such as this I cannot really do justice to all the interesting information in this book.
In my recent post aboutthrowing sticks and stones, I mentioned that creating a good spear was not as easy as some survival manuals make out, and that the throwing stick might be a better investment of your time and energies.
I had wanted to link this comment to an article that I had written back in my early days on the internet. However, the throwing weapons group I had originally written it for had long since disappeared, and to my surprise, I had not placed a copy on my otherwebsite.
Below is the original article from many decades ago, with some minor updating and editing.
Since I wrote this, I have discovered several of my original articles are preserved on this site.
A Short Essay on Spears
Sometime ago, I started putting together notes on easily-made weapons and started off with spears since most survival books make this out to be quite simple. Just grab a length of wood and sharpen one end, and off you go!
Not quite!
Assuming that you do have a handy forest nearby, you won't see that many six foot+ lengths of timber of suitable width just growing from the ground, not anywhere I've been, anyhow.
If you do find something without needing to chop down a tree, it probably won't be straight, so you have to beath it.
Beathing involves gently roasting the wood over a fire or in hot ashes to make it temporarily supple. After this, you will probably have to hang your spear up to dry a day or so. Hanging a heavy weight from it may help the shaft stay straight. Bell towers were sometimes used to make and store pikes and spears.
Throwing Spears
For a throwing spear, just sharpening a point on one end and throwing it may not be enough. The spear will probably yaw like crazy and you may miss your mark by at least a foot.
Your spear needs flight stabilization.
Although fletching is sometimes used, most throwing spears are stabilized by drag, for which the front half needs to be heavier than the rear.
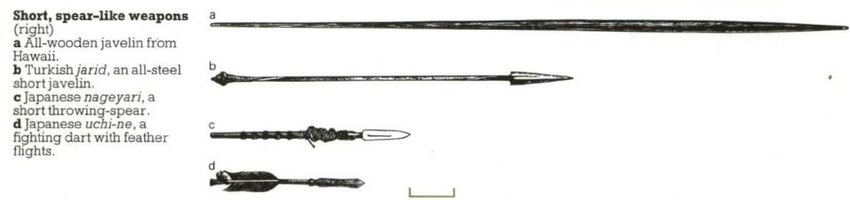
For a “self” spear (one made of a single piece of wood), drag stabilization may be achieved by tapering the shaft towards the butt, or better still. selecting a length of wood that is already tapered.
Captain Cook's expedition to Hawaii acquired a very nice example of such a spear (above), which must have been the product of many hours carving, particularly since the owner was unlikely to have had metal tools.
A simpler option is to fit a heavier head or a fit a weight just behind the head.
Most spears that have a separate head have a head that is denser than the shaft material.
Flint heads are well known, but one can also carve a blade from wood, maybe gumming flakes of flint or shell to it.
Fixing a knife as a spear point will do, but the blade length handy for a knife is often too short for a good spear and any cross guard will limit penetration. Traditional boar‑spears penetrated at least ten inches, and bear‑spears more than double this.
A point can be carved from wood, and fire hardened in some cases, but if for a throwing spear, ensure it has sufficient weight.
Fire hardening is a process that is often mentioned, but not described in detail in many survival manuals. Fire hardening is “lightly toasting” the sharpened point of a wooden weapon to drive out some of the moisture. The point is then sharpened further. Fire hardening may make a wooden tip harder, but also makes it more brittle. Sometimes grease, oil or fat is applied to the treated point afterwards.
Other useful construction materials include flint, obsidian, glass, shell, slate, bone, horn, antler or metal, either on their own or added to a wooden head.
Drag stabilization may also be increased by adding cloth streamers or long tufts of grass or hair behind the head.
Thrusting Spears
Sometimes your intended meal will have other ideas and will want to come up and inform you of its differing opinion. In such a situation, a thrusting spear is useful, no matter what other weapon you were using to hunt.
Forward balance is not such a problem for a thrusting spear but penetration still is. In this situation your concern is too much rather than too little.
Some beasties have been known to impale themselves further onto a spear or sword attempting to get the hunter within reach of their horns, tusks, claws or teeth!
The solution to this hazard is some form of arrest, usually a crossbar a foot or more down the shaft.
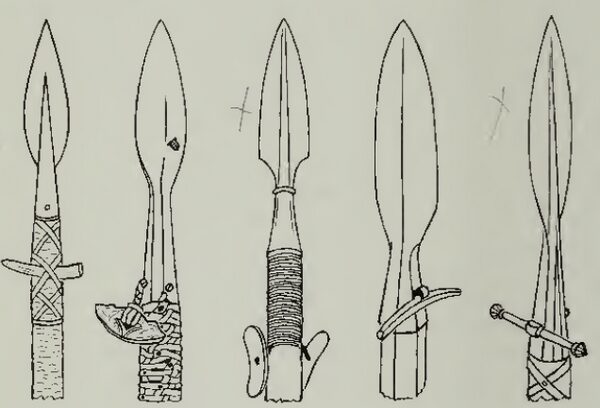
A number of examples are shown in the illustration above, taken from “Hunting Weapons” by Howard L. Blackmore.
The leftmost uses a boar tusk thrust through the bindings. Several others use plates of bone or horn attached by cordage. Blackmore, p.91: “To start with, in the fifteenth century, the bar was a piece of wood or horn held firmly in position by thonging. It was then realized that if the bar hung loose it was still effective and was not so liable to cause accidental injury to the bearer or his companions. The piece of horn forming the bar, often only roughly shaped, was fastened to the haft by a leather strap passing through a hole in the socket or woven into the binding which normally criss-crossed the head of the haft to provide a grip.”
In some weapons, the arrest is not so obvious, being incorporated into the design of the blade or socket. Examples of this include the partizan and the lugged or winged spears.
Having more than one point automatically limits penetration, as can be seen with the Chinese tiger fork.
Thrusting spears are also used for hunting, usually from ambush.
A thrusting spear should lack any barbs so that it can be easily withdrawn for a second thrust or to be used against another target.
Barbs and Multiple Points
A throwing spear may be barbed, and in a hunting situation this may be done for two reasons:
Firstly, it is done to keep a poisoned blade in the animal's body long enough for the poison to take effect. Often the head detaches so that the shaft (the production of which may have involved quite a lot of work) will not be lost or damaged as the animal escapes through the brush or tries to rub the head loose. Having a wound partially plugged by a shaft reduces the rate of blood loss, but the movement of the shaft will also inhibit clotting, prolonging bleeding time.
Heads are also barbed to prevent an animal escaping from the spear head when the shaft of the spear is held or the weight of the shaft will hinder escape.
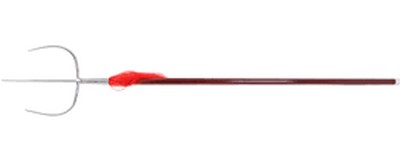
The most familiar examples of this are fishing spears (which may be more effective thrust rather well as thrown).
Sometimes the head of a spear will be designed to detach but will be on a line so that the fish/seal/hippo(!) can be hauled in once exhausted.
The drag of the detached shaft through the water may further tire the animal and sometimes a bladder or buoy is added to the shaft increase this effect.
This technique is also used with arrows.
An very nice example (above), taken from “The Art of Attack” by Henry Swainson Cowper. The drag of the arrow shaft being pulled sideways through the water tires the prey. The barbed arrowhead is made from bone and inserts into a socket in the end of the shaft.
Because fish are often hard to hit, many fishing spears (and arrows) have multiple points, and this strategy may also be used on small elusive furred and feathered game too. For ideas for such designs, I suggest browsing Cowper and Blackmore, paying particular attention to the multi‑pointed spear, harpoon and arrow heads made from non‑metallic materials such as antler, wood and bone.
Throwing Cords
A useful trick that can be applied to spears is to tie a loop of cordage to the shaft and slip the first two fingers through the loop when throwing. This increases energy transfer to the shaft and was known to the Greeks as the “ankulé” and to the Romans as the “amentum”. Cowper describes this on p.230.
A variant of this is to tie the cord with a half hitch, either near the centre of gravity or the butt. Using this knot allows the cord to remain with the thrower after the spear is cast. Cowper describes this on p.231, using the term “ounep”.
Miners in West Riding, Yorkshire, used this method to throw 31 inch long drag stabilised arrows, and ranges commonly exceeded 200 yards. Cowper describes this on p.230, the source being “The Crossbow/The Book of the Crossbow” by Sir Ralph Payne-Gallwey.
Conventional arrows can be thrown by the same method and this maybe a useful hunting technique for a bow hunter should your bow be broken.
If suitable materials are available, and the above design principles are borne in mind, quite effective spears can be made.
Spears are also useful as walking and wading aids, as carrying poles, shelter supports etc.
In my blog on foundation survival equipment, two of the items were a rain poncho and a blanket. Given how expensive good blankets are these days, many of you will have opted for a poncho-liner (aka “woobie”) instead.
Why a blanket/poncho-liner rather than a sleeping bag? A good sleeping bag is well worth having. In warmer conditions, however, a poncho-liner may be a better choice than that bulky five-season expedition bag you just had to buy, “just in case”. In colder conditions, a poncho-liner may be combined with a sleeping bag of more modest (and more practical) capabilities.
In case you have not worked it out, a more practical sleeping bag purchase would have been a two or three-season bag that can be combined with other items in colder weather, including another sleeping bag. Generally, several thinner layers trap more warm air than one very thick one.
The poncho-liner was designed to be part of a warm weather sleeping system. The instructions are that the poncho-liner is to be tied to a GI-issue rain poncho, with the rain poncho outermost. The soldier lies on one half of the combination and folds the other half over themselves. The snaps (poppers) on the rain poncho should not be used to fasten the opening if sleeping in a combat zone.
Tying the liner to the poncho may not be necessary. Threading the tapes through the eyelets may keep things together by friction alone.
Easiest knot is to make a loop at the base of the cord and pass it up through the eyelet. Make a loop higher in the cord and take it over the edge of the pooncho and pass the loop through the first. Hold the free end and pull the other side of the second loop to pull the first loop snug. This is very easy to tie and easy to undo with cold, wet hands. This is “two-thirds of a Highwayman's Hitch”.
The above method of using rain poncho and liner together has become known as a “ranger roll”, not to be confused with the packing method of the same name. It has been pointed out to me that this system resembles an Australian swag, with the obvious difference a swag uses heavier but breathable canvas,
Ironically, the best way I have found to pack a poncho roll is the other kind of ranger roll.
The poncho and liner (presumably as a ranger-roll configuration) is designated as a sleeping system for temperatures above 50°F (10°C). Put another way, if your breath is fogging, make more elaborate sleeping arrangements.
Rigging your rain poncho as a shelter, such as a ridge tent or lean-to, will trap a layer of air above while you sleep wrapped in your liner. You will be better ventilated and more comfortable than the ranger-roll. Where tactically possible, a fire may be built before a lean-to.
Insulating yourself from ground-chill will also facilitate sleeping at lower temperatures. Place hay, browse, bracken etc between yourself and the ground. Wreckage such as seat cushions may be used. If you have an insulated kip-mat, it may be used instead of or in addition to the previous measures.
If you want to use your poncho as a shelter you will need to carry some cordage, pegs and possibly poles. The two hanks of cord I recommended adding to your EDC will do fine. Since most ponchos or liners do not have a waist cord such cord may be knotted around the waist when wearing a rain-poncho and/or poncho-liner. Bungee cords are an alternative to cordage for shelters, and may also be used around the waist if your brought them long enough.
Some ponchos only have eyelets at the corners, or even lack these. Fit eyelets to each corner and the centre of each edge.
There are alternate options, of course. One of them is a bivi-bag and a pair of poncho-liners.
A poncho-liner is a sensible thing to acquire, even if most of the time you just throw it over yourself when watching telly in the colder months.
Useful though the poncho-liner is, there is room for improvement.
Below is a video of “Green-Craft's” poncho-liner improvements:
Personally, I found some of the modifications described hard to fully comprehend. Long, verbal descriptions on a video are not the best means of communicating information. The video could have benefited from some more illustrations and written lists.
I decided not to use many of these suggested modifications.
For one thing, I do not like “hand-warmer” pockets. Move with your hands in your pockets and you cannot defend yourself nor save yourself if you fall. Essentially, hand-warmer pockets are diametrically the opposite of what this blog is about.
I also had concerns that some of these modifications would affect the packability of my poncho-liner.
And I am short on funds, so cannot afford all the bits needed for the modifications even if I did want them.
The Head Hole
Why did the inventors of the poncho-liner not include a head hole so that it could be worn under a rain-poncho?
Perhaps it was something to do with the commitment to the war in Vietnam? Warm clothing was not seen as a high priority?
Modifying your poncho-liner so that it can be worn as a real poncho is probably the most useful modification you can make, and it is relatively simple.
• Sewing supplies. A needle, suitably coloured thread, pins, chalk, scissors/shears, a tape measure.
You do not want a zipper with shiny nor reflective teeth, so you will probably get a plastic zip. Colour and shades should be one that blends well with the basic appearance of your poncho-liner.
My poncho-liner is in German Tropentarn desert camo (aka “desert flecktarn” or “fleckdesert”), which is actually quite a good general-purpose pattern. Thus I brought a zipper described as beige.
I brought my double bias tape and the colour was described as “stone”.
If you have some scraps of suitably coloured or patterned material you can make your own bias tape by cutting it diagonally. Using different scraps will enhance the disruptive effect.
There are videos on how to make bias tape and how to join the different sections. You will need and iron and possibly a former.
The Cut
Decide which side of your poncho-liner will be the “outer” and which the “inside.” Also decide which part will be “front” and which “back”. My poncho-liner has a label in one corner so I arranged it so that this would be inside and at the back.
As evenly as possible, fold your poncho-liner width-wise. Then fold it lengthwise. The corner of the folds should be the centre of your poncho-liner.
Many blogs ago, I advised you to buy some chalk and add it to your EDC. You probably had several sticks left. Add some to your home sewing kit, it is times such as these it comes in useful.
Measure down from the centre corner 8 cm and mark a spot with your chalk. Make an 8cm cut through both thicknesses of the poncho-liner. Note that the cut you are making is lengthwise, going from back to front.
Unfold the poncho-liner. From the edge of the cut measure 19 cm and mark a point with chalk. I used a set-square here to ensure the line was perpendicular to a width-wise fold. Cut down the front 19 cm.
You now have a poncho-liner with a 35 cm hole in the centre. Check this fits easily over your head. Make it a shade bigger if necessary.
Fitting the Zip and Collar
Unzip your zipper into separate halves.
On the outermost side of the poncho-liner, place your zipper parts on either side of the head-hole.
Position them so that for each the teeth are on the opposite side to the opening.
You should be looking at the “back side” of the zipper and the puller should be on the front-side of the poncho-liner when fully down.
Pin each of the zipper halves so that the toothless edge is flush with the cut edge of the head-hole.
Note that your zipper is longer than the hole you cut. Make sure they are closely aligned. Try closing the zipper while it is still only pinned in position and adjust as necessary.
Fitting the Double Bias Tape
Once you are happy with the position of your zipper, you need to pin the bias tape into position.
I suggest you watch a few videos to familiarize yourself with how this tape is used. We are going to fold it all the way over the edge of the head-hole. If you look at the outer edges of your poncho-liner you will see a similar method has already been used to finish that edge.
Cut two lengths of bias tape about the same length as your zipper. Unfold the tape so that you are looking at its “inside”.
Place the tape, inside uppermost, over your zipper half. Align the inner edge of the tape so that it is flush with the cut-edge of the poncho and the toothless edge of the zipper. Pin in position and repeat for the other side.
You can remove the pins you put in to hold the zipper.
There should be pins securing both tape and zipper to the poncho-liner.
Note that if I was to do this again, I would use short lengths of bias tape to cover the top and bottom of the cut before adding the zipper. What I have done does not look too bad (on the outside!), but it could have been neater.
Sewing
I started off trying to use a “mini-sewing machine”. This was very cheap when I brought it. I notice the price is creeping up now!
After attaching the first zipper half I got sick of repeatably rethreading the thing, and realized I could probably do a neater job hand-sewing. Some sections would need to be hand-sewn anyway.
Sew along the crease of the bias tape that is closer to the hole.
Once this is done, fold the tape so that it completely covers the cut edge of the liner and the other crease touches the inside of the poncho-liner, the far edge of the tape tucked in.
Both creases of the tape are thus folded and both edges of the tape tucked in.
Sew just inside the edge of the tape so your thread passes through all four layers of tape, the zipper and the poncho-liner.
Finishing the Zipper
Close your zipper and tuck each end through the cut to the inner side of the poncho-liner.
Finish the ends of the bias tape so they are sewn to the zipper.
Since the top and bottom of my head-hole was untaped, I put a few stiches through the zipper and through the poncho-liner to close off any opening that remained. Lastly, add a length of cord or tape to your zipper-puller.
This will stop it rattling. It also lets you easily work the zipper if your hands are cold and numb or wearing thick gloves.
If you can get some bootlace that matches the ties on your poncho-liner, that would be cool. I used a length of “desert-camo” 3mm budget paracord, which does not look out of place.
The Zipper Explained
Why use this configuration for your zipper?
When used as a garment, the teeth of the opened parts of the zipper will not contact your bare neck. You can roll the edges of the opening outward if you wish. This is shown in the photo immediately below.
There are other ways to prevent the teeth rubbing the neck, but the above method is one of the simplest and involves very little sewing.
The puller of the zipper is at the front when opened so that you can adjust the neck opening to vary ventilation or retain more heat.
The zipper I brought was described as beige but the actual colour was lighter and more yellow than I had hoped. Because very little of the zipper is visible on the outside, I got lucky and it blends very nicely with the rest of the poncho-liner. I think it may work better than the dark green zipper I also considered.
In practice, the zipper will usually be covered by a scarf or shemagh.
The zipper I brought was missing a tooth at the very top. This caused the puller to jam if the zip is fully closed. Fortunately, by tucking the very bottom and top of the zip, the last few centimetres of each end are not used, yet the opening can be fully closed. A combination of luck and improvisation!
The bias tape I brought was described as “stone” in colour. I was expecting something with a hint of brown, but it proved to be a light, very neutral-looking grey. Not surprisingly, this colour and shade goes very well with both the zipper and the poncho-liner in general.
The camera flash probably creates a greater contrast than the naked eye sees.
Poppers
Once I had fitted the zipper, I went about installing some plastic poppers (aka “snaps”, “snap-fasteners”). These may need special pliers to fit.
You will need something that can poke a small hole through the poncho-liner. I used a stout sailmaker's needle I have in my home sewing kit. A set of these is worth having. The smaller ones go in you EDC or travel kits, the larger into your home sewing and/or repair kit.
You can chalk the needle to make the holes easier to locate.
Getting the Poppers Right
Lay-out your poncho with the inner side upwards.
Mentally divide it into quarters. We will be installing poppers using the following rules. The reason for this will be explained later:
• Each quarter will have the popper halves all of the same time. A quarter will only contain “male” poppers or “female”.
• If a quarter at the top has male poppers, the quarter immediately below will have female, and vice versa.
• If a quarter on the left has male poppers, that on the immediate right will have female, and vice versa.
• Quarters that are diagonally opposite will contain the same type of popper half.
I started off by installing the corner-most popper halves. Concentrate on getting these right and then it is just a matter of using the same popper type for each quarter.
I installed the corner poppers 40mm in from the side edge of the poncho-liner and 190mm from the top or bottom edge. If you are on the large side, place the poppers closer to the edge.
Next, fold your poncho-liner width-wise. Use the top and bottom poppers you have just added if you wish.
From the width-wise fold, measure down 240 to 250mm and install a popper 40mm in from the side. Make sure each quarter of the poncho-liner has the same type popper-half.
When you are wearing the poncho-liner, using this popper forms a sort of sleeve. The opening is generous enough to allow for bulky cold weather clothing. You can also slip your hand in and use it as a hand-warmer, “Fu Manchu”-style.
You will want to add a few more poppers down the side between the “sleeve” popper. I chose to add three more to each side.
With your poncho-liner still folded width-wise, fasten the sleeve and corner poppers. Make another width-wise fold so the corner popper touches the sleeve popper. Mark where the fold is and install a popper. As always, make sure each quarter of the poncho-liner has the same type popper-half.
Install additional poppers between the sleeve and corner poppers and the middle popper you just fitted.
Finishing the Poppers
The poppers I had purchased were supposedly “beige”. They turned out to be way lighter than expected, and had a gloss finish! When installed on the poncho-liner they appeared like they were white.
Luckily, I have some enamel model paints, several in colours close to that of the poncho-liner. I used these to paint the outer sides of the popper halves. I did not bother to paint the inners. I suspect the paint on the inners will either wear off too quickly or affect functionality, but try it if you wish.
For the record, the colours I used were Humbrol no.84 Stone and Revell no.83 Leather Brown. None of the poppers passed through green areas of the camouflage, so I did not use any of my green paints. These are not exact colour matches for the poncho-liner, but if someone is close enough to see the difference camouflage is no longer an option!
Like most painting, a second coat will improve it. You can stipple the surface to produce a more matt-effect, or even sprinkle a little sand on the first coat. However, given that the surface of the poncho-liner is quite smooth, the practical value of this is moot.
While you are at it, see if the poppers on your rain-poncho could use some paint.
Again, the flash on my camera probably shows them up more than the naked eye can discern them.
Below is a shot taken without flash.
You may not be able to avoid painting your poppers, but start off with some that are matt, medium shade and a natural or neutral colour if you can.
The Poppers Explained
Why did I insist such attention be paid to which popper half went in which quarter?
If you want to sleep in your poncho-liner, fold it lengthwise and tuck under the foot-end. You will find you can use the poppers to fasten the free long edges. Much more compact and less bulk than fitting a long zip on this edge!
Personally, I find sleeping like this a little restrictive and am more likely to use the liner like a conventional blanket. Part of the appeal of the liner as a warm weather sleeping system is that it does not confine you like a sleeping bag. Best way to turn the poncho-liner into a cold weather system is use it with a sleeping bag!
Obviously, if the poppers of the rain poncho on a ranger-roll should not be fastened in a threat environment, the same goes for the poppers you fitted to your liner when sleeping.
Wearing your poncho-liner? Two sets of poppers line up to create a sleeve-type opening. Those below can be used to close up the sides.
These simple modifications will take you less than a day, even if you have to hand-sew.
My friend Sam had the concept of “Sam’s Van”: that one should not have more than could be moved in a single vanload, an example of quantity-limited minimalism.
In all honesty, I cannot call myself a minimalist. My girlfriend is probably having a hearty laugh at the very notion!
I have, however, attempted to make use of some of its techniques.
Don’t Count!
A very useful piece of advice I came across was “Don’t Count!”
“I only own n number of things” makes for a great blog title, but if many of us try to apply this in practice it can lead to unhealthy obsessiveness, or goal-post shifting.
Well done to those who have reduced their belongings to just n-items, but bear in mind a more productive application of the exercise is to reduce your belongings to only the things you need, rather than an arbitrary number.
Some possessions naturally begat others. I have knives and other edged tools for my kitchen, hobbies, toolbox, camping and EDC. It would be very foolish for me not to own at least one other possession to keep them sharp, for example.
Sometimes a simple single addition may make a lot of difference.
I carry my keys on a carabiner. Not all of my trousers have loops in the best position for this.
I brought myself a robust key-hanger that fits on my belt. The hanger even has a couple of stout press-studs so I am able to place it on my belt without needing to unthread it. Now the keys always hang directly over the pocket. An additional possession well worth having.
Clear the Decks
Another good tip I have encountered is to “clear the decks”.
Ideally, nothing should be on your floor except your furniture.
Once you have relocated or discarded the stuff that was taking up your floor-space, move on to the other horizontal surfaces and declutter them.
Minimalism for Preppers
Applying minimalist techniques can be a very useful exercise, especially for preppers.
You can apply them just to your backpacking or bug-out outfit, or to your life in general.
I come across a lot of lists of equipment. Many of the “essentials” are actually only conveniences or “nice to haves”.
I have read a minimalist list where the person owned one bowl, one plate, one mug and one glass. Presumably their mates never came around for a cuppa or a drink. Or perhaps their mates were all minimalists too and were expected to bring their own cups!
The same list included a set of measuring cups for cooking. Perhaps a single measuring jug is more minimalist than a set of cups? Perhaps they could drink out of the measuring jug! I was rather pleased to see someone offering a graduated drinking glass!
Kitchenware
If you are on the move, your minimalist cooking kit is a spork and canteen cup or mess tin. Many canteen cups now have non-stick coating, so use a non-metallic spork.
Stephane Reynaud wrote a cookbook called “One Knife, One Pot, One Dish”. Not as minimalist as some would want, since the “pot” in different recipes may be a casserole, frying-pan, saucepan, baking dish, bain-marie or even a food processor.
If you want a very minimalist cooking outfit for home, a frying pan/skillet and a flameproof casserole is not a bad option.
Since you will be spending less money on kitchenware overall, you can probably afford quality examples of what you do select.
The casserole should be of the sort that you can use on either the hob or in the oven. If you use a halogen oven, you will obviously need a casserole that can fit inside of it and when filled is not too heavy for you to lift out.
An oven-baking dish is a useful supplement to the casserole. If you have a halogen oven, make sure your dish is of a size and shape that fits it. Most halogen ovens include a suitable baking dish with their accessories.
Select a spatula that can serve as a turner, server and a stirrer.
I like to cook and get a little creative in the kitchen, so I do not think it is too great a disaster if I have a couple of extra pots and spatulas.
A small saucepan will probably see lots of use. You will probably find you do not need more than two or three of varying size. Two frying pans of different sizes is sometimes convenient, although I use my wok and frying pans a lot less since I got the halogen oven.
If you do use a halogen oven, you will know that tongs are pretty useful for removing or turning hot food. You could use a pair of spatulas, I guess, but chances are your halogen oven came with a set of tongs, so why not keep these?.
You will need a chopping board and/or a set of flexible cutting board sheets for use with your knife.
I would opt for a Chinese cleaver, but you may then need a small knife for those rare jobs the cleaver is not good for. You should also have a serrated knife for cutting bread and fruit.
It is useful to have scissors and a spare penknife in the kitchen. Then again, my kitchen also has a buck-axe and Mora-knife!
I quite like the sets of measuring cups and spoons I have hanging up in the kitchen. I try to use them to stop over-serving myself portions. The minimum is probably a measuring jug.
Have at least one mixing bowl. Perhaps invest in an ovenproof one that may be used in the microwave or halogen oven.
Usually I drain food using the pot lid. A sieve, strainer or colander may sometimes be needed. The perforated steamer and mesh dishes from my halogen oven may substitute.
I could probably use a larger selection of storage boxes for the fridge, and make the ones I have more accessible.
For each person, there should be a bowl, plate, mug and drinking glass.
If you are a big tea drinker, you will want your mug made from glass. A glass mug is a good all-rounder for all kinds of hot or cold drinks.
For cold drinks you may want something taller with more volume and room for ice.
Ideally, have two sets of tableware for each person. You will need to wash-up less frequently and you can accommodate guests. If there are more than two of you, the extra plates and bowls are useful for serving. Bowls also get used for mixing, marinating and microwaving.
For each person, a set of utensils: knife, fork, spoon. All-metal, single-piece sets are more durable. The knife should be of a form that can cut cooked food and spread butter. Have a couple of spare sets for guests.
You may want a steak/cutting knife and teaspoon for each person or guest too. Personally, I like to have at least half a dozen additional teaspoons. A teaspoon is far better for spreading jam or marmalade than a knife, incidentally.
Adopt my methods of quick, economical washing-up and you will find it easy to maintain a stock of clean cutlery and dishes.
I have a dish-drying cloth, but seldom use it since letting washing-up drain and air-dry is cleaner and more convenient. It gets used more often to swat flies. Drying my hands is more common, and this only needs a small hand-towel. Same hand-towel is useful for handling hot dishes and pots.
What Do You Really Need?
It is foolish to think what applies to yourself is true for everyone else. That is quite a useful thing to remember in everyday life. Keep this in mind when you read minimalist lists.
Sometimes I find that I do not need some of the items on minimalist’s lists. Having a good penknife does away with the need for many other implements.
My girlfriend recently tidied-up a bedroom that had been used for storage.
“Transformed” is probably a better term. It was hard to believe it was the same room!
I was looking around for a rug with a two-metre high pile of junk swept under it.
One of the few items she declared surplus to requirements was a desk-lamp. She had absolutely no use for this, she declared. Neither had I, I realized.
I have two desk-lamps, both fitted with daylight bulbs. I only ever use them when I am photographing something.
I mention this, since several minimalist lists of belongings include desk-lamps or floor-lamps as essentials. Perhaps their home is considerably darker than mine and they do actually need them.
Most of us do our writing and reading on computers these days, so I would venture that many of us do not need a separate desk-lamp. I certainly do not need a lamp to “create mood”.
Sometime ago I got rid of a freestanding lamp since I never used it.
I think television shows create a false impression here. Often on the box, we see an interior with multiple lamps, all of them lit in the middle of the day!
Don’t use lights you do not need, and reduce your energy bill. Sell or donate lamps you never use.
Another item that is surprisingly common on minimalist lists of “necessities” is bathroom scales. Personally, I have never owned a set of bathroom scales. I do not need a set to tell me I am carrying extra weight, I can see it! Similarly, weight-loss that the scale claims has no value. What matters is that which I and others perceive.
Wastebaskets? I have certain in-laws that cannot grasp not to use a bin without a liner. My rubbish for recycling goes into a repurposed plastic bag. This usually hangs from one corner of a kitchen chair, so I need no bin.
Foodstuff that might attract flies goes into a bag in the freezer until it is thrown out into the bins outside.
Not that I get many flies, since I fitted all the windows I might open for ventilation with insect mesh! Simple addition: big change!
Something I don’t see on many lists is a dressing gown. I spend most of my time at home wearing little else! One of the pleasures of a nice shower is drying off in a snuggly dressing gown!
My older dressing gown has fallen to bits, so I may replace it with a longer, hooded fleece gown for the colder months, and to wear when the other fleece gown is being washed.
The dressing gown is supplemented by a fleece blanket in the lounge. I spend most of my time alone, so heating the whole house if it is a little chilly is stupid. I often watch television or play video games with a blanket thrown over me. If it gets colder, I throw a poncho-liner over this too.
Constructive Minimalism
In an apparent paradox, if I have been reading a minimal list of belongings, it is more usual for me to think about buying something rather than discarding something.
This illustrates how minimalist lists can be a useful tool for making you concentrate on what are your essentials and highlighting where you might make improvements.
I have, however, taken to practicing a self-imposed “cool-down” period. I wait at least 24 hours before I click “buy”. I may miss the occasional bargain, but generally I save more money by avoiding spending it on stuff I can manage without.
Thinking of your possessions as “collections” or “kits” can be productive in rationalizing what you have.
Bedding
Considering bedding, it occurred to me my life would be a lot easier if I had two brand-new sets of sheets and duvet covers. Some of my older stuff did not quite fit the mattress I now have.
Two sets give me one new set on the bed while the other is in the wash.
I have an extra duvet and pillow, so I can use my older stuff for these, again giving a set in use and one in the wash.
Stationery
If I consider the topic of “stationery”, what do I actually need, compared to what I have?
Most writing is now done on the computer, so pens and paper are seldom used.
I have blank A4 paper for the printer (although the printer seldom behaves well enough to print anything! The device is mainly used for scanning.). That blank A4 paper can be used for various other things. A pad of lined paper and/or a notepad or two. Pad of post-it notes. Stick of paper glue.
You may have uses for a highlighter, stapler or some paper-clips.
Seldom do I need envelopes these days. If I do need one, I can fold a piece of paper into one. I do occasionally send packages, so some tape is useful.
I have plenty of knives, so I could do without a pencil sharpener, although there is little point in discarding the couple that I have.
I have some super glue and blu tac, although these reside in my modelling supplies.
Erasers, pens, pencils, of course.
Go through your pens and discard refills or disposable pens that no longer work.
Some forms require you to fill them in in black ink, so make sure that some of your pens are black.
Recently I had to send a parcel and was unable to find a thick pen to write the address with. So I bought a pair of black Sharpies, adding one to my EDC and keeping the other for home use.
Sometimes it is a matter of organization.
I had lots of pens and pencils, but distributed in various diverse locations. Pool most of your erasers, pencils and pens into a box or a large pencil case. You can still have a pen and/or pencil in places you are likely to need them, but if you do need something you only have to look in one place.
I have a pen and pencil in a box in the lounge, a pen and pencil in a kitchen drawer, and everything else in a large pencil case in my room. A handful of paper-clips form the zip-pull.
Ruler, protractor and a pair of compasses can be handy at times, and also serve in the “tools/DIY” category.
DIY Tools
The DIY tools I probably use the most are a tape measure and a drill. There are often screw-hooks that need putting up.
A awl, gimlet or bradawl is useful for beginning drill holes. The reamer on a penknife is good for many jobs, but the T-handle location means it is awkward in restricted spaces.
Many jobs I have used a drill for actually only need a gimlet. If just starting out, invest in a set of gimlets. Only buy or borrow a drill when you encounter a job that really needs one.
A penknife reamer makes a pilot hole large enough for the screw-section of a gimlet and reduces the chance of splitting the grain.
To start accurately drilling metal, a centrepunch and hammer is useful. A nail or scriber may substitute for a centrepunch for some applications.
On the back of my tool cupboard door hangs a tape measure, small spirit level, a Stanley knife and a hand-crank flashlight. The flashlight is mainly used for exploring the depths of the cupboard, but may be used for other household applications.
With the abundance of small electronic devices in modern life, a set of fine screwdrivers will prove useful. Add tweezers and magnet(s) as suggested. You may wish to add a spudger. One screwdriver should be large enough for rewiring plugs (3 mm slot). If this is not the case, buy a small electrician's screwdriver.
You will probably need some pliers. Needle-nose and chunky, possibly curved too. Your hobbies may require additional smaller examples.
Eastwood's character in “Grand Torino” opinions that all you really need is duct tape and mole grips. A related witticism “If it rattles and shouldn't, duct tape it. If it doesn't rattle and should, use WD40”.
Scan It and Toss It
As mentioned, my printer is also a scanner. It can feed-in and scan whole stacks of papers automatically. Or at least, it did until Epson discontinued the software needed to do this for my model!
A scanner may be very useful for decluttering your life.
When I moved in with my girlfriend, I scanned scores of folders of documents, magazine articles and old papers. This allowed me to throw out several sacks of the old papers and makes it easier to find the information I want when I want it.
Bag and Box
Bag or box stuff when you can. You will save yourself time if these bags and boxes are transparent or mesh.
For example, stick all of your pairs of gloves that are not in jacket pockets in a mesh bag in a drawer or on a wardrobe shelf. When you need gloves, just one place to look, and no hunting for a glove hiding in with the socks.
Things that are wanted but seldom used may be tucked away on a high shelf or bottom of a wardrobe. Conversely, some things that you might make more use of may currently be hidden out of sight and out of mind.
Put your teaspoons in a small jar on the countertop rather than hidden in the bottom of a crowded drawer. Makes them much easier to find.
My final advice is to understand that decluttering is likely to be a “work-in-progress”.
Many times you will think that you are nearly done, but are not! Changing one thing will put other things in a new context.
Scanning the last of my old papers got me thinking about the various plastic and card folders they had been in.
I have lots of books and DVDs. While I like to call the exercise “decluttering”, there is no way my home will ever look uncluttered.
It might be argued that much of my minimalism is “below the surface”.
There is now less in the cupboards and drawers. What is in there is now more logically organized and more easily found.
It is quite probable that no-one will notice the difference except myself.
Over the years, this blog has visited the topic of Soldier’s Load several times, and published a number of equipment lists.
What to carry, and what not to, is of interest to any backpacker, outdoorsperson, prepper or survivalist. Although a list may have been written for a military context, understanding the reasons for any differences is often productive.
The following list is something of a “classic”, being taken from SLA Marshall’s book “The Soldier’s Load and the Mobility of a Nation”(1949). It seems to be obligatory to mention this work when writing about Soldier’s Load. How much notice is taken of its suggestions is beyond the scope of today’s blog.
Marshall, and many other sources, had concluded that the optimum marching load for the average man is not more than one-third of body weight. Marshall also maintained that troops would carry more food, more munitions, more everything into combat than there was any reason to believe they would use.
On this basis, Marshall proposed an optimum working combat of around 40 pounds (80% of optimum carried load).
SLA Marshall: “We can do it, as is shown by the following table of weights. Though we had many variations of combat dress in World War II, according to the climate, the present field uniform strikes a good general average insofar as weight is concerned.”
WEIGHT OF CLOTHING
Undershirt, drawers, socks…………..0.62
Shirt, flannel …………..1.13
Trousers, wool…………..1.69
Jacket, wool…………..3.02
Cap, field ………….. 0.25
Boots, combat…………..4.13
Belt, waist…………..0.19
○ Total for the field uniform…………… 11.03 [lbs]
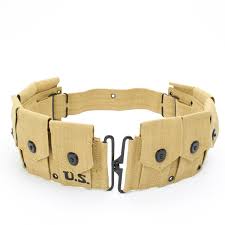
Belt, cartridge 2/48 Rds M-1 ammunition………….. 2.29
Canteen w/cover and cup…………..2.69
First-aid packet…………..0.40
Helmet w/liner…………..2.82
Rifle M-1 w/o bayonet, w/sling…………..10.30
Two (2) Grenades (Fragmentation)…………..2.62
○ Light pack w/one (1) K Ration and mess gear………….. 7.79
Includes:
Haversack and carrier…………..2.46
Toilet articles…………..0.92
Change of underwear…………..0.43
Two (2) pairs of socks…………..0.38
One (1) K Ration…………..2.31
Mess gear…………..1.29
○ Total, field uniform and battle equipment…………..39.94 [lbs]
“On that figure, I am prepared to stand. One blanket, woolen, OD, would add another four pounds; one raincoat, another three pounds. During initial combat in hot weather, it is better to take a chance without them than to put that much extra weight on men just as they are about to undergo fire for the first time.”
Commentary
Unlike many later analysts, Marshall included the weight of the clothing in his estimate. This is often disregarded if the wearers are accustomed to wearing the items.
• Undershirt and drawers of this period are likely to be cotton tee-shirt and boxer shorts. Socks are presumably wool, rather than the cotton socks worn with service dress. Underwear can, of course, be varied with season and climate. “Drawers” may mean long underwear.
• “Flannel” is a somewhat ambiguous term these days. A M1937 wool shirt was in service at the time and this is probably that suggested. Woollen clothing is preferable if you are going to get rained on.
Incidentally, the prototype M43 combat dress had featured a “high-neck sweater” to be worn under the field coat or as outerwear in hot weather. The fatigue/utility shirt (M42 HBT/OG-107) would become the preferred hot-weather wear.
A friend of mine likened soldiering to an extreme sport, which did make we wonder if field gear should be made to more closely resemble sports and active gear.
Something modelled on a tracksuit top or hoodie may be a better intermediate layer than a conventional shirt.
Pocket configuration of hoodies/tracksuit tops is not ideal. Handwarmer pockets are a bad idea, since your hands should be out of them helping and defending you. Extra sleeve pockets and Napoleon chest-pockets are useful, as it a kidney-area pocket for soft items such as hats and scarves.
I prefer hoods that can be stowed away inside a collar. It is easy to snag a hood on a branch when moving through the woods.
Poppers to supplement any zip would allow for more versatility in ventilation.
I am undecided as to whether a fully opening or pullover configuration works best as field wear.
• Wool trousers (M1937) are suggested. Cotton cargo trousers had seen widespread introduction with the new 1943 field gear. Cargo trousers are a good modern substitution, since the pockets are ideal for carrying much of your skin-level EDC emergency items.
• “Jacket, Wool”, could be one of several garments.
It may be the M1939 wool field coat, or the ETO “Ike” Jacket. The latter had been based on British battledress and had been intended for both field and service wear. In practice, they had been in short supply so usually only officers had them and kept them for non-combat use.
By the time of Marshall’s writing, the M1939 had been widely replaced by the cotton and wool M41 “Parsons” field jacket and the cotton M43.
My experience with my desert parka makes me suspect that such an item is far more practical than a conventional half-length field jacket.
Being uninsulated and lightweight, it can be worn comfortably across a broad range of weather.
It appears to be a single layer, although the inside appears to have a closely bonded thin lining.
Vent zips and a roomy interior allows for good air circulation in hot weather and cooling via bellows-effect.
A loose cut allows room for the liner or other insulation when cold.
Its larger size covers more of the distinctive human body-shape.
Buy your parka on the big side. Mine is thigh-length.
I have modified the hood of mine so that it rolls into a collar secured by poppers when not in use.
The only other modification I might wish for is more and larger pockets.
The desert parka is a reasonably priced item, so is an easy way to modify a soldier’s appearance.
Such a field parka can easily be replaced by another more suited in colour and cut for non-combat, service or parade wear. The latter may appear something like the frock coat/greatcoat look that is used in some Japanese anime.
The idea of using a “long” coat as basic combat dress has obvious echoes of the French practice of usually fighting wearing their greatcoats.
• A woollen watchcap, beanie or headover may be a more useful and versatile item than a field-cap. A hat with a brim does keep the rain off my glasses, however.
At least one type of gloves, and something to act as a scarf such as a keffiyah or scrim should also be part of a basic outfit.
• The belt listed is probably the item intended to hold up the trousers, rather than an equipment belt.
• “Belt, cartridge 2/48 Rds M-1 ammunition… 2.29” did give me pause.
The cartridge belt for use with the Garand M1 rifle has ten pockets, each holding an eight-round clip.
With the rifle loaded, the soldier’s basic ammo load was 88 rounds.
Marshall advocated soldiers carry less ammo, but only filling six pockets of the belt for 48 rounds seemed odd. And what did “2/” signify? Was it a transcription error in my PDF copy of the book?
Eventually, I learnt Garand ammo was issued in a throwaway cloth bandolier. This bandolier had six pockets, each holding one eight-round clip, for 48 rounds total!
Soldiers would often carry a pair of bandoliers in addition to a fully loaded cartridge belt, for 23 clips/184 rounds.
It seemed logical that Marshall was suggesting that a soldier just carry a pair of bandoliers instead of a ten-pocket cartridge belt. This would still give the soldier 104 rounds (2 bandoliers of 48 + 8 loaded).
The quoted weight of “2.29 lbs” is still a mystery.
A loaded Garand bandolier weighed 3.5 lbs, and a loaded M1923 cartridge belt even more, so the figure might be expected to be either 3.5 or 7 if a pair of bandoliers was intended.
This use of such bandoliers is a practical system for the Garand.
I would not, however, recommend the Garand for modern shooters.
There are lighter weapons with equivalent performance, and the need to have ammo in clips for the mechanism to fully function is an obvious potential problem.
The bandoliers used for the Garand were also used for the Springfield M1903, each pocket holding a pair of five-round strippers, for total of 60 rounds per bandolier.
Thus something similar might be used for a bolt-action rifle or for the loose ammo for a shotgun.
The bandolier was also apparently repurposed to hold six 15-round M1 Carbine magazines.
Few modern self-loading rifles can be loaded by strippers, so another arrangement for carrying their ammo must be used.
The above does, however, give a useful idea of the number of ready rounds carried that may be practical.
Substantially reducing the weight carried on the waist belt and eliminating the need for tight webbing suspenders would improve both air and blood circulation. This would be very welcome in hot or very cold climates.
• A canteen/water-bottle is a reasonable item to carry on your person. Since a cartridge/equipment belt is not listed, it is not clear how Marshall’s soldier carried it.
In a modern context, a flexible water-bladder may be preferred to a rigid bottle. Many modern examples have a sip-tube so you can drink without unpacking your water container.
The canteen cup should probably be carried in the pack rather than on the belt.
• The first aid package is probably one area where greater quantities are prudent. Bullets often make exit holes as well as entries. Optimising the CI_IFAK/Trauma kit carried is an entire topic in itself!
• Marshall suggest a pair of fragmentation grenades, rather than the five to eight some units encouraged soldiers to carry. Modern fragmentation grenades are a little lighter than their 1949-era equivalents.
While a civilian would not carry fragmentation grenades, legal smoke bombs have practical applications for defence and signalling.
It is not explained how Marshall’s soldier was to carry his pair of grenades.
The 1943 combat gear had introduced jacket and trouser pockets designed to take several grenades.
In the thigh pockets, grenades were difficult to reach and the weight was uncomfortable. Enough weight and the trousers would not stay up without suspenders.
The lower jacket pockets were difficult to access if wearing belt-gear and cast-iron weights swinging around your genitals was objectionable!
The above items constitute what some authors call a “fighting load”.
The “combat load” is considered to include a fighting load and an approach march load.
The “approach march load” is usually in a small pack that is dropped or cached before closing with the enemy.
The haversack Marshall describes is the approach march load.
• The suggested haversack contents are reasonable. Two pairs of spare socks and a spare set of underwear sounds about right.
On other pages, I have described effective wash-kits much lighter than those many soldiers carry. This should include a roll of toilet paper.
The K-ration can be replaced by modern equivalents. Marshall is telling us the combat load needs food for a day or so, not a week or more!
Rations such as MREs may include heating pouches, reducing the need for a stove and fuel.
The mess-kit can probably be replaced by a metal canteen cup and an emergency stove, such as the British Crusader or US Natick.
Pack the interior of the cup with packets of instant noodles and other useful items.
The only other eating item needed is a spork.
A plastic sandwich box makes a useful eating bowl. When not used as such, fill the interior with a brew-kit, spork and packet-soup and OXO cubes.
• The poncho-liner can substitute for the wool field blanket suggested.
A set of goggles and a flashlight are worth adding to the pack contents.
• The issue US army raincoat would be replaced by the more versatile and lighter rain-poncho.
Incidentally, another advantage of the desert parka is that it can be worn over a lightweight plastic raincoat, providing protection and camouflage while the waterproof stops water reaching the warm layers below.
Recently I have been jotting down some thoughts on minimalism. I will share some of these observations in a future blog.
This is quite a useful exercise, since often it identifies deficiencies in what I have. It also inspired me to organize my current possessions more logically.
A Room of Rucksacs
One field I started thinking about was that of bags.
Part of my bedroom floorspace is taken up by several rucksacs, and more lurk on top of the wardrobe or in a nearby trunk.
Different models for different purposes: The Alaskan Packboard I built that I used to tour Germany, Holland and Austria. The internal-framed pack I acquired for Iceland, since I did not trust airline baggage handling with my packboard. The DPM Northern Ireland Patrol Pack and large Bergen that I treated myself to. The most travelled pack is one that converts into a soft suitcase and has six large external pockets.
Daysacs
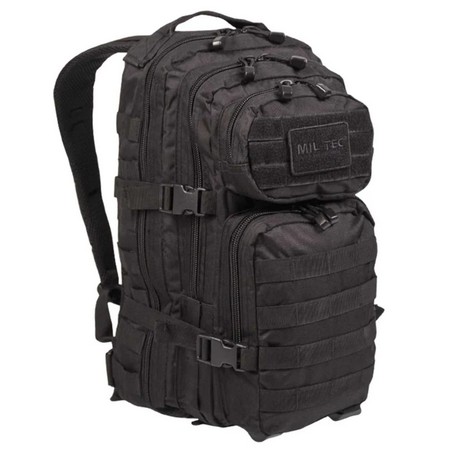
A large rucksac is a useful thing to own, and like me, you may own several, each suited for different purposes.
A smaller bag, such as a daysac, is likely to see more use, however. It may be used weekly, or even daily. I notice many women carry small rucksacs in lieu of a handbag.
Smaller packs are less well represented in my collection. The one I have used most recently is rather small, and somewhat tatty. I acquired this from lost property at work (yes, it is amazing what people leave and never come back for). It only has one external pocket and I have had to repair the shoulder strap junction at least twice.
Elsewhere, I have told the story of why my beloved North Face daysac is no longer with me. The multi-pocked pack I brought to replace it proved to be far too small for my trip to Kos.
Given the use it will get, it makes sense to invest in a good quality daysac. Sadly, I have very little budget for such things these days. I have spent several days web-searching for a new daysac, only to find what I did not want or could not afford.
Following my recent article, I wanted something neutral and natural in colour rather than the ubiquitous black. A search for khaki backpacks turned up an item on ebay. Price had dropped and was within my budget. For that money, I would risk it.
The Sunrise Khaki Backpack
The bag arrived several days ago, and I am pleasantly surprised.
It is a little bigger than I expected. Dimensions quoted on websites can often be misleading.
Quoted dimensions were 47 x 31 x 21 cm, and size was quoted as 31 litres. That latter figure seems to be external volume rather than internal capacity.
The bag is probably ideal size for a general-purpose daysac. When I am travelling my daysac serves as my cabin baggage or carries the items I may need when sightseeing. This bag is of a size that most airlines will permit as cabin baggage. When moving between locations the daysac needs to be small enough to fit inside my larger rucksac, so I have only one bag to carry and watch.
Colour is a nice khaki-coyote brown shade, not so light that it will show up dirt. The inside is lined with a black nylon/polyester[?], so better finished than I was expecting. This, however, is my single, very minor gripe with this bag. A black interior makes things more difficult to located within a bag. More manufactures should utilize lighter materials such as the bright lime green used inside my girlfriend's theft-resistant bags.
Unlike my old North Face, the main compartment has a padded pocket that can take a laptop computer. I could have used this a few months ago while I was hot-desking!
Interior is large enough to take my soft-core pack with plenty of room left for other items.
The main external pocket is quite large. The interior seems rather bare. This could use some internal pockets for smaller items. One can only expect so much for this price, however. Interior pocket is something I may add when I have time.
On each side is an open-topped, elasticated pocket suitable for carrying a waterbottle or collapsible umbrella.
Very little needed to be done to bring this pack “up to speed”.
The shoulder straps each have a plastic D-ring, so adding a snap-link to the left one took an instant.
The zippers needed pull-tails, and short length of “desert-camo” paracord I had proved to be ideal length and colour. The main compartment zipper is two-way, that of the exterior compartment one-way.
The other addition I made was to coil a wallet chain around the grab-handle. This is a trick I have borrowed from my girlfriend's theft-resistant bags. When stationary, feed the chain around a chair or table leg to deter sneak thieves. Obviously, this precaution does not mean you can wander off to the toilets and leave your bag unattended! Even if you added a lock, a thief could cut through part of a bag if left unwatched.
This is not the highest quality bag you can find. You can easily spend ten times as much on a daysac. Whether or not you will get ten-times the bag is for you to decide.
This is all I can afford at the moment, and nicely demonstrates some of the features you might look for in a bag, and some of the modifications you might consider.
This particular bag is has the brand “Compass, Sunrise Bags” and model number “BPC108-KK”.
Mil-Tec MOLLE Multi-Pocket Backpack
While I was researching this blog, I discovered something new about my small black multi-pocket daysac. Other than its small size, this really is a nice bag, well-made with lots of nice features.
The bag is made by “Mil-Tec” in Germany. I discovered the same design is produced in two different capacities, 20 litres (“small”) and 36 litres (“large”). There is also a 14 litre kid's pack.
A number of sellers offer copies/knock-offs of the Mil-Tec design, many claiming to be “30 litres” The dimensions claimed for some of these suggest that even the exterior volume of the bag is less than 30 litres.
I suspect that I in fact brought the 20 litre version of the Mil-Tec, assuming it was the same as the “30 litre” bags being offered elsewhere.
The genuine 36 litre Mil-Tec can be found for quite a reasonable price, although out of my current budget, sadly. Based on my examination of the 20 litre version, the 36 litre may be a very good choice for anyone looking for a slightly larger daysac or patrol sack.
Recently I blogged on the topic of dish-washing. Today, I want you to imagine that you are somewhere far from civilized plumbing. You may want to wash your cookware, clothing or you may want to wash yourself. What do you do?
Some of you, I suspect, may suggest that you head for the nearest body of water and wash there. We will assume you have been prudent and lucky enough to have placed your camp within an easy travel distance of water. Not too close, to limit hassles from insects.
Washing yourself or your dishes in a body of water is not ideal. Even in parts of the world where that water is not inhabited by crocodiles, alligators, mosquitoes, schistosomiasis or similar.
The problem is that your activity generates what is known as “greywater” or “sullage”. Dirty water, soap or detergent, and also suspended fats, grease and food particles.
Even if you use biodegradable products, biodegradation takes time! While this process is on-going, your greywater may have various effects on the body of water, including changes in pH, viscosity and changes in oxygen level.
A much better approach is to cast your greywater on to the soil, some distance from the nearest body of water. The creatures of the soil can deal with greywater much better than those of the water, and any effects are more localized. Choose ground that is absorbent, and do not use the same place on consecutive days.
OK, so you have seen the wisdom of washing some distance from the water source. Just how do you get the water to wash with to the desired location?
Your water bottle or bladder probably only holds a litre or three. You have probably treated the contents to make them safe for drinking, so using this for washing is a little wasteful.
Your canteen cup probably only holds half a litre or so.
You could fabricate a water carrier from local materials. Kephart has a whole chapter on making utensils from bark. Such crafts take time, and suitable materials will not be available in every environment or season.
Would it not have been useful if you had brought a plastic bucket with you?
Buckets for Preppers
I recall being in a bar decades ago. I had just rented a new place, actually my first real flat with multiple rooms I did not have to share with anyone. I was chatting to a young woman and told her: “I have brought a plastic bucket and bowl, so I am all set!” Many years and many locations later, that same bucket and bowl are still with me. Used the bowl just a few weeks back to soak the grill of my halogen oven.
Some will scoff! “I'm a backpacker! I go ultra-light! There is no room for a bucket!”.
Empty buckets weight very little. Being mass-produced, they cost very little too! Shop around!
If you pack the bucket full of foodstuffs and other stores, it will take up very little room in your pack. It actually provides them with some protection. Oddly, some larger capacity buckets pack better than their smaller cousins. More on capacity later.
What Use Is a Bucket?
What uses can we put a bucket to? We have already mentioned carrying water for washing, dish-washing and laundry.
• A friend of mine gave me a folding camping sink that holds about ten litres. Not a priority for the bug-out bag, but he thought it might be useful for more recreational camping trips. I now look at this item and wonder just how I was supposed to fill it. Ten litres of water is around 22 pounds! A filled, folding sink is not something you want to carry from a standpipe. I would have needed a bulk-water carrier, or a bucket.
If you have tried the techniques in my dish-washing article, you will know that you do not need a large capacity vessel to wash most items.
You can use a small bowl or bucket of water to wash a large diameter item such as a plate, frying pan or yourself!
Use a cup, or your hand, as a water ladle to wet and rinse. The dirty water does not go back into the vessel, so it is cleaner and more efficient.
I doubt that folding sink will ever see use. I will find a bucket that fits into my pack. A bucket will probably be more durable than a sink/bowl designed to fold.
• Read through a survival manual or book on woodcraft, and you will probably come across references to soaking things to make them more pliable or more edible. You cannot fit much in a mess-tin!
So many wilderness guides mention uses for containers, yet so many kit lists don't actually include any!
• Cannot reach the water source? Bucket on a rope may solve that problem.
• Let the water come to you! Place your bucket to collect rainwater.
• Successful day fishing or squirrel shooting? Carry your windfall back to camp in a bucket.
• Find a patch of berries? Your bucket will hold as much as you can carry.
As a quick aside: In one of Ray Mears shows one of his local hosts had an interesting berry-picking technique. She simply swiped the bush with her basket. Enough berries apparently detached and ended up in the basket for this to be a considerable labour-saving. Something to experiment with in berry season!
• An empty bucket can be used as a drum to guide companions back to camp, or just let them know dinner is nearly ready.
• A bucket can be used to dig through soft snow or sand.
• A up-turned bucket makes a useful stool and (if sturdy enough) can be used as a step.
• If you have trouble squatting when attending to “calls of nature” an up-turned bucket can be a useful support while you hang your nether-regions over a “cat-hole”.
• And if it is really nasty outside the shelter, as a vase de nuit.
Any party of more than a couple of individuals should include a bucket in their equipment.
Smaller parties and solo travellers should give them serious consideration.
Any vehicle, be it boat, SUV or APC, should find room for a bucket. The interior of the bucket can be used to store other useful items. In an emergency, grab the bucket and be instantly equipped with useful assets.
Some companies even offer 72-hour kits packed in buckets.
Choosing a Bucket
For backpackers, cyclists and lightweight travellers, the bucket chosen needs some consideration.
Obviously, we want a bucket that will fit easily into our pack, with little wasted space.
There is little point in my recommending a bucket of a certain capacity. In my kitchen I have two buckets, not counting one for floor-washing. The five litre bucket is too narrow at the bottom. It will fit in a daysack, but it is space-inefficient. The three (Imperial) gallon bucket is about twice the capacity (13.6 litres) but is too wide at the top for even my largest rucksacks.
It is not a good idea to try and carry more than ten litres in a bucket or container.
The interior dimensions of your pack will be more significant than bucket capacity. Taking your pack down to the hardware store and trying some buckets for size is not that bad an idea. Remember the bucket will be riding above your softer pack items, so perhaps put a sleeping bag and a realistic load of clothing in the pack before you hit the hardware store.
Depending on intended role, you may want bright colours or natural and neutral. The outside of a bucket can easily be spray-painted.
Cylindrical buckets, with the bottom of similar diameter to the top, may be a better choice than more conventional tapered designs. Between five and ten litre size may be a good option for these.
If you decide to buy a bucket on-line, bear in mind that perfectly suitable items may be available under various other names, such as “paint kettle” or “storage tub”. There will be bowls and various other containers that can be made into buckets with just the simple addition of a handle.